반응형

안드로이드에서 애드몹을 이용해 수익을 창출해 보자.


프로젝트 수준의 build.gradle 파일에서 Google의 Maven 저장소와 Maven 중앙 저장소를 포함한다. (기본적으로 적용 되어있다)

공식문서에는 아래와 같이 allprojects 섹션에도 포함하라고 나오지만 하지 않아도 된다. (포함 하면 세팅값 충돌 문제가 발생한다)

프로젝트 수준의 build.gradle 파일에서 Google의 Maven 저장소와 Maven 중앙 저장소를 buildscript 및 allprojects 섹션에 포함하세요.

※ Error: Build was configured to prefer settings repositories over project repositories but repository 'Google' was added by build file 'build.gradle'


모듈의 앱 수준 Gradle 파일(일반적으로 app/build.gradle)에 Google 모바일 광고 SDK의 종속 항목을 추가한다.

※ 참고

File - Project Structure... - Dependencies - app - + - Library Dependency - com.google.android.gms:play-services-ads 입력 - Search 클릭


AdMob 앱 ID(AdMob UI에서 식별됨)를 앱의 AndroidManifest.xml 파일에 추가한다.

실제 앱에서는 위에 표시된 앱 ID가 아닌 실제 AdMob 앱 ID를 사용한다.


레이아웃을 위와 같이 변경한다.


레이아웃에 AdView를 추가한다.

실제 앱에서는 위에 표시된 테스트 광고 단위 ID가 아닌 실제 광고 단위 ID를 사용한다.


위와 같이 표시된다.

adView 옆의 경고(!)는 레이아웃과 뷰세팅값의 불일치로 나타나는 경고로, 간단히 수정 가능하다.

■ Invalid layout param in a LinearLayout: layout_centerHorizontal

- The given layout_param is not defined for the given layout, meaning it has no effect. This usually happens when you change the parent layout or move view code around without updating the layout params. This will cause useless attribute processing at runtime, and is misleading for others reading the layout so the parameter should be removed.


액티비티 JAVA 파일에 광고를 로드하는 코드를 작성한다.


앱을 실행 시키면 광고가 표시된다.

※ 참고

AdMob 모바일 광고 SDK(Android)


반응형
Posted by J-sean
:
반응형

우선 액션바를 제거해 보자.


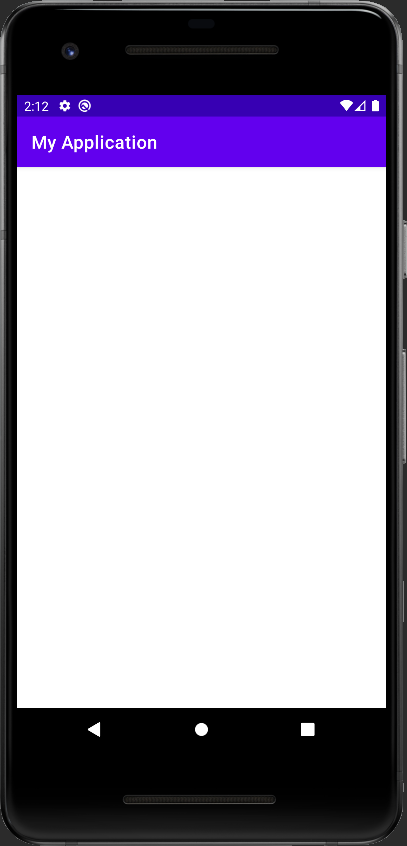
My Application이라는 액션바가 기본적으로 나타난다.


themes.xml 파일을 불러온다.


style 태그의 parent를 위와같이 변경한다.


아니면 'Customize your theme here' 메세지 아래에 위와 같은 코드를 작성한다.


앱을 실행하면 액션바가 나타나지 않는다.


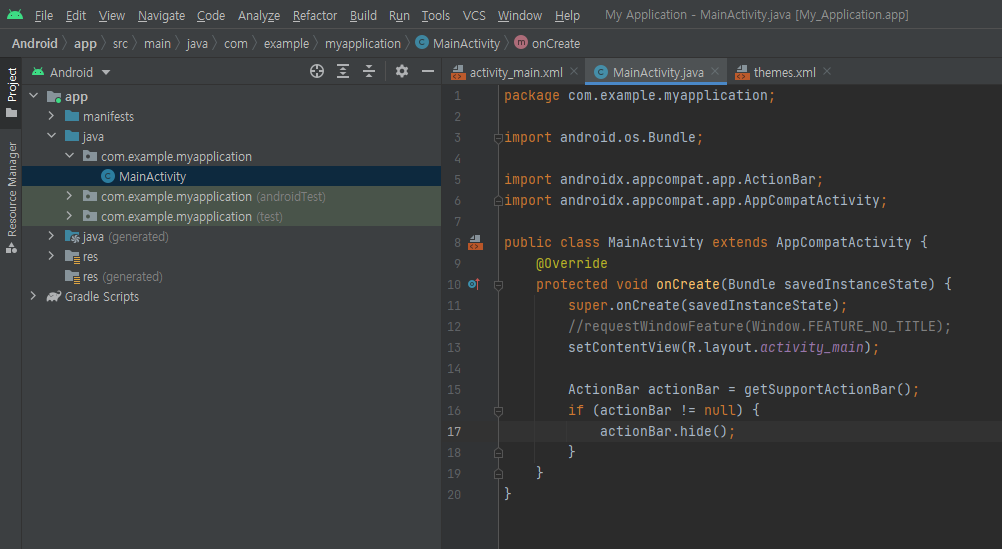
JAVA 코드에서도 액티비티의 액션바 레퍼런스를 이용해 액션바를 감출 수 있다.


이번엔 상태 표시줄을 제거해 보자.


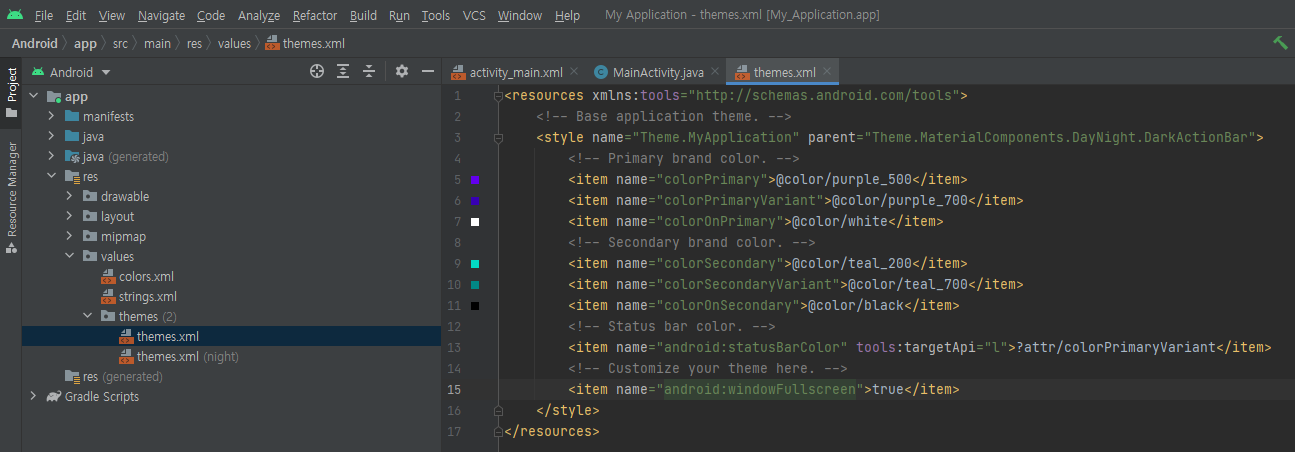
themes.xml 파일의 'Customize your theme here' 메세지 아래에 위와 같은 코드를 작성한다.


앱을 실행하면 상태 표시줄이 나타나지 않는다.


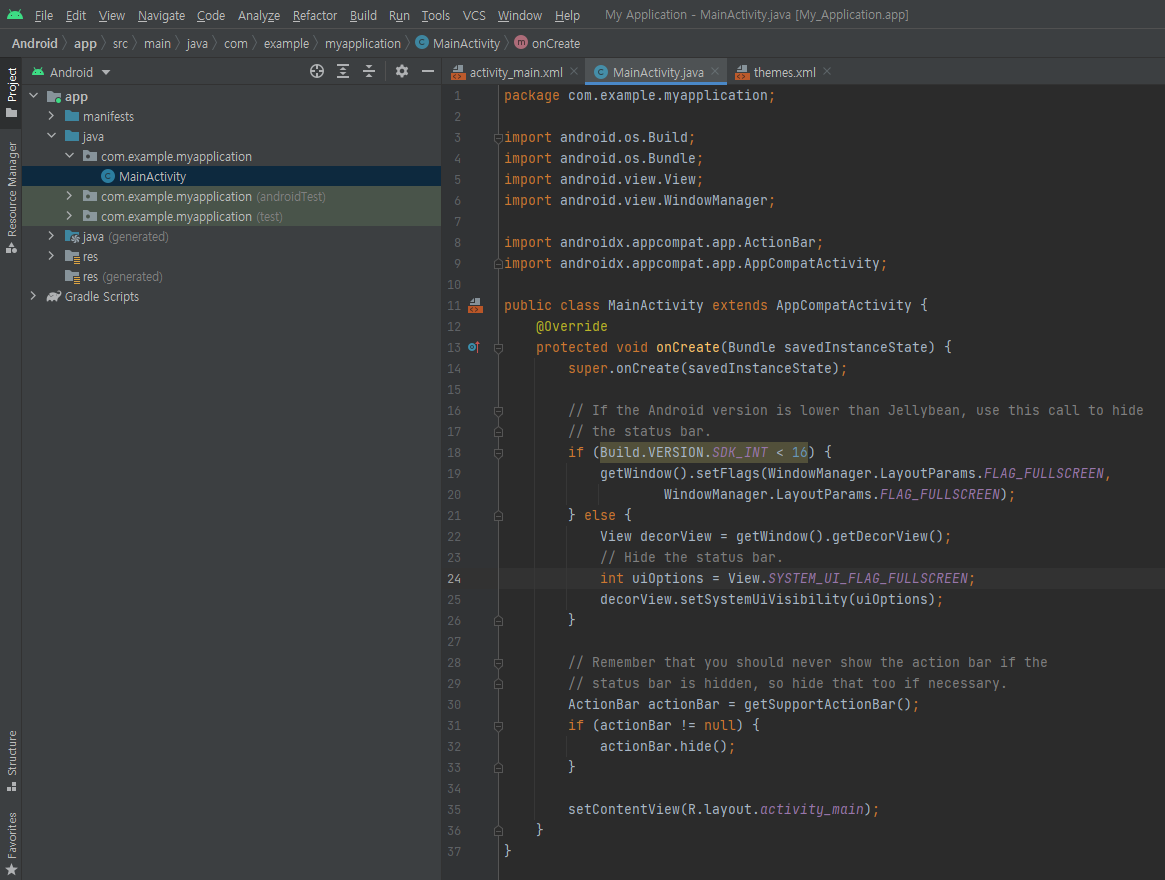
JAVA 코드에서도 상태 표시줄을 감출 수 있다. (버전에 따라 여러가지 방법이 있다)

상태 표시줄을 숨기면 액션바도 보이지 않게 해야한다. (바로 위 예에서는 상태 표시줄만 숨겼지만 별 문제는 없어 보였다. 정확히 어떤 문제가 있는지는 잘 모르겠다. 이 예에서도 actionBar.hide()를 주석처리해도 별 문제는 없다)


액션바, 상태 표시줄이 모두 숨겨져 앱이 전체화면으로 표시된다.

※ 참고

상태 표시줄 숨기기


반응형
Posted by J-sean
:
반응형

It describes how to use the touch API in Android applications.


1
2
3
4
5
6
7
8
9
10
11
12
13
14
15
16
17
18
19
20
21
22
23
24
25
26
27
28
29
30
31
32
33
34
35
36
37
38
39
40
41
42
43
44
45
46
47
48
49
50
51
52
53
54
55
56
57
58
59
60
61
62
63
64
65
66
67
68
69
70
71
72
73
74
75
76
77
78
79
80
81
82
83
84
85
86
87
88
89
public class MainActivity extends AppCompatActivity {
 
    int[] id = new int[3];
    int[] x = new int[3];
    int[] y = new int[3];
    String result;
 
    TextView textView;
 
    @Override
    protected void onCreate(Bundle savedInstanceState) {
        super.onCreate(savedInstanceState);
        setContentView(R.layout.activity_main);
 
        textView = findViewById(R.id.textView);
    }
 
    @Override
    public boolean onTouchEvent(MotionEvent event) {
 
        // 3개의 포인터(터치)까지 허용
        int pointer_count = event.getPointerCount();
        if (pointer_count > 3)
            pointer_count = 3;
 
        // ACTION_POINTER_DOWN 과 ACTION_POINTER_UP 이벤트는 액션 값에 추가적인 정보가 인코딩 되어 있다.
        // 액션 값과 MotionEvent.ACTION_POINTER_INDEX_MASK를 & 연산을 하게 되면 눌리거나 떼어진 포인터의 인덱스 값을 알 수 있다.
        // public static final int ACTION_POINTER_INDEX_MASK
        // Bits in the action code that represent a pointer index, used with ACTION_POINTER_DOWN and ACTION_POINTER_UP.
        switch (event.getAction() & MotionEvent.ACTION_MASK)
        {
            case MotionEvent.ACTION_DOWN:
                result = "Single Touch Down:";
                id[0= event.getPointerId(0);
                x[0= (int)event.getX(0);
                y[0= (int)event.getY(0);
                result += "\n(" + x[0+ ", " + y[0+ ")";
                break;
 
            case MotionEvent.ACTION_POINTER_DOWN:
                result = "Multi Touch Down:";
                for (int i = 0; i < pointer_count; i++)
                {
                    id[i] = event.getPointerId(i);
                    x[i] = (int)event.getX(i);
                    y[i] = (int)event.getY(i);
                    result += "\n(" + id[i] + ": " + x[i] + ", " + y[i] + ")";
                }
 
                // Move는 싱글, 멀티 모두 ACTION_MOVE 하나로 처리
            case MotionEvent.ACTION_MOVE:
                result = "Touch Move:";
                for (int i = 0; i < pointer_count; i++)
                {
                    id[i] = event.getPointerId(i);
                    x[i] = (int)event.getX(i);
                    y[i] = (int)event.getY(i);
                    result += "\n(" + id[i] + ": " + x[i] + ", " + y[i] + ")";
                }
                break;
 
            case MotionEvent.ACTION_UP:
                result = "Single Touch Up:";
                id[0= event.getPointerId(0);
                x[0= (int)event.getX(0);
                y[0= (int)event.getY(0);
                result += "\n(" + x[0+ ", " + y[0+ ")";
                break;
 
            case MotionEvent.ACTION_POINTER_UP:
                result = "Multi Touch Up:";
                for (int i = 0; i < pointer_count; i++)
                {
                    id[i] = event.getPointerId(i);
                    x[i] = (int) event.getX(i);
                    y[i] = (int) event.getY(i);
                    result += "\n(" + id[i] + ": " + x[i] + ", " + y[i] + ")";
                }
                break;
 
            default:
                break;
        }
 
        textView.setText(result);
 
        return super.onTouchEvent(event);
    }
}


Run the app and touch the panel.


반응형
Posted by J-sean
:
반응형

It describes how to use the touch API in Android applications.


1
2
3
4
5
6
7
8
9
10
11
12
13
14
15
16
17
18
19
20
21
22
23
24
25
26
27
28
29
30
31
32
33
34
35
36
37
38
39
40
41
42
43
44
public class MainActivity extends AppCompatActivity {
 
    int x, y;
    TextView textView;
 
    @Override
    protected void onCreate(Bundle savedInstanceState) {
        super.onCreate(savedInstanceState);
        setContentView(R.layout.activity_main);
 
        x = -1;
        y = -1;
        textView = findViewById(R.id.textView);
    }
 
    @Override
    public boolean onTouchEvent(MotionEvent event) {
 
        switch (event.getAction())
        {
            case MotionEvent.ACTION_DOWN:
                x = Math.round(event.getX());
                y = Math.round(event.getY());
                textView.setText("Down position: " + x + ", " + y);
                break;
 
            case MotionEvent.ACTION_MOVE:
                x = Math.round(event.getX());
                y = Math.round(event.getY());
                textView.setText("Move position: " + x + ", " + y);
                break;
 
            case MotionEvent.ACTION_UP:
                x = Math.round(event.getX());
                y = Math.round(event.getY());
                textView.setText("Up position: " + x + ", " + y);
                break;
 
            default:
                break;
        }
 
        return super.onTouchEvent(event);
    }


Run the app and touch the panel.


반응형
Posted by J-sean
:
반응형

Create a simple drawing app for Android.


1
2
3
4
5
6
7
8
9
10
11
12
13
14
15
16
17
18
19
20
21
22
23
24
25
26
27
28
29
30
31
32
33
34
35
36
37
38
39
40
41
42
43
44
45
46
47
48
49
50
51
52
53
54
55
56
57
58
59
60
61
62
63
64
65
66
67
68
69
70
71
72
73
74
75
76
77
78
79
80
81
82
83
84
85
86
87
88
89
90
public class MainActivity extends AppCompatActivity {
 
    @Override
    protected void onCreate(Bundle savedInstanceState) {
        super.onCreate(savedInstanceState);
        setContentView(new MyView(this));
    }
 
    public class MyView extends View {
        Paint paint = new Paint();
        boolean isDrawing = false;
        ArrayList<Float> coordinateList = new ArrayList<>(100);
        // Each ArrayList instance has a capacity. The capacity is the size of the array used to store
        // the elements in the list. It is always at least as large as the list size. As elements are
        //  added to an ArrayList, its capacity grows automatically. The details of the growth policy
        //  are not specified beyond the fact that adding an element has constant amortized time cost.
 
        MyView(Context context)
        {
            super(context);
            paint.setColor(Color.BLUE); // 0xff0000ff
            paint.setStrokeWidth(8);
        }
 
        @Override
        public void onDraw(Canvas canvas)
        {
            // ArrayList, Float[], float[]은 서로 직접 호환되지 않음.
            Float[] coordinateFloat = coordinateList.toArray(new Float[coordinateList.size()]);
            float[] coordinate = new float[coordinateFloat.length];
 
            for (int i = 0; i < coordinateFloat.length; i++)
            {
                coordinate[i] = coordinateFloat[i].floatValue();
            }
 
            // 특정 색으로 화면을 채우는 메서드
            // void drawRGB(int r, int g, int b)
            // void drawARGB(int a, int r, int g, int b)
            // void drawColor(int color)
            // void drawPaint(Paint paint)
            canvas.drawARGB(2552552550); // Yellow
            canvas.drawLines(coordinate, paint);
            // Draw a series of lines. Each line is taken from 4 consecutive values in the pts array.
            // Thus to draw 1 line, the array must contain at least 4 values. This is logically the
            // same as drawing the array as follows: drawLine(pts[0], pts[1], pts[2], pts[3]) followed
            // by drawLine(pts[4], pts[5], pts[6], pts[7]) and so on.
        }
 
        // drawLines()는 4개의 좌표를 이용해 1개의 직선을 그린다(x1, y1, x2, y2)
        // 1개의 직선을 그리고 다음 직선의 시작 좌표(x1, y1)에 이전 끝 좌표(x2, y2)가
        // 없다면 끊어진 선으로 그려지게 된다. 마우스를 뗄때는 다음 직선의 시작 좌표로
        // 넣어준 값 두 개(x1, y1)를 삭제 해야 한다.
        @Override
        public boolean onTouchEvent(MotionEvent event)
        {
            switch (event.getAction())
            {
                case MotionEvent.ACTION_DOWN:
                    coordinateList.add(event.getX());
                    coordinateList.add(event.getY());
                    isDrawing = true;
                    break;
 
                case MotionEvent.ACTION_MOVE:
                    if (isDrawing)  // 이 코드에서는 별 의미는 없는 if
                    {
                        coordinateList.add(event.getX());
                        coordinateList.add(event.getY());
 
                        coordinateList.add(event.getX());
                        coordinateList.add(event.getY());
                    }
 
                    invalidate();
                    break;
 
                case MotionEvent.ACTION_UP:
                    coordinateList.remove(coordinateList.size() -1);
                    coordinateList.remove(coordinateList.size() -1);
                    isDrawing = false;
                    break;
 
                default:
                    break;
            }
 
            return true;
        }
    }


Run the app and draw.


To simplify the code, you can also use Path. The result is the same.

1
2
3
4
5
6
7
8
9
10
11
12
13
14
15
16
17
18
19
20
21
22
23
24
25
26
27
28
29
30
31
32
33
34
35
36
37
38
39
40
41
42
43
44
45
46
47
48
49
50
51
52
53
54
55
56
57
public class MainActivity extends AppCompatActivity {
 
    @Override
    protected void onCreate(Bundle savedInstanceState) {
        super.onCreate(savedInstanceState);
        setContentView(new MyView(this));
    }
 
    public class MyView extends View {
        Paint paint = new Paint();
        boolean isDrawing = false;
        Path path = new Path();
 
        MyView(Context context)
        {
            super(context);
            paint.setColor(Color.BLUE); // 0xff0000ff
            paint.setStyle(Paint.Style.STROKE); // Paint.Style.FILL(기본값)로 하면 채워진 도형이 그려진다
            paint.setStrokeWidth(8);
        }
 
        @Override
        public void onDraw(Canvas canvas)
        {
            canvas.drawARGB(2552552550);
            canvas.drawPath(path, paint);
        }
 
        @Override
        public boolean onTouchEvent(MotionEvent event)
        {
            switch (event.getAction())
            {
                case MotionEvent.ACTION_DOWN:
                    path.moveTo(event.getX(), event.getY());
                    isDrawing = true;
                    break;
 
                case MotionEvent.ACTION_MOVE:
                    if (isDrawing)
                    {
                        path.lineTo(event.getX(), event.getY());
                        invalidate();
                    }
                    break;
 
                case MotionEvent.ACTION_UP:
                    isDrawing = false;
                    break;
 
                default:
                    break;
            }
 
            return true;
        }
    }


반응형
Posted by J-sean
:
반응형

Handling multiple buttons with one listener.

한 개의 리스너로 여러개의 버튼을 처리할 수 있다.


1
2
3
4
5
6
7
8
9
10
11
12
13
14
15
16
17
18
19
20
21
22
23
24
25
26
27
28
29
30
31
public class MainActivity extends AppCompatActivity {
 
    @Override
    protected void onCreate(Bundle savedInstanceState) {
        super.onCreate(savedInstanceState);
        setContentView(R.layout.activity_main);
 
        findViewById(R.id.button1).setOnClickListener(myClick);
        findViewById(R.id.button2).setOnClickListener(myClick);
        findViewById(R.id.button3).setOnClickListener(myClick);
    }
 
    View.OnClickListener myClick = new View.OnClickListener() {
        @Override
        public void onClick(View view) {
            switch (view.getId()) {
                case R.id.button1:
                    Toast.makeText(getApplicationContext(), "Button 1", Toast.LENGTH_SHORT).show();
                    break;
 
                case R.id.button2:
                    Toast.makeText(getApplicationContext(), "Button 2", Toast.LENGTH_SHORT).show();
                    break;
 
                case R.id.button3:
                    Toast.makeText(getApplicationContext(), "Button 3", Toast.LENGTH_SHORT).show();
                    break;
            }
        }
    };
}


반응형
Posted by J-sean
:
반응형

A notification is a message that Android displays outside your app's UI to provide the user with reminders, communication from other people, or other timely information from your app. Users can tap the notification to open your app or take an action directly from the notification.


1
2
3
4
5
6
7
8
9
10
11
12
13
14
15
16
17
18
19
20
21
22
23
24
25
26
27
28
29
30
31
32
33
34
35
36
37
38
39
40
41
42
43
44
45
46
47
48
49
50
51
52
53
54
55
56
57
58
59
60
61
62
63
64
65
66
67
68
69
70
71
72
73
74
75
76
77
78
79
80
81
82
83
84
85
86
87
88
89
90
91
92
93
94
95
96
97
98
99
public class MainActivity extends AppCompatActivity {
 
    NotificationManager notificationManager;
 
    private static String CHANNEL1_ID = "Channel1_ID";
    private static String CHANNEL1_NAME = "Channel1_NAME";
 
    private static String CHANNEL2_ID = "Channel2_ID";
    private static String CHANNEL2_NAME = "Channel2_NAME";
 
    private final int RequestCode = 101;
 
    @Override
    protected void onCreate(Bundle savedInstanceState) {
        super.onCreate(savedInstanceState);
        setContentView(R.layout.activity_main);
 
        Button button = findViewById(R.id.button);
        button.setOnClickListener(new View.OnClickListener() {
            @Override
            public void onClick(View v) {
                ShowNotification1();
            }
        });
 
        Button button2 = findViewById(R.id.button2);
        button2.setOnClickListener(new View.OnClickListener() {
            @Override
            public void onClick(View v) {
                ShowNotification2();
            }
        });
    }
 
    public void ShowNotification1() {
        notificationManager = (NotificationManager)getSystemService(NOTIFICATION_SERVICE);
        NotificationCompat.Builder builder = null;
 
        if (Build.VERSION.SDK_INT >= Build.VERSION_CODES.O) {
            if (notificationManager.getNotificationChannel(CHANNEL1_ID) == null) {
                notificationManager.createNotificationChannel(new NotificationChannel(CHANNEL1_ID, CHANNEL1_NAME, NotificationManager.IMPORTANCE_DEFAULT));
                builder = new NotificationCompat.Builder(this, CHANNEL1_ID);
            } else {
                builder = new NotificationCompat.Builder(this, CHANNEL1_ID);
            }
        } else {
            builder = new NotificationCompat.Builder(this);
            // This package is part of the Android support library which is no longer maintained.
        }
 
        builder.setContentTitle("Simple notification");
        builder.setContentText("Message for simple notification");
        builder.setSmallIcon(android.R.drawable.ic_menu_view);
 
        Notification notification = builder.build();
 
        notificationManager.notify(1, notification);
        // Post a notification to be shown in the status bar. If a notification with the same id has already been posted by your application and has not yet
        // been canceled, it will be replaced by the updated information.
        // - Parameters
        // id: An identifier for this notification unique within your application.
        // notification: A Notification object describing what to show the user. Must not be null.
    }
 
    public void ShowNotification2() {
        notificationManager = (NotificationManager)getSystemService(NOTIFICATION_SERVICE);
        NotificationCompat.Builder builder = null;
 
        if (Build.VERSION.SDK_INT >= Build.VERSION_CODES.O) {
            if (notificationManager.getNotificationChannel(CHANNEL2_ID) == null) {
                notificationManager.createNotificationChannel(new NotificationChannel(CHANNEL2_ID, CHANNEL2_NAME, NotificationManager.IMPORTANCE_DEFAULT));
                builder = new NotificationCompat.Builder(this, CHANNEL2_ID);
            } else {
                builder = new NotificationCompat.Builder(this, CHANNEL2_ID);
            }
        } else {
            builder = new NotificationCompat.Builder(this);
        }
 
        Uri uri = Uri.parse("https://s-engineer.tistory.com");
        Intent intent = new Intent(ACTION_VIEW, uri);
        // ACTION_VIEW: Display the data to the user. This is the most common action performed on data -- it is the generic action you can use on a piece of
        // data to get the most reasonable thing to occur. For example, when used on a contacts entry it will view the entry; when used on a mailto: URI it
        // will bring up a compose window filled with the information supplied by the URI; when used with a tel: URI it will invoke the dialer.
        PendingIntent pendingIntent = PendingIntent.getActivity(this, RequestCode, intent, PendingIntent.FLAG_UPDATE_CURRENT);
 
        builder.setContentTitle("Notification with PendingIntent");
        builder.setContentText("Message for notification with PendingIntent");
        builder.setSmallIcon(android.R.drawable.ic_menu_view);
        builder.setAutoCancel(true);
        // Setting this flag will make it so the notification is automatically canceled when the user clicks it in the panel.
        builder.setContentIntent(pendingIntent);
        // Supply a PendingIntent to send when the notification is clicked.
 
        Notification notification = builder.build();
 
        notificationManager.notify(2, notification);
    }
}


Run the app and click "SIMPLE NOTIFICATION" button.


A simple notification appears as an icon in the status bar. Users can swipe down on the status bar to open the notification drawer, where they can view more details and take actions with the notification.


Go back to the app and click "NOTIFICATION WITH PENDINGINTENT" button. Then click the notification again.


It will take you to a great blog.


반응형
Posted by J-sean
:
반응형

Add a vibration and a ringtone notification to your android application.


<AndroidManifest.xml>

1
    <uses-permission android:name="android.permission.VIBRATE"/>


<MainActivity.java>

1
2
3
4
5
6
7
8
9
10
11
12
13
14
15
16
17
18
19
20
21
22
23
24
25
26
27
28
29
30
31
32
33
34
35
36
37
38
39
40
41
42
43
44
45
46
47
48
49
50
51
52
53
54
55
56
57
58
59
60
61
62
63
64
65
66
67
68
69
70
71
72
public class MainActivity extends AppCompatActivity {
 
    @Override
    protected void onCreate(Bundle savedInstanceState) {
        super.onCreate(savedInstanceState);
        setContentView(R.layout.activity_main);
 
        Button button = findViewById(R.id.button);
        button.setOnClickListener(new View.OnClickListener() {
            @Override
            public void onClick(View v) {
                Vibrator vibrator = (Vibrator)getSystemService(Context.VIBRATOR_SERVICE);
 
                if (Build.VERSION.SDK_INT >= 26) {
                    vibrator.vibrate(VibrationEffect.createOneShot(100010));
                    // - public static VibrationEffect createOneShot (long milliseconds, int amplitude)
                    // Create a one shot vibration. One shot vibrations will vibrate constantly for the specified period of time at the specified amplitude, and then stop.
                    // milliseconds long: The number of milliseconds to vibrate. This must be a positive number.
                    // amplitude int: The strength of the vibration. This must be a value between 1 and 255, or DEFAULT_AMPLITUDE.
                } else {
                    vibrator.vibrate(1000);
                    // Vibrate constantly for the specified period of time.
                    // This method was deprecated in API level 26. Use vibrate(android.os.VibrationEffect) instead.
                }
            }
        });
 
        Button button2 = findViewById(R.id.button2);
        button2.setOnClickListener(new View.OnClickListener() {
            @Override
            public void onClick(View v) {
                Uri uri = RingtoneManager.getDefaultUri(RingtoneManager.TYPE_NOTIFICATION);
                // - public static Uri getDefaultUri (int type)
                // Returns the Uri for the default ringtone of a particular type. Rather than returning the actual ringtone's sound Uri, this will return the symbolic Uri
                // which will resolved to the actual sound when played.
                // - public static final int TYPE_NOTIFICATION
                // Type that refers to sounds that are used for notifications.
                // Constant Value: 2 (0x00000002)
 
                Ringtone ringtone = RingtoneManager.getRingtone(getApplicationContext(), uri);
                // Returns a Ringtone for a given sound URI.
                // If the given URI cannot be opened for any reason, this method will attempt to fallback on another sound. If it cannot find any, it will return null.
 
                ringtone.play();
                // Plays the ringtone.
            }
        });
 
        Button button3 = findViewById(R.id.button3);
        button3.setOnClickListener(new View.OnClickListener() {
            @Override
            public void onClick(View v) {
                MediaPlayer mediaPlayer = MediaPlayer.create(getApplicationContext(), R.raw.media);
                // Convenience method to create a MediaPlayer for a given resource id. On success, prepare() will already have been called and must not be called again.
                // When done with the MediaPlayer, you should call release(), to free the resources. If not released, too many MediaPlayer instances will result in an exception.
 
                mediaPlayer.setOnCompletionListener(new MediaPlayer.OnCompletionListener() {
                    @Override
                    public void onCompletion(MediaPlayer mp) {
                        mp.release();
                        // Releases resources associated with this MediaPlayer object. It is considered good practice to call this method when you're done using the MediaPlayer.
                    }
                });
                // Interface definition for a callback to be invoked when playback of a media source has completed.
 
                mediaPlayer.start();
                // Starts or resumes playback. If playback had previously been paused, playback will continue from where it was paused. If playback had been stopped, or never
                // started before, playback will start at the beginning.
            }
        });
    }
}


Add a media file for MediaPlayer.


Run the app and click the buttons.


반응형
Posted by J-sean
: