반응형

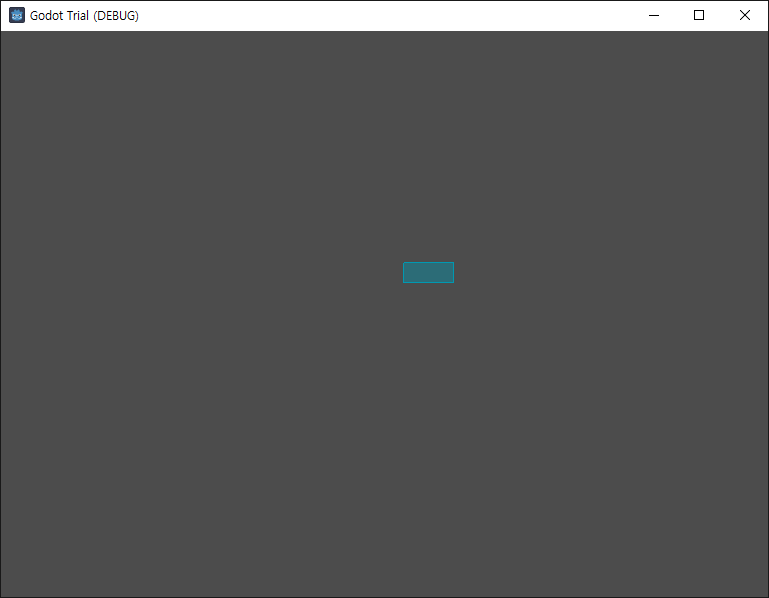
런타임(디버그)에 collision shape이 표시되도록 해 보자.


CollisionShape2D를 추가하고 크기를 조절한다.


Debug - Visible Collision Shapes를 체크한다.


현재 씬을 실행(디버그)하면 collision shape이 표시된다.


반응형
Posted by J-sean
:
반응형

Box2D DebugDraw를 사용해 보자.


b2Draw 클래스를 상속해 DebugDraw 클래스를 만들고 사용하면 된다.


1
2
3
4
5
6
7
8
9
10
11
12
13
14
15
16
17
18
19
20
21
22
23
24
25
26
27
28
29
30
31
32
33
34
35
36
37
38
39
40
41
42
43
44
45
46
47
48
49
50
51
52
53
54
55
56
57
58
59
60
61
62
63
64
65
66
67
68
69
70
71
72
73
74
75
76
77
78
79
80
81
82
83
84
85
86
87
88
89
90
91
92
93
94
95
96
97
98
99
100
101
102
103
104
105
106
107
108
109
110
111
112
113
114
115
116
117
118
119
120
121
122
123
124
125
126
127
128
129
130
131
132
133
134
135
136
137
138
139
140
141
142
143
144
145
#include <iostream>
#include "SDL.h"
#include "box2d/box2d.h"
 
class DebugDrawer : public b2Draw
{
public:
    DebugDrawer(SDL_Renderer* renderer) {
        this->renderer = renderer;
    }
private:
    SDL_Renderer* renderer;
    void DrawSolidPolygon(const b2Vec2* vertices, int32 vertexCount, const b2Color& color) {}
    void DrawPoint(const b2Vec2& p, float sizeconst b2Color& color) {}
    void DrawPolygon(const b2Vec2* vertices, int32 vertexCount, const b2Color& color) {
        SDL_SetRenderDrawColor(renderer, 25500, SDL_ALPHA_OPAQUE);
        SDL_FRect* rect = new SDL_FRect{ vertices[0].x, vertices[0].y, vertices[1].x
            - vertices[0].x, vertices[3].y - vertices[0].y };
        SDL_RenderDrawRectF(renderer, rect);
    }
    void DrawCircle(const b2Vec2& center, float radius, const b2Color& color) {}
    void DrawSolidCircle(const b2Vec2& center, float radius, const b2Vec2& axis, const b2Color& color) {}
    void DrawSegment(const b2Vec2& p1, const b2Vec2& p2, const b2Color& color) {}
    void DrawTransform(const b2Transform& xf) {}
};
 
int main(int argc, char* argv[]) {
    SDL_Init(SDL_INIT_VIDEO);
    SDL_Window* window = SDL_CreateWindow("SDL Test", SDL_WINDOWPOS_UNDEFINED,
        SDL_WINDOWPOS_UNDEFINED, 640480, SDL_WINDOW_RESIZABLE);
    SDL_Renderer* renderer = SDL_CreateRenderer(window, -10);
    SDL_Surface* playerSurface = SDL_LoadBMP("player.bmp");
    SDL_Texture* texture = SDL_CreateTextureFromSurface(renderer, playerSurface);
 
    // World 정의
    b2Vec2 gravity(0.0f, 9.8f);
    b2World world(gravity);
 
    // DebugDraw 정의
    DebugDrawer* debugDrawer = new DebugDrawer(renderer);
    debugDrawer->SetFlags(b2Draw::e_shapeBit | b2Draw::e_jointBit |
        b2Draw::e_centerOfMassBit | b2Draw::e_aabbBit | b2Draw::e_pairBit);
    world.SetDebugDraw(debugDrawer);
 
    // Player 정의
    b2BodyDef playerBodyDef;
    playerBodyDef.type = b2_dynamicBody;
    playerBodyDef.position.Set(0.0f, 0.0f);
    playerBodyDef.linearVelocity = b2Vec2(50.0f, 0.0f);
    playerBodyDef.angularVelocity = 0.2f;
    b2Body* playerBody = world.CreateBody(&playerBodyDef);
    b2PolygonShape dynamicBox;
    dynamicBox.SetAsBox((float)playerSurface->/ 2, (float)playerSurface->/ 2);
    b2FixtureDef fixtureDef;
    fixtureDef.shape = &dynamicBox;
    fixtureDef.density = 1.0f;
    fixtureDef.friction = 0.3f;
    fixtureDef.restitution = 0.5f;
    playerBody->CreateFixture(&fixtureDef);
 
    // Ground 정의
    b2BodyDef groundBodyDef;
    groundBodyDef.position.Set(0.0f, 400.0f);
    b2Body* groundBody = world.CreateBody(&groundBodyDef);
    b2PolygonShape groundBox;
    groundBox.SetAsBox(500.0f, 0.0f);
    SDL_Rect groundRect = { 040050010 };
    groundBody->CreateFixture(&groundBox, 0.0f);
 
    // Wall 정의
    b2BodyDef wallBodyDef;
    wallBodyDef.position.Set(300.0f, 0.0f);
    b2Body* wallBody = world.CreateBody(&wallBodyDef);
    b2PolygonShape wallBox;
    wallBox.SetAsBox(0.0f, 480.0f);
    SDL_Rect wallRect = { 300010480 };
    wallBody->CreateFixture(&wallBox, 0.0f);
 
    float timeStep = 1.0f / 500.0f;
    int velocityIterations = 6;
    int positionIterations = 2;
 
    SDL_Event event;
    bool quit = false;
 
    while (!quit) {
        while (SDL_PollEvent(&event)) {
            switch (event.type) {
            case SDL_QUIT:
                quit = true;
                break;
            case SDL_KEYDOWN:
                printf("Key pressed: %s\n", SDL_GetKeyName(event.key.keysym.sym));
                if (event.key.keysym.sym == SDLK_SPACE) {
                    playerBody->SetTransform(b2Vec2(0.0f, 0.0f), 0.0f);
                    playerBody->SetLinearVelocity(b2Vec2(50.0f, 0.0f));
                    playerBody->SetAngularVelocity(0.2f);
                }
                if (event.key.keysym.sym == SDLK_ESCAPE)
                    quit = true;
                break;
 
            default:
                break;
            }
        }
 
        world.Step(timeStep, velocityIterations, positionIterations);
 
        SDL_SetRenderDrawColor(renderer, 255255255, SDL_ALPHA_OPAQUE);
        SDL_RenderClear(renderer);
 
        // Ground 그리기
        SDL_SetRenderDrawColor(renderer, 22014020, SDL_ALPHA_OPAQUE);
        SDL_RenderFillRect(renderer, &groundRect);
 
        // Wall 그리기
        SDL_SetRenderDrawColor(renderer, 646464, SDL_ALPHA_OPAQUE);
        SDL_RenderFillRect(renderer, &wallRect);
 
        // Player 그리기        
        b2Vec2 playerPosition = playerBody->GetPosition();
        SDL_Rect destRect = { (int)playerPosition.x - playerSurface->/ 2,
            (int)playerPosition.y - playerSurface->/ 2, playerSurface->w, playerSurface->h };
        SDL_RendererFlip flip = SDL_FLIP_NONE;
        float angle = playerBody->GetAngle() * (180 / (float)M_PI);
        SDL_RenderCopyEx(renderer, texture, NULL&destRect, angle, NULL, flip);
 
        // 가장 마지막에 DebugDraw 그리기
        world.DebugDraw();
 
        SDL_RenderPresent(renderer);
    }
 
    // debugDrawer 해제
    delete debugDrawer;
 
    SDL_DestroyTexture(texture);
    SDL_FreeSurface(playerSurface);
    SDL_DestroyRenderer(renderer);
    SDL_DestroyWindow(window);
    SDL_Quit();
 
    return 0;
}


코드를 입력하고 빌드한다.


위 GIF 이미지에서 잘 보이지 않지만 모든 오브젝트의 Shape에 빨간 폴리곤이 그려진다.


실제로는 빨간 폴리곤이 잘 보인다.


※ 참고

Box2D b2Draw


반응형
Posted by J-sean
:
반응형

컴퓨터를 사용하다 보면 알 수 없는 이유로 프로그램이 멈출 때가 있다. 내 컴퓨터에서 그런 문제가 발생한다면 바로 디버깅 해 볼 수 있지만 다른 장소의 컴퓨터에서 발생하는 경우에는 바로 디버깅할 수 없다. 이럴때는 아래 링크를 참고해 메모리 덤프 파일을 생성하고 분석해 볼 수 있다.


2023.07.02 - [Reverse Engineering] - BSOD Crash on Crtl + Scroll 매뉴얼 메모리 덤프


이 프로그램(LabApp.exe)이 작동을 멈춰서(hang) 덤프를 생성했다.


'!process 0 1f labapp.exe' 명령으로 멈춘 프로세스 정보를 확인해 본다.

프로세스 주소: ffffc58f9a4df080
스레드 주소: ffffc58f9a506080


조금 더 내려보면 덤프 생성시 작동중이던 스레드 콜스택을 확인 할 수 있다.

아래와 같은 OnHangBtn 함수가 실행중이었다. 프로그램이 멈춘 이유를 찾았으니 쉽게 해결 할 수 있다.

void CLabAppDlg::OnHangBtn() 
{
    while (1)
    {
         // do nothing
        ;
    }
}


만약 소스 파일이 없는 프로그램이라면 아래 내용을 계속 진행한다.


'.process ffffc58f9a4df080' 명령으로 프로세스 컨텍스트를 바꾼다.


'.thread ffffc58f9a506080' 명령으로 레지스터 컨텍스트를 바꾼다.

레지스터 컨텍스트까지 바꾸면 LabApp.exe 프로세스의 실행중이던 스레드 스텍 프레임으로 바뀐다. 그런데 제일 마지막에 실행되었던 OnHangBtn 함수 이름이 표시되지 않고 주소로만 표시된다.


※ 참고

'.thread /p ffffc58f9a506080' 명령으로 프로세스, 레지스터 컨텍스트를 한번에 바꿀 수도 있다.


0x401b27(OnHangBtn 함수 주소) 어셈블리 코드를 확인해 보자.

eax 레지스터에 1을 넣고 test eax, eax 연산을 진행한다. eax를 AND 연산하면 0이 아니기 때문에 ZF는 0이고 rip(eip)는 0x401b27로 무한히 돌아가게(jmp) 된다. 문제의 원인이 파악 되었다.


반응형
Posted by J-sean
:
반응형

실행중인 프로그램이 특정 조건을 만족하면 메모리 덤프 파일을 생성하도록 해 보자.


문제가 있는(메모리 덤프를 생성할) 프로그램을 미리 실행시킨다.


Procdump.zip
0.70MB

위 파일을 다운로드하고 압축을 푼다.


ProcDump 폴더로 이동한다.


'procdump 프로세스명' 으로 실행하면 바로 미니 덤프를 생성한다.


미니 덤프가 생성되었다.


'-ma -c 20 -s 5' 옵션을 주고 실행한다.

-ma: 전체 덤프 생성

-c: 덤프 생성 CPU 사용율 임계값

-s: 덤프 생성 조건 연속 시간

= CPU 사용율이 20%이상으로 5초 지속되면 전체 덤프 파일을 생성한다.


CPU 사용률이 20%를 넘기자 카운트가 시작되고 5초 후 전체 덤프 파일이 생성된다.


전체 덤프 파일이 생성되었다.


덤프 파일을 분석하면 어디서 문제가 발생하는지 파악할 수 있다.


이번엔 '-ma -t' 옵션으로 실행한다.

-t: 프로세스가 종료되면 덤프 파일을 생성한다. (크래시 발생으로 비정상 종료되어도 덤프 파일 생성)


프로세스가 종료되자 전체 덤프 파일이 생성된다.


전체 덤프 파일이 생성되었다.


※ 참고

ProcDump


반응형
Posted by J-sean
:
반응형

응용 프로그램이 비정상 종료하는 경우 덤프 파일을 생성하도록 해 보자.


응용 프로그램 크래시 발생시 자동으로 에러 리포트가 작성된다. 하지만 문제 파일, 운영체제 등의 정보만 들어 있어 별 의미가 없다.


크래시 발생시 덤프할 파일명으로 레지스트리 키를 만든다.


Value Description Type Default Value
DumpFolder 덤프 파일 생성 폴더 REG_EXPAND_SZ %LOCALAPPDATA%\CrashDumps
DumpCount 폴더에 보관할 덤프파일 갯수 REG_DWORD 10
DumpType 덤프 타입
1: 미니 덤프
2: 전체 덤프
RED_DWORD 1


응용 프로그램 크래시가 발생하면 레지스트리에 설정한 대로 덤프 파일이 생성된다.


위 내용은 응용 프로그램마다 개별적으로 적용하는 경우이고 ...\Windows Error Reporting\LocalDumps 레지스트리에 키 값을 만들어주면 모든 프로그램에 대해 동일한 덤프 세팅을 적용할 수 있다. 기본적으로 C:\Users\XXXX\AppData\Local\CrashDumps에 덤프 파일이 생성되도록 설정되어 있다.


※ 참고

Collecting User-Mode Dumps


반응형
Posted by J-sean
:
반응형

Windbg로 분석할 수 있도록 덤프 파일을 생성해 보자.


디버깅 정보 쓰기 - '커널/전체 메모리 덤프'가 선택되어 있어야 한다.


NotMyFault.zip
1.40MB

위 파일을 다운로드하고 압축을 풀어준다.


컴퓨터 환경에 맞는 파일을 실행한다.


크래시 발생 옵션을 선택하고 Crash 버튼을 클릭한다.

Crash 버튼을 클릭하면 블루 스크린이 나타나고 재부팅 되니 열려있는 작업은 모두 종료한다.


메모리 덤프가 생성된다.


※ 참고

Generate a kernel or complete crash dump


반응형
Posted by J-sean
:
반응형

도스박스에 디버거를 붙여 실행해 보자.


일반적으로 도스박스를 실행하면 위 메인 창이 표시된다.


dosbox-74-3-debug.zip
1.52MB

위 파일을 다운 받고 압축을 풀어 도스박스가 설치된 폴더에 저장한다. (도스박스 버전은 0.74-3이다)


저장한 파일을 실행하면 위와 같이 레지스터, 데이터, 코드 등이 표시되는 디버거 창이 함께 나타난다.

명령어를 실습해 보자. 디버거가 아닌 도스박스 메인 창에서 Alt+Pause키를 누른다. 디버거가 활성화 되면 아래 명령을 입력한다.

memdump 0000:0010 20


Output/Input 창 아래에 Memory dump success 메세지가 표시된다.


MEMDUMP.TXT 파일이 생성된다.


0000:0010 부터 0x20 바이트의 메모리가 덤프되었다.


※ 참고

Understanding the DOSBox debug screen

Guide to the DOSBox debugger


반응형
Posted by J-sean
:
반응형

x32/x64 디버거에서 심볼파일(pdb)을 불러오자.


디버깅할 프로세스를 불러온다.


심볼파일을 불러온다.

symload module_name, path


심볼파일이 존재하면 완료 메세지가 뜬다.


심볼 윈도우에서 모듈을 선택하고 심볼을 확인한다.

만약 프로그램 파일이 존재하는 디렉토리에 심볼파일이 같이 존재하면 자동으로 로드된다.


※ 참고

symload/loadsym

symunload/unloadsym


반응형
Posted by J-sean
: