반응형

WMware 리눅스(우분투)와 윈도우 폴더를 공유해 보자.


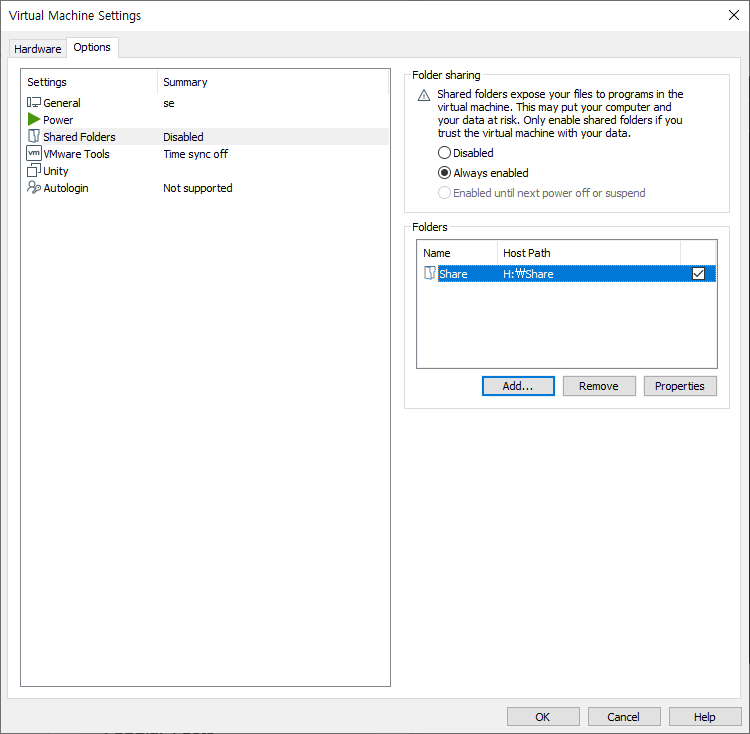
가상머신의 세팅 옵션에서 Folder sharing을 enable하고 공유할 윈도우 폴더를 지정한다.


리눅스에서 공유에 사용할 디렉토리를 생성하고 아래 명령으로 마운팅 한다.

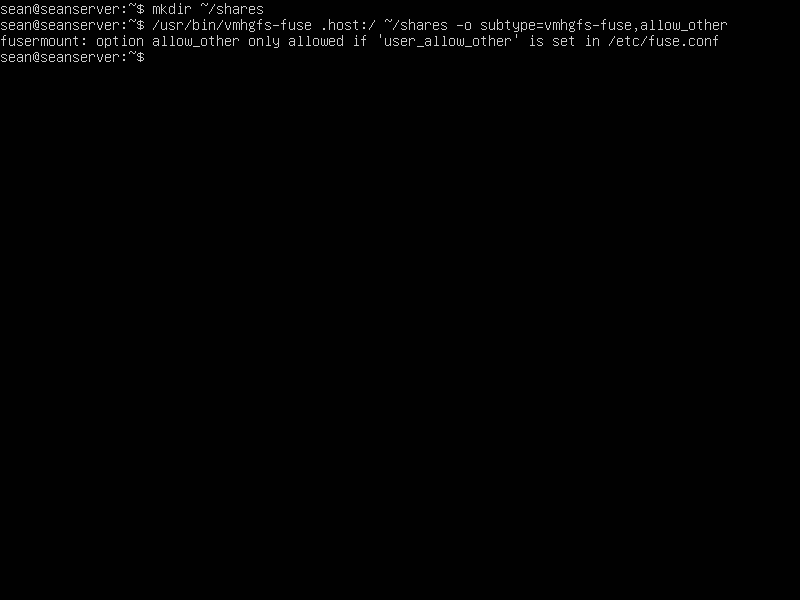
/usr/bin/vmhgfs-fuse .host:/ ~/shares -o subtype=vmhgfs-fuse,allow_other

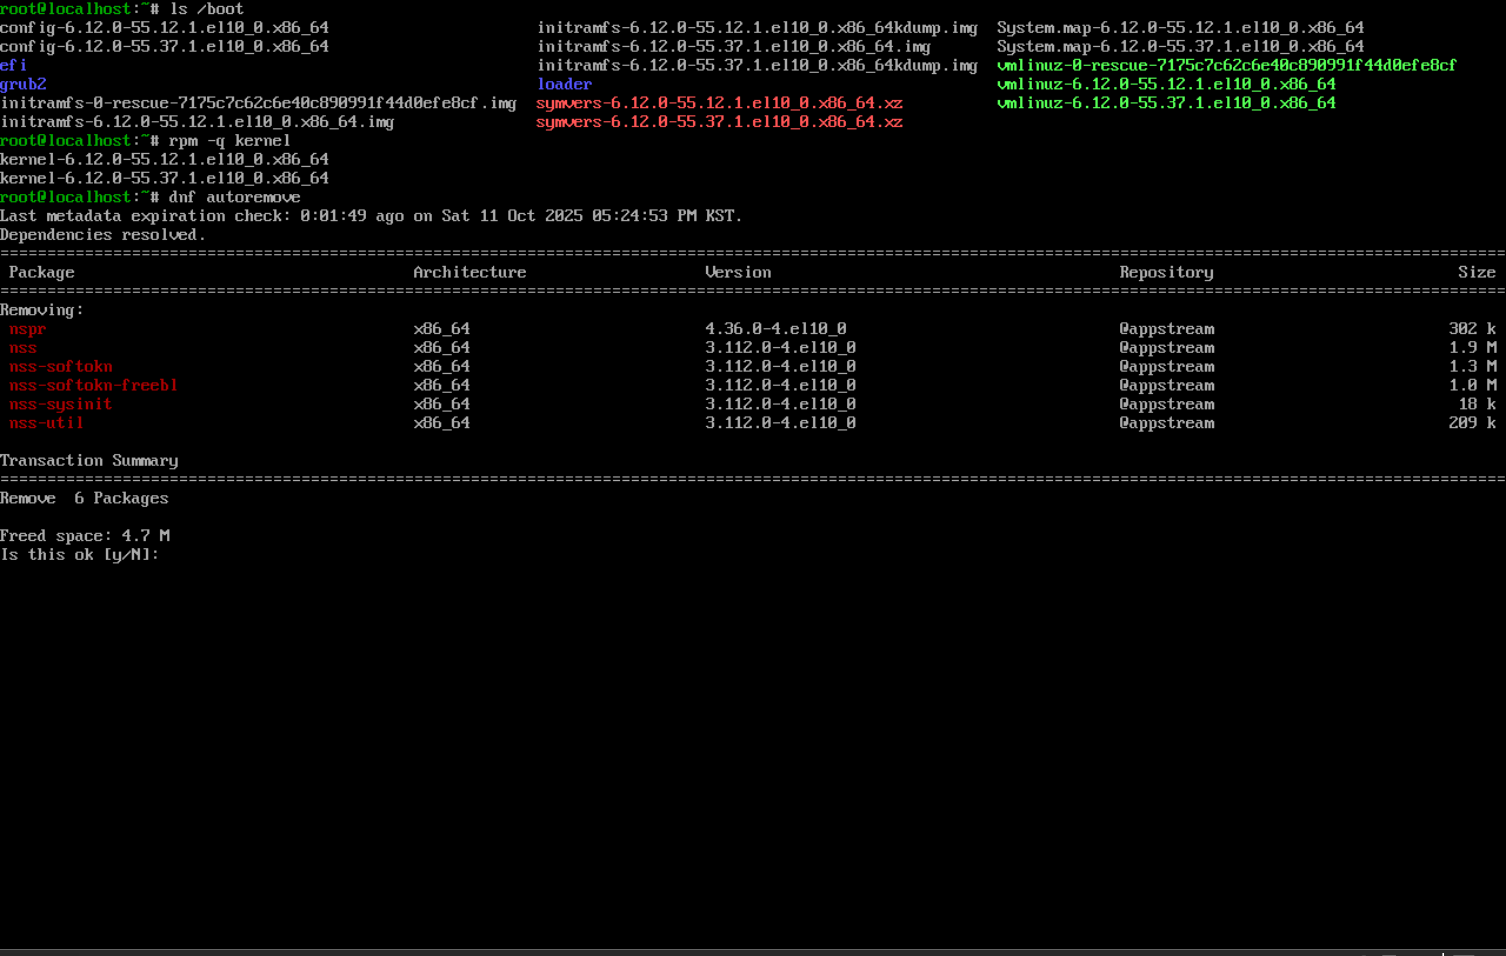
위 그림과 같이 allow_other 옵션 때문에 에러가 발생한다면 아래 내용을 진행한다. (아니면 명령 앞에 sudo를 붙여준다)


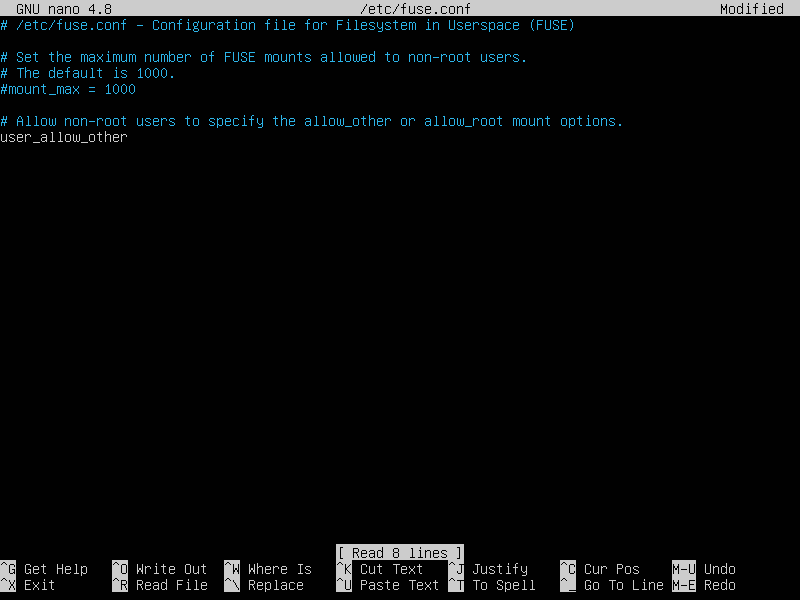
/etc/fuse.conf 파일을 에디터로 오픈 한다.


user_allow_other 명령의 주석을 해제한다.


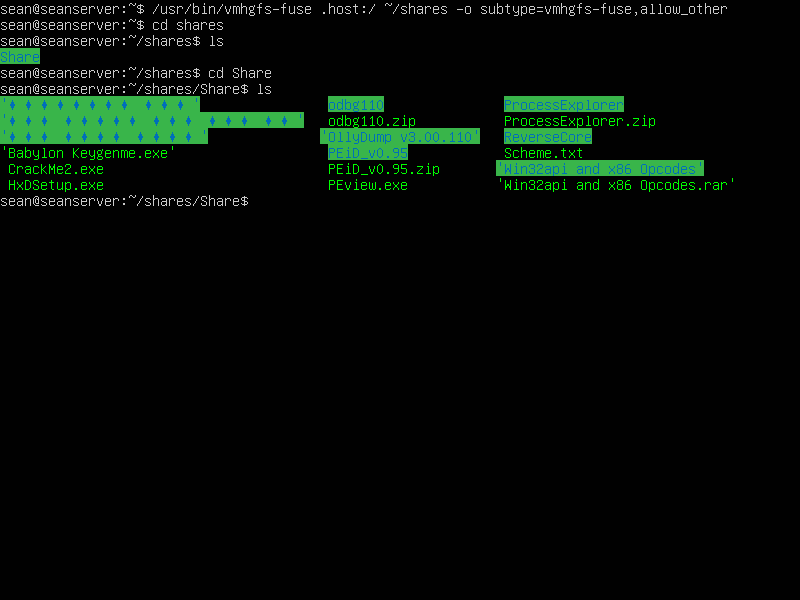
다시 마운팅 명령을 실행하면 문제 없이 마운팅 된다.

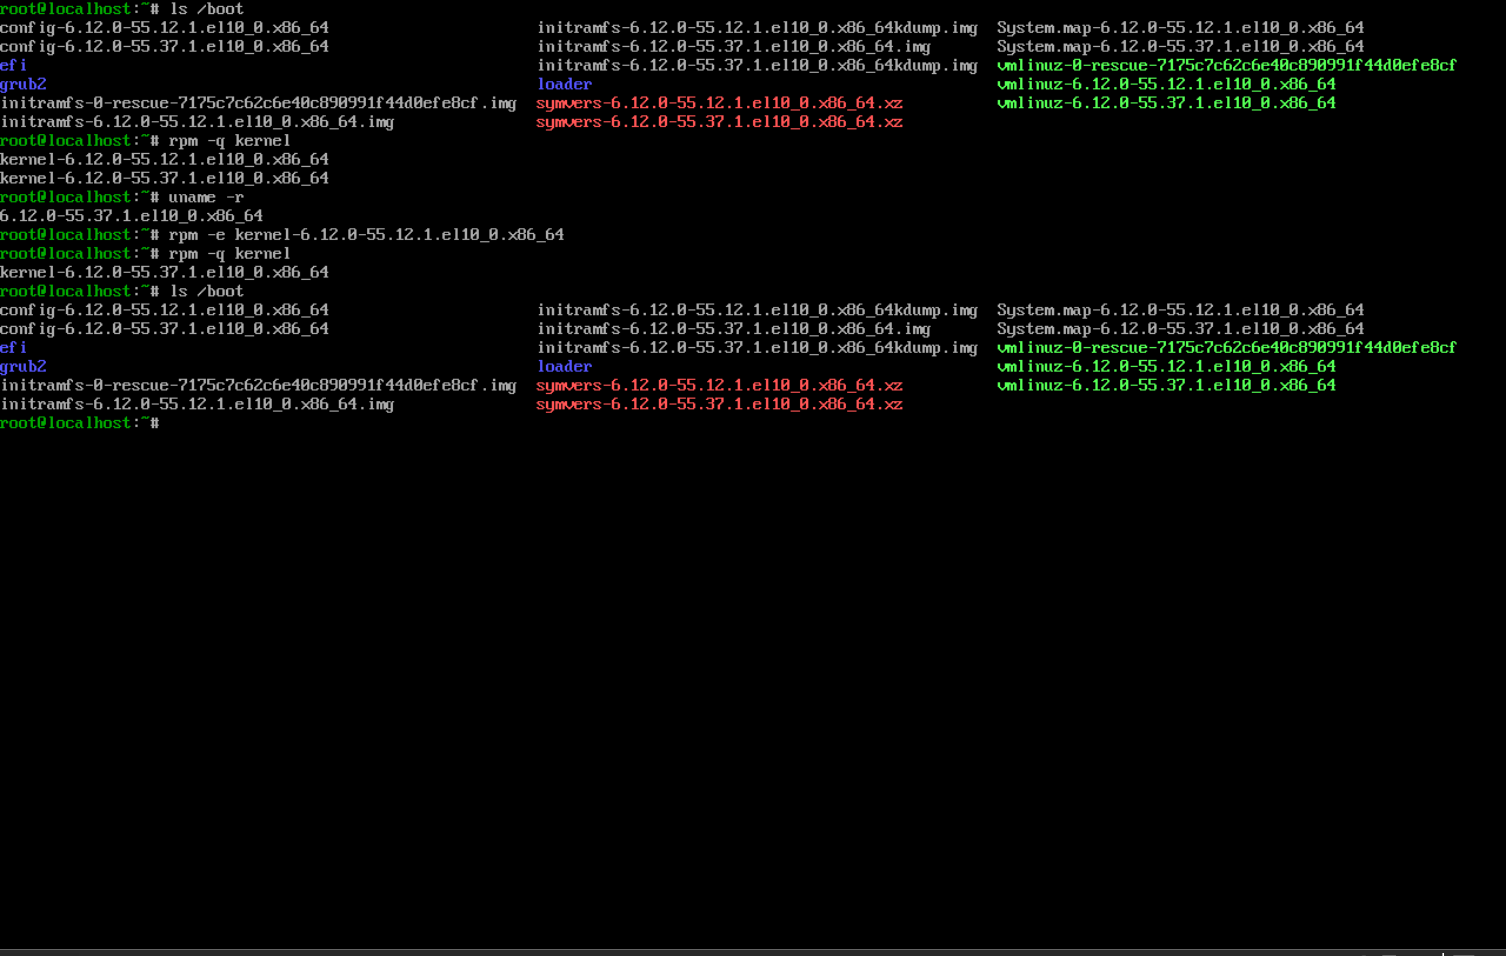
재부팅하면 다시 마운팅해야 한다.


※ 참고

Using Shared Folders


반응형
Posted by J-sean
:
반응형

우분투에 서버용 JDK를 설치하고 세팅해 보자.


openjdk-XX-jdk-headless(서버용)를 설치한다.


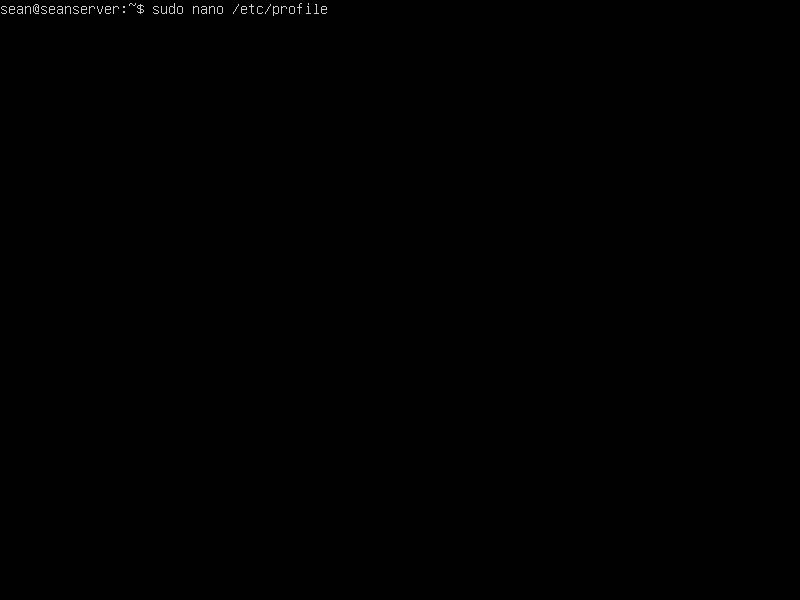
/etc/profile 파일을 오픈 한다.


/etc/profile 파일


파일의 마지막에 JAVA_HOME 세팅을 추가한다.


/etc/environment 파일을 오픈 한다.


/etc/environment 파일


PATH 끝에 ':$JAVA_HOME/bin'을 추가한다.


재부팅하고 echo 명령으로 $JAVA_HOME과 $PATH를 확인한다.


사실 /usr/bin/ 에 JAVA_HOME/bin 파일이 모두 있기 때문에 PATH 추가는 굳이 하지 않아도 상관 없다.


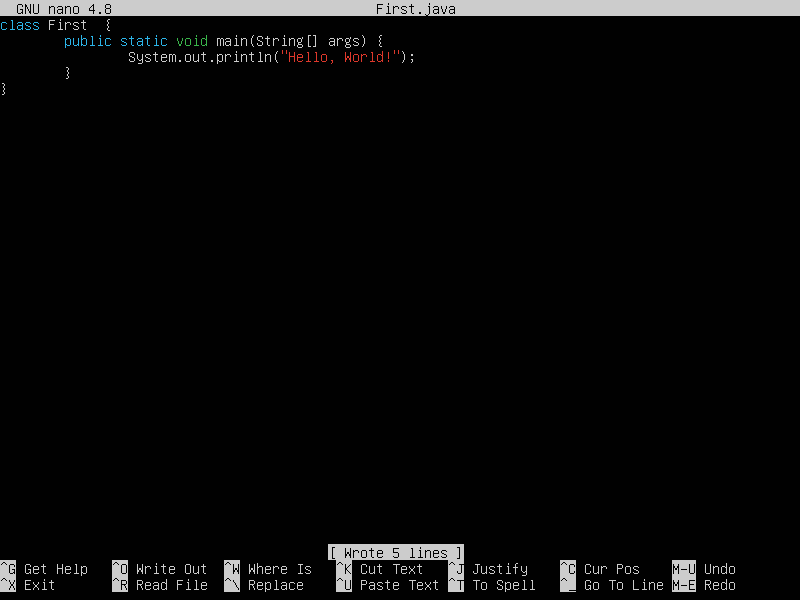
테스트용 JAVA 소스 파일을 작성하고 저장한다.


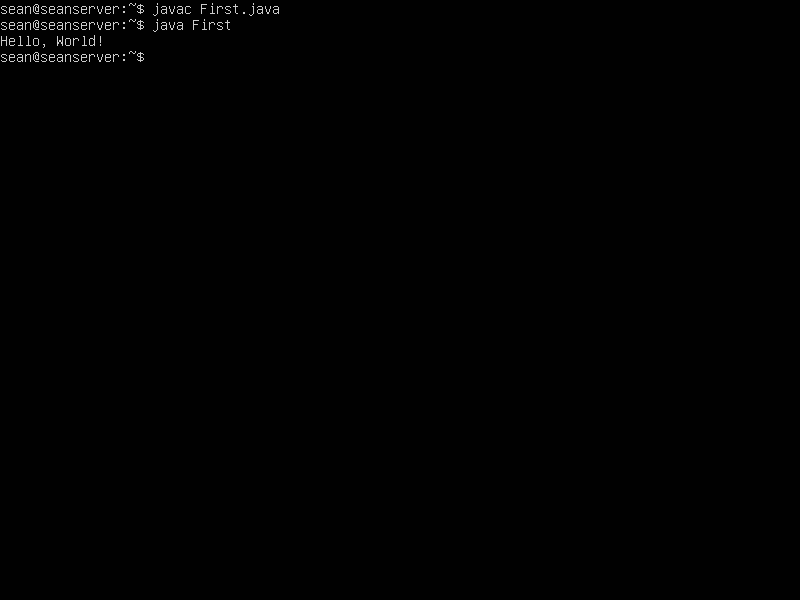
컴파일 하고 실행한다.


반응형
Posted by J-sean
:
반응형

우분투 16.04 서버를 사용하던 중 업데이트를 했더니 ESM(Extended Security Maintenance)이 활성화 되지 않아 업데이트를 할 수 없다는 메세지가 떴다.


우분투 ESM을 활성화 하고 업데이트 해 보자.


우분투 홈페이지에 가입하고 UA Subscriptions를 확인하면 Token이 있다.


아래 명령어를 실행한다.

(급히 적용 하느라 스크린샷은 없다)


# Note that the following steps are not necessary in Ubuntu Pro
# Install the latest UA client
$ sudo apt update
$ sudo apt install ubuntu-advantage-tools

# Use the client to attach this machine to your contract using your UA token
$ sudo ua attach <token>            # <token>에 홈페이지에서 찾은 토큰을 넣는다.
# Ensure ESM-infra is enabled as well:

$ sudo ua enable esm-infra         # 이미 enable 되었다고 나올거다.
$ sudo apt update
$ sudo apt upgrade


※ 참고

https://ubuntu.com/blog/ubuntu-16-04-lts-transitions-to-extended-security-maintenance-esm


반응형
Posted by J-sean
:
반응형

리눅스(우분투, 라즈베리 파이)에서 특정 프로그램이 자동 실행 되도록 해 보자.


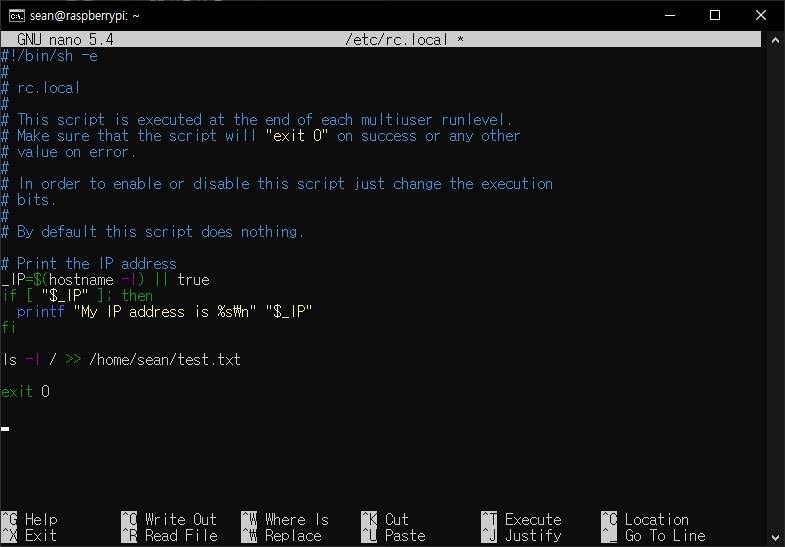
/etc/rc.local 파일에 실행하고 싶은 명령을 추가한다.

위 예제는 루트 디렉토리(/)의 파일 목록을 /home/sean/test.txt 파일로 출력한다.

'exit 0' 명령 위에 추가한다.


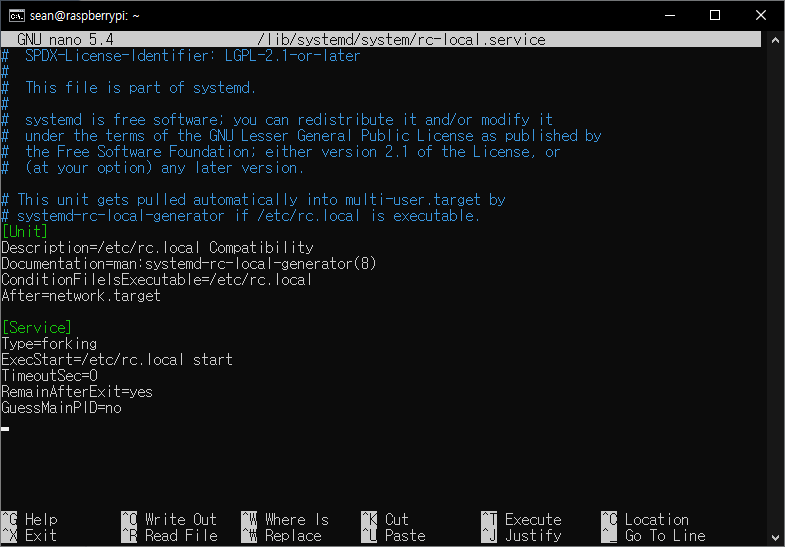
/lib/systemd/system/rc-local.service 파일을 열어준다.


아래 명령을 추가한다.

[Install]

WantedBy=multi-user.target


서비스를 활성화한다.


재부팅 해보면 rc.local 파일이 자동 실행되어 ~/test.txt 파일이 생성돼 있다.


반응형
Posted by J-sean
:
반응형

MySQL(MariaDB)과 구글 차트를 연동해 보자.


아래 내용을 참고해 웹서버와 데이터베이스를 준비한다.

2021.08.25 - [Linux] - Linux(Ubuntu) Build Your Own Web Server - 리눅스(우분투)로 웹서버 만들기

2021.08.28 - [Linux] - Linux(Ubuntu) MariaDB(MySQL) Server Remote Access - 데이터베이스 원격 접속

(데이터베이스는 로컬로 사용하므로 원격 설정을 할 필요는 없다)


위와 같은 데이터베이스와 테이블을 생성한다.


시간, 온도, 습도 데이터를 적당히 입력한다.


1
2
3
4
5
6
7
8
9
10
11
12
13
14
15
16
17
18
19
20
21
22
23
24
25
26
27
28
29
30
31
32
33
34
35
36
37
38
39
40
41
42
43
44
45
46
47
48
49
50
51
52
53
54
55
56
57
58
59
60
61
62
63
64
65
66
67
68
69
70
71
72
73
74
75
76
77
78
79
80
81
82
83
84
85
86
87
88
89
90
91
92
93
94
95
96
<html>
<head>
    <script type="text/javascript" src="https://www.gstatic.com/charts/loader.js"></script>
    <script src="http://ajax.googleapis.com/ajax/libs/jquery/1.11.2/jquery.min.js"></script>
    <!--
    <script type="text/javascript" src="http://code.jquery.com/jquery-1.11.2.min.js"></script>
    -->
 
    <?php
        // 에러가 발생하면 내용 표시
        error_reporting(E_ALL);
        ini_set('display_errors''1');
 
        $mysql_host = "localhost";
        $mysql_user = "root";
        $mysql_password = "1234";
        $mysql_db = "test_db";
 
        $conn = mysqli_connect($mysql_host$mysql_user$mysql_password$mysql_db);
        if (!$conn) {
            die("Database Connect Error: " . mysqli_connect_error());
        }
            
        //echo "Database Connected.<br><br>";
            
        $sql = "SELECT * FROM test_tb";
        $result = mysqli_query($conn$sql);
        
        if (mysqli_num_rows($result> 0) {
            while ($row = mysqli_fetch_assoc($result)) {
                $data_array[] = $row;
            }
            $chart = json_encode($data_array);
        } else {
            echo "No Data";
        }
        
        //echo $chart;
 
        mysqli_close($conn);
    ?>
 
    <script type="text/javascript">
        google.charts.load('current', { packages: ['corechart''line'] });
        google.charts.setOnLoadCallback(drawChart);
        
        function drawChart() {
            var chart_array = <?php echo $chart; ?>;
            //console.log(JSON.stringify(chart_array))
            var header = ['dt''temp''humid'];
            var row = "";
            var rows = new Array();
            jQuery.each(chart_array, function(index, item) {
                row = [
                    item.dt,
                    Number(item.temp),
                    Number(item.humid)
                ];
                rows.push(row); 
            });
 
            var jsonData = [header].concat(rows);
            var data = new google.visualization.arrayToDataTable(jsonData);
            var options = {
                title: 'Temperaure & Humid',
                hAxis: {
                    title: 'Time'
                },
                series: {
                    0: { targetAxisIndex: 0 },
                    1: { targetAxisIndex: 1 }
                },
                vAxes: {
                    0: {
                        title: 'Temperature',
                        viewWindow: { min: -30, max: 50 }
                    },
                    1: {
                        title: 'Humid',
                        viewWindow: { min: 30, max: 100 }
                    }
                }
                //,
                //curveType: 'function',
                //legend: { position: 'bottom' }
            };
 
            var chart = new google.visualization.LineChart(document.getElementById('chart_div'));
            chart.draw(data, options);
        }
    </script>
</head>
<body>
    <div id="chart_div" style="width: 900px; height: 500px"></div>
</body>
</html>


소스를 입력하고 웹서버에 저장한다.(/var/www/html/index.php)


웹서버에 접속하면 위와 같은 그래프가 표시된다.


X축 레이블을 좀 더 보기 편하게 바꾸고 테이블 차트도 추가해 보자.


1
2
3
4
5
6
7
8
9
10
11
12
13
14
15
16
17
18
19
20
21
22
23
24
25
26
27
28
29
30
31
32
33
34
35
36
37
38
39
40
41
42
43
44
45
46
47
48
49
50
51
52
53
54
55
56
57
58
59
60
61
62
63
64
65
66
67
68
69
70
71
72
73
74
75
76
77
78
79
80
81
82
83
84
85
86
87
88
89
90
91
92
93
94
95
96
97
98
99
100
101
102
103
104
105
106
107
108
109
110
<html>
<head>
    <script type="text/javascript" src="https://www.gstatic.com/charts/loader.js"></script>
    <script src="http://ajax.googleapis.com/ajax/libs/jquery/1.11.2/jquery.min.js"></script>
    <!--
    <script type="text/javascript" src="http://code.jquery.com/jquery-1.11.2.min.js"></script>
    -->
 
    <?php
        // 에러가 발생하면 내용 표시
        error_reporting(E_ALL);
        ini_set('display_errors''1');
 
        $mysql_host = "localhost";
        $mysql_user = "root";
        $mysql_password = "1234";
        $mysql_db = "test_db";
 
        $conn = mysqli_connect($mysql_host$mysql_user$mysql_password$mysql_db);
        if (!$conn) {
            die("Database Connect Error: " . mysqli_connect_error());
        }
            
        //echo "Database Connected.<br><br>";
            
        $sql = "SELECT * FROM test_tb";
        $result = mysqli_query($conn$sql);
        
        if (mysqli_num_rows($result> 0) {
            while ($row = mysqli_fetch_assoc($result)) {
                $data_array[] = $row;
            }
            $chart = json_encode($data_array);
        } else {
            echo "No Data";
        }
        
        //echo $chart;
 
        mysqli_close($conn);
    ?>
 
    <script type="text/javascript">
        google.charts.load('current', { packages: ['corechart''line'] });
        google.charts.load('current', { packages: ['table'] });
        google.charts.setOnLoadCallback(drawChart);
        
        function drawChart() {
            var chart_array = <?php echo $chart; ?>;
            //console.log(JSON.stringify(chart_array))
            var header = ['Date&Time(MM-DD HH:MM)''Temp''Humid'];
            var row = "";
            var rows = new Array();
            jQuery.each(chart_array, function(index, item) {
                row = [
                    item.dt.substr(511),  // 너무 긴 날짜 및 시간을 짧게 추출
                    Number(item.temp),
                    Number(item.humid)
                ];
                rows.push(row); 
            });
 
            var jsonData = [header].concat(rows);
            var data = new google.visualization.arrayToDataTable(jsonData);
 
            var lineChartOptions = {
                title: 'Temperaure & Humid',
                hAxis: {
                    title: 'Time',
                    showTextEvery: 4    // X축 레이블이 너무 많아 보기 힘드므로 4개마다 하나씩 표시
                },
                series: {
                    0: { targetAxisIndex: 0 },
                    1: { targetAxisIndex: 1 }
                },
                vAxes: {
                    0: {
                        title: 'Temperature',
                        viewWindow: { min: -30, max: 50 }
                    },
                    1: {
                        title: 'Humid',
                        viewWindow: { min: 30, max: 100 }
                    }
                }
                //,
                //curveType: 'function',
                //legend: { position: 'bottom' }
            };
 
            var lineChart = new google.visualization.LineChart(document.getElementById('lineChart_div'));
            lineChart.draw(data, lineChartOptions);
 
            // 테이블 차트
            var tableChartOptions = {
                showRowNumber: true,
                width: '40%',
                height: '20%'
            }
 
            var tableChart = new google.visualization.Table(document.getElementById('tableChart_div'));
            tableChart.draw(data, tableChartOptions);
        }
    </script>
</head>
<body>
    <div id="lineChart_div" style="width: 900px; height: 500px"></div>
    <div id="tableChart_div"></div>
</body>
</html>


소스를 수정하고 웹서버에 저장한다.(/var/www/html/index.php)


웹서버에 접속하면 위와 같은 그래프와 차트가 표시된다.


※ 참고

2022.05.05 - [Web Development] - Google Chart - 구글 차트 1

반응형
Posted by J-sean
:
반응형

안드로이드 리눅스 커널 명령을 실행해 보자.


레이아웃에 에디트박스, 버튼, 텍스트뷰를 적당히 배치한다.


1
2
3
4
5
6
7
8
9
10
11
12
13
14
15
16
17
18
19
20
21
22
23
24
25
26
27
28
29
30
31
32
33
34
35
36
37
38
39
40
41
42
43
44
45
46
47
48
49
50
51
52
53
package com.example.myapplication;
 
import androidx.appcompat.app.AppCompatActivity;
 
import android.os.Bundle;
import android.view.View;
import android.widget.Button;
import android.widget.EditText;
import android.widget.TextView;
 
import java.io.BufferedReader;
import java.io.InputStreamReader;
 
public class MainActivity extends AppCompatActivity {
 
    EditText editText;
    Button button;
    TextView textView;
 
    @Override
    protected void onCreate(Bundle savedInstanceState) {
        super.onCreate(savedInstanceState);
        setContentView(R.layout.activity_main);
 
        editText = findViewById(R.id.editTextTextPersonName);
        button = findViewById(R.id.button);
        textView = findViewById(R.id.textView);
 
        button.setOnClickListener(new View.OnClickListener() {
            @Override
            public void onClick(View view) {
                StringBuffer stringBuffer = new StringBuffer();
 
                java.lang.Process process;
                try {
                    process = Runtime.getRuntime().exec(editText.getText().toString());
                    process.waitFor();
                    // Causes the current thread to wait, if necessary, until the process
                    // represented by this Process object has terminated.
                    BufferedReader bufferedReader = new BufferedReader(new InputStreamReader(process.getInputStream()));
                    String line = "";
                    while ((line = bufferedReader.readLine()) != null) {
                        stringBuffer.append(line + "\n");
                    }
                } catch (Exception e) {
                    e.printStackTrace();
                }
                String result = stringBuffer.toString();
                textView.setText(result);
            }
        });
    }
}


소스를 입력하고 빌드한다.


실행하면 위와같은 화면이 나타난다.


간단한 명령어를 입력하고 결과를 확인한다.


명령어 실행시 매번 새로운 프로세스에서 실행되기 때문에 연속적인 작업을 할 수 는 없다.

예) cd /proc, pwd를 차례로 실행해도 결과는 항상 /이다.


1
2
3
4
5
6
7
8
9
10
11
12
13
14
15
16
17
18
19
20
21
22
23
24
25
26
27
28
29
30
31
32
33
34
35
36
37
package com.example.myapplication;
 
import androidx.appcompat.app.AppCompatActivity;
 
import android.os.Bundle;
import android.view.View;
import android.widget.Button;
import android.widget.EditText;
import android.widget.TextView;
 
public class MainActivity extends AppCompatActivity {
 
    EditText editText;
    Button button;
    TextView textView;
 
    @Override
    protected void onCreate(Bundle savedInstanceState) {
        super.onCreate(savedInstanceState);
        setContentView(R.layout.activity_main);
 
        editText = findViewById(R.id.editTextTextPersonName);
        button = findViewById(R.id.button);
        textView = findViewById(R.id.textView);
 
        button.setOnClickListener(new View.OnClickListener() {
            @Override
            public void onClick(View view) {
                try {
                    Runtime.getRuntime().exec(editText.getText().toString());
                } catch (Exception e) {
                    e.printStackTrace();
                }
            }
        });
    }
}


소스를 위와 같이 바꾸고 input 명령어를 사용해 보자.

(process.waitFor() 를 사용하면 아래 예에서 제대로 동작하지 않는다)


input keyevent KEYCODE_BACK 명령을 실행하면 Back 버튼이 눌린것 처럼 동작한다.


input keyevent KEYCODE_CALL 명령을 실행하면 전화 화면이 나타난다.

※ 참고

KeyEvent


반응형
Posted by J-sean
:
반응형

안드로이드 앱을 위한 리눅스(우분투) 데이터베이스(MySQL/MariaDB) 서버를 만들어 보자.


app/res/xml/network_security_config.xml 파일을 작성한다.


AndroidManifest.xml 에 인터넷 권한과 networkSecurityConfig를 추가한다.


리니어 레이아웃에 에디트텍스트, 버튼, 텍스트뷰를 적당히 배치한다.


1
2
3
4
5
6
7
8
9
10
11
12
13
14
15
16
17
18
19
20
21
22
23
24
25
26
27
28
29
30
31
32
33
34
35
36
37
38
39
40
41
42
43
44
45
46
47
48
49
50
51
52
53
54
55
56
57
58
59
60
61
62
63
64
65
66
67
68
69
70
71
72
73
74
75
76
77
78
79
80
81
82
83
84
85
86
87
88
89
90
91
92
93
94
package com.example.myapplication;
 
import androidx.appcompat.app.AppCompatActivity;
 
import android.os.Bundle;
import android.view.View;
import android.widget.Button;
import android.widget.EditText;
import android.widget.TextView;
 
import java.io.BufferedReader;
import java.io.InputStreamReader;
import java.io.OutputStream;
import java.net.HttpURLConnection;
import java.net.URL;
import java.nio.charset.StandardCharsets;
 
public class MainActivity extends AppCompatActivity {
 
    EditText editText1;
    EditText editText2;
    TextView textView;
 
    @Override
    protected void onCreate(Bundle savedInstanceState) {
        super.onCreate(savedInstanceState);
        setContentView(R.layout.activity_main);
 
        editText1 = findViewById(R.id.editText1);
        editText2 = findViewById(R.id.editText2);
        textView = findViewById(R.id.textView);
 
        Button button = findViewById(R.id.button);
        button.setOnClickListener(new View.OnClickListener() {
            @Override
            public void onClick(View view) {
                String id = editText1.getText().toString();
                String name = editText2.getText().toString();
 
                new Thread(new Runnable() {
                    @Override
                    public void run() {
                        RequestData(id, name);
                    }
                }).start();
            }
        });
    }
 
    public void RequestData(String id, String name) {
        try {
            BufferedReader bufferedReader;
            StringBuilder stringBuilder = new StringBuilder();
 
            String urlString = "http://192.168.171.200/data_check.php";
            URL url = new URL(urlString);
            HttpURLConnection conn = (HttpURLConnection) url.openConnection();
            if (conn != null) {
                conn.setConnectTimeout(5000);
                conn.setReadTimeout(5000);
                conn.setRequestMethod("POST");
                conn.setDoInput(true);
                conn.setDoOutput(true);
                conn.connect();
 
                String parameter = "id=" + id + "&name=" + name;
                OutputStream outputStream = conn.getOutputStream();
                outputStream.write(parameter.getBytes(StandardCharsets.UTF_8));
                outputStream.flush();
                outputStream.close();
 
                int responseCode = conn.getResponseCode();
 
                if (responseCode == HttpURLConnection.HTTP_OK) {
                    bufferedReader = new BufferedReader(new InputStreamReader(conn.getInputStream()));
                } else {
                    bufferedReader = new BufferedReader(new InputStreamReader(conn.getErrorStream()));
                }
 
                String line = null;
                while ((line = bufferedReader.readLine()) != null) {
                    stringBuilder.append(line + "\n");
                }
 
                textView.setText(stringBuilder);
 
                bufferedReader.close();
                conn.disconnect();
            }
        } catch (Exception e) {
            e.printStackTrace();
        }
    }
}


서버에 데이터를 요청하고 표시하는 소스를 작성한다. (MainActivity.java)


리눅스(우분투) 서버 데이터베이스에 위와 같은 테이블과 데이터를 생성한다.


1
2
3
4
5
6
7
8
9
10
11
12
13
14
15
16
17
18
19
20
21
22
23
24
25
26
27
28
29
30
31
32
33
34
35
36
<?php
    $mysql_host = "localhost";
    $mysql_user = "root";
    $mysql_password = "1234";
    $mysql_db = "member_db";
 
    $conn = mysqli_connect($mysql_host$mysql_user$mysql_password$mysql_db);
 
    if (!$conn) {
        die("Database Connect Error: " . mysqli_connect_error());
    }
 
    $android = strpos($_SERVER['HTTP_USER_AGENT'], "Android");
 
    if ((($_SERVER['REQUEST_METHOD'== 'POST'&& isset($_POST['submit'])) || $android)
    {
        $post_id = trim($_POST['id']);
        $post_name = trim($_POST['name']);
 
        $sql = "SELECT * FROM member WHERE id='$post_id' AND name='$post_name'";
        $result = mysqli_query($conn$sql);
 
        if (mysqli_num_rows($result== 1 ) {
            $member = mysqli_fetch_assoc($result);
            echo "ID: " . $member['id'] . " Name: " . $member['name'] . " Age: " . $member['age'];
        } else {
            echo "No Data.";
            mysqli_close($conn);
            exit;
        }
    } else {
        echo "No Android Device Detected.";
    }
 
    mysqli_close($conn);
?>


아파치 서버 디렉토리에 안드로이드 앱 요청을 처리할 PHP 파일을 작성한다. (/var/www/html/data_check.php)


앱을 실행하고 정보를 요청하면 Age 데이터가 표시된다.


잘못된 정보 요청.


안드로이드가 아닌 다른 운영체제로 서버에 접속.

※ 참고

SELinux 유효성 검사


반응형
Posted by J-sean
:
반응형

PHP에 MariaDB(MySQL)를 연동해 보자.


MariaDB(MySQL), PHP 뿐만 아니라 php-mysql도 필요하다.


위와 같이 member_db 데이터베이스에 member 테이블을 만든다.


데이터베이스 정보를 읽어오는 php 소스를 작성한다.


서버에 접속하면 데이터베이스 내용이 표시된다.


데이터베이스 접속 오류시 표시 내용 (잘못된 암호)


반응형
Posted by J-sean
: