반응형

DataGridView에 출력한 내용을 수정하고 XML로 저장해 보자.


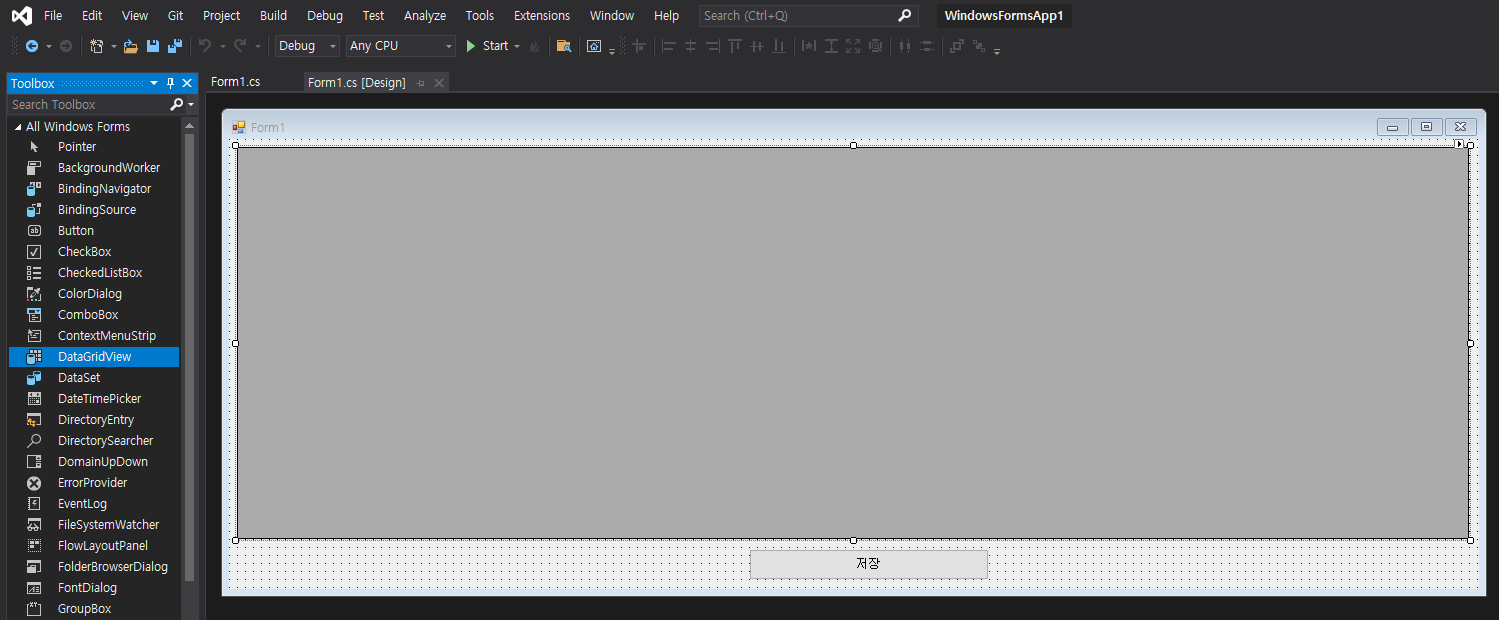
WinForm에 DataGridView, Button을 적당히 배치한다.


1
2
3
4
5
6
7
8
9
10
11
12
13
14
15
16
17
18
19
20
21
22
23
24
25
26
27
28
29
30
31
32
33
34
35
36
37
38
39
40
41
42
43
44
45
46
47
48
49
50
51
52
53
54
55
56
57
58
59
60
using System;
using System.Collections.Generic;
using System.ComponentModel;
using System.Data;
using System.Drawing;
using System.Linq;
using System.Text;
using System.Threading.Tasks;
using System.Windows.Forms;
 
namespace WindowsFormsApp1
{
    public partial class Form1 : Form
    {
        DataTable dataTable;
        string selectedCellString;
 
        public Form1()
        {
            InitializeComponent();
 
            try
            {
                dataTable = new DataTable("game");
                dataTable.ReadXmlSchema("gamelist.xml");
                dataTable.ReadXml("gamelist.xml");
                dataGridView1.DataSource = dataTable;
 
                // 데이터 테이블 내용 변경 후 콜백함수 지정.
                dataTable.RowChanged += DataTable_RowChanged;
            }
            catch (Exception exc)
            {
                MessageBox.Show(exc.Message);
            }
        }
 
        private void DataTable_RowChanged(object sender, DataRowChangeEventArgs e)
        {
            // 변경된 내용 표시
            MessageBox.Show(selectedCellString + " => " +
                e.Row[dataGridView1.SelectedCells[0].ColumnIndex].ToString(), "변경");
        }
 
        private void button1_Click(object sender, EventArgs e)
        {
            // 저장
            dataTable.WriteXml("gamelist.xml");
        }
 
        private void dataGridView1_SelectionChanged(object sender, EventArgs e)
        {
            // 프로그램 시작 시 인덱스 에러 방지
            if (dataGridView1.SelectedCells.Count < 1)
                return;
 
            selectedCellString = dataGridView1.SelectedCells[0].Value.ToString();
        }
    }
}


소스를 입력하고 빌드한다.


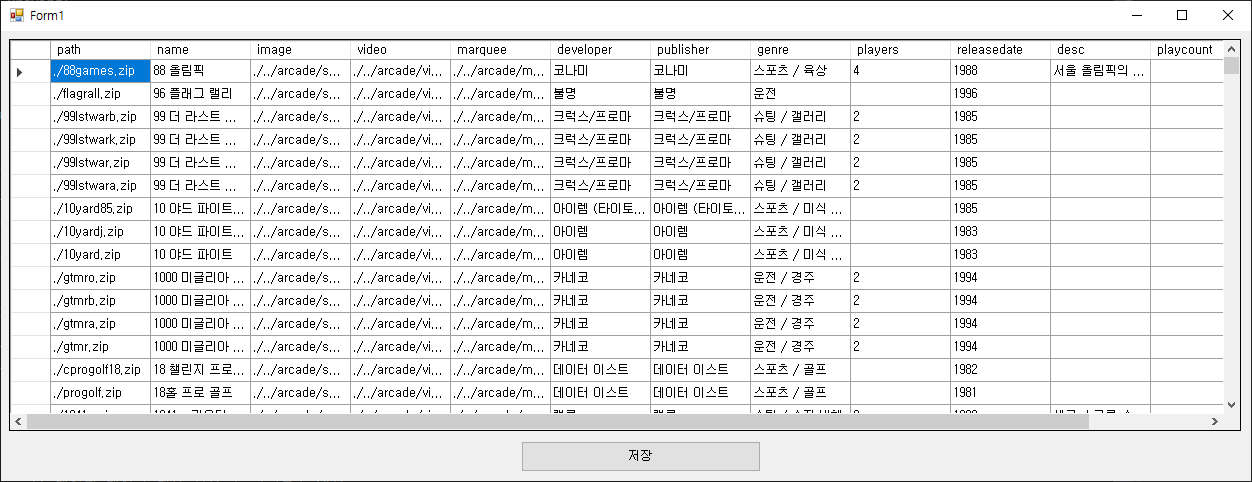
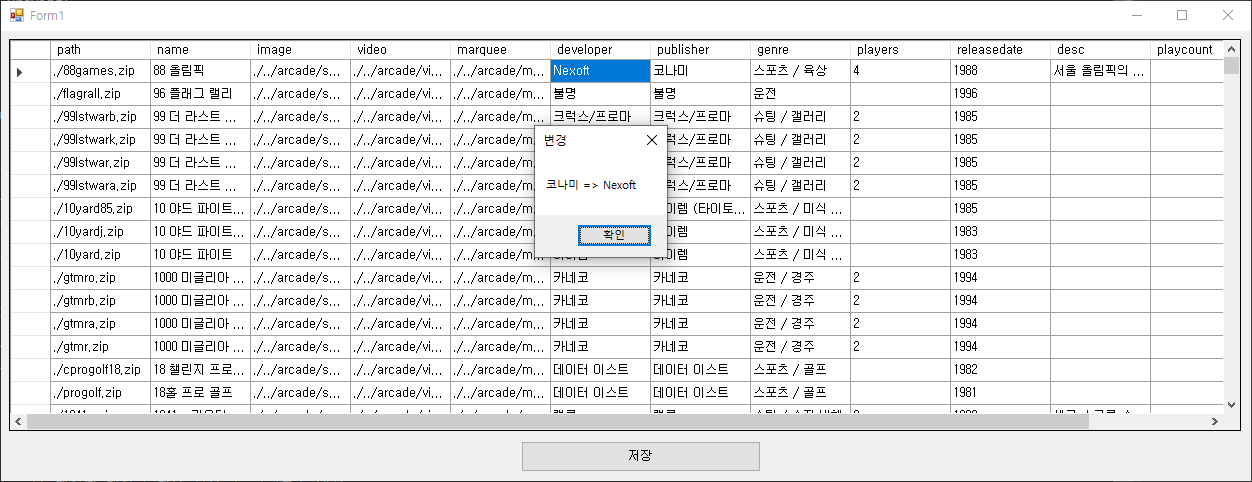
실행하면 'gamelist.xml' 의 내용이 표시된다.


원하는 셀을 수정하고 저장 버튼을 클릭한다.


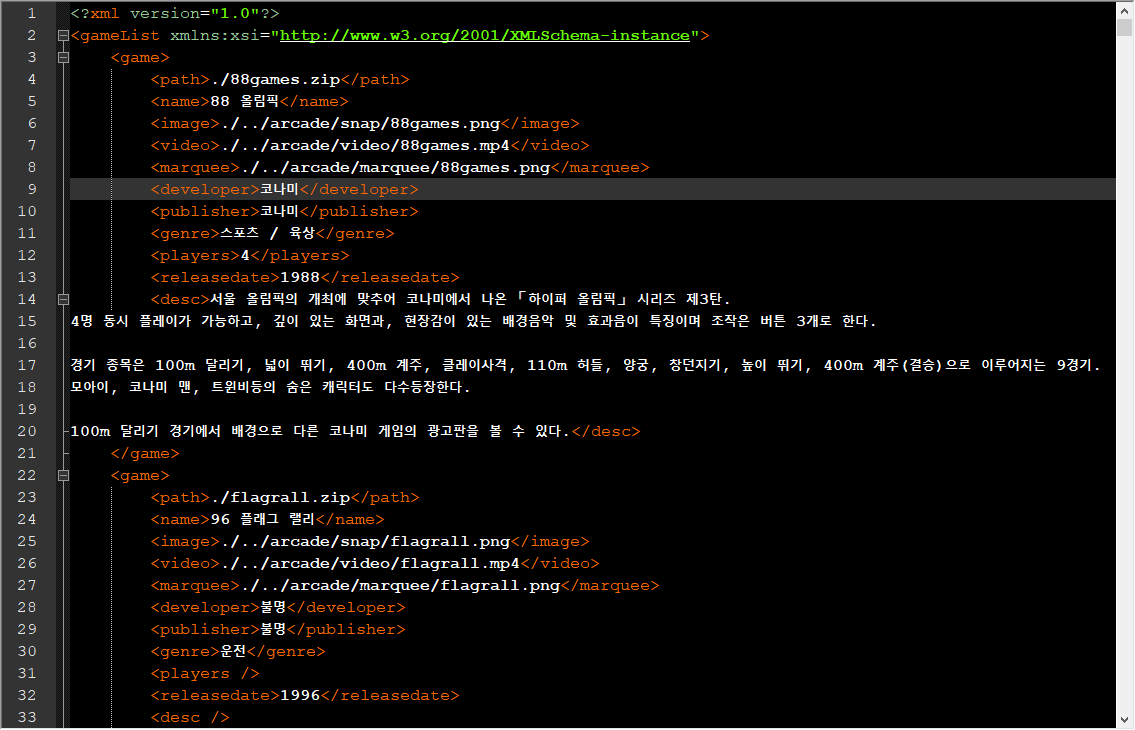
원본 'gamelist.xml'


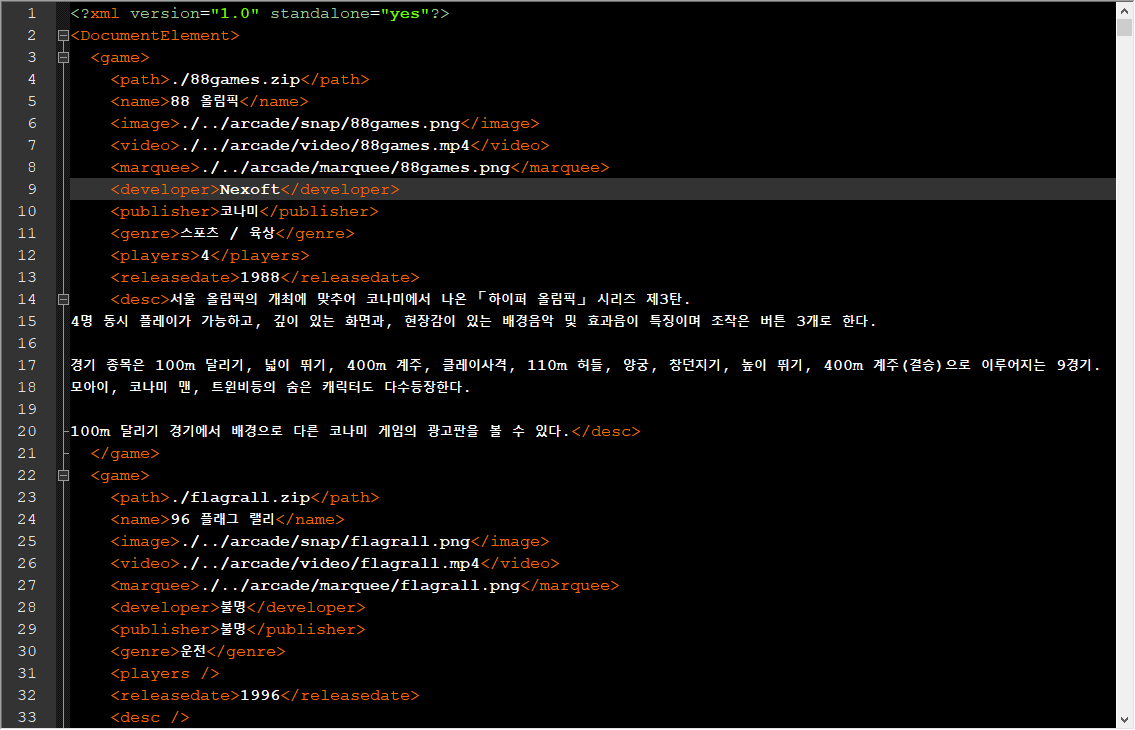
수정된 'gamelist.xml'

DataGridView에서 수정한 내용과 함께 <gameList xmlns:xsi="http://www.w3.org/2001/XMLSchema-instance"> 태그도 <DocumentElement>로 변경되었다.


반응형
Posted by J-sean
:
반응형

DataTable 이나 DataSet 클래스를 이용해 XML 파일을 생성하고 읽어올 수 있다. 이 두 클래스로 생성한 XML 파일이 아닌 임의의 XML 파일을 읽어서 DataGridView에 표시해 보자.


WinForm에 DataGridView를 적당히 배치한다.


1
2
3
4
5
6
7
8
9
10
11
12
13
14
15
16
17
18
19
20
21
22
23
24
25
26
27
28
29
30
31
32
33
34
35
36
37
38
39
40
41
42
43
44
using System;
using System.Collections.Generic;
using System.ComponentModel;
using System.Data;
using System.Drawing;
using System.Linq;
using System.Text;
using System.Threading.Tasks;
using System.Windows.Forms;
 
namespace WindowsFormsApp1
{
    public partial class Form1 : Form
    {
        public Form1()
        {
            InitializeComponent();
 
            try
            {
                DataTable dataTable = new DataTable("game");
                dataTable.ReadXmlSchema("gamelist.xml");
                // 'gamelist.xml'은 인터넷에서 주워온 파일이다.
                // DataTable.WriteXml()에 XmlWriteMode.WriteSchema
                // 옵션을 줘서 만든 XML 파일이 아니면 DataTable 클래스
                // 생성시 테이블 이름("game")을 정확히 지정해 주고
                // Schema를 읽어와야 한다.                
                dataTable.ReadXml("gamelist.xml");
                dataGridView1.DataSource = dataTable;
 
                /* DataSet 클래스 사용 예. 더 간단하다.
                DataSet dataSet = new DataSet();
                dataSet.ReadXml("gamelist.xml");
                dataGridView1.DataSource = dataSet.Tables["game"];
                //dataGridView1.DataSource = dataSet.Tables[0];
                */
            }
            catch (Exception exc)
            {
                MessageBox.Show(exc.Message);
            }
        }
    }
}


소스를 입력하고 빌드한다.


'gamelist.xml' 파일의 구성


gamelist.xml
5.73MB


실행하면 gamelist.xml의 내용이 표시된다.


반응형
Posted by J-sean
:
반응형

C# WinForm과 SQLite를 이용해 간단한 회원관리 프로그램을 만들어 보자.


DataGridView, Button등을 윈폼에 적당히 배치한다.


1
2
3
4
5
6
7
8
9
10
11
12
13
14
15
16
17
18
19
20
21
22
23
24
25
26
27
28
29
30
31
32
33
34
35
36
37
38
39
40
41
42
43
44
45
46
47
48
49
50
51
52
53
54
55
56
57
58
59
60
61
62
63
64
65
66
67
68
69
70
71
72
73
74
75
76
77
78
79
80
81
82
83
84
85
86
87
88
89
90
91
92
93
94
95
96
97
98
99
100
101
102
103
104
105
106
107
108
109
110
111
112
113
114
115
116
117
118
119
120
121
122
123
124
125
126
127
128
129
130
131
132
133
134
135
136
137
138
139
140
141
142
143
144
145
146
147
148
149
150
151
152
153
154
155
156
157
158
159
160
161
162
163
164
165
166
167
168
169
170
171
172
173
174
175
176
177
178
179
180
181
182
183
184
185
186
187
188
189
190
191
192
193
194
195
196
197
198
199
200
201
202
203
204
205
206
207
208
209
210
211
212
213
214
215
216
217
218
219
220
221
222
223
224
225
226
227
228
229
230
231
232
233
234
235
236
237
238
239
240
241
242
243
244
245
246
using System;
using System.Collections.Generic;
using System.ComponentModel;
using System.Data;
using System.Drawing;
using System.Linq;
using System.Text;
using System.Threading.Tasks;
using System.Windows.Forms;
 
using System.Data.SQLite;
 
namespace Manager
{
    public partial class Form1 : Form
    {
        SQLiteConnection connection;
        SQLiteCommand command;
        DataTable dataTable;
 
        public Form1()
        {
            InitializeComponent();
 
            dataGridView1.SelectionMode = DataGridViewSelectionMode.FullRowSelect;
            dataGridView1.ReadOnly = true;
            dataGridView1.AllowUserToAddRows = false;
 
            comboBox1.DropDownStyle = ComboBoxStyle.DropDownList;
            comboBox1.Items.Add("아이디로");
            comboBox1.Items.Add("이름으로");
            comboBox1.Items.Add("생일로");
            comboBox1.SelectedIndex = 0;
 
            try
            {
                connection = new SQLiteConnection("Data Source=" + Application.StartupPath + "/member.db");
                connection.Open();
 
                command = new SQLiteCommand(connection);
                command.CommandText = "CREATE TABLE IF NOT EXISTS member (" +
                    "id TEXT UNIQUE NOT NULL, " +
                    "name TEXT NOT NULL, " +
                    "birthday TEXT NOT NULL)";
                command.ExecuteNonQuery();
 
                command.CommandText = "SELECT * FROM member";
                SQLiteDataReader reader = command.ExecuteReader();
                dataTable = new DataTable();
                dataTable.Load(reader);
                dataGridView1.DataSource = dataTable;
                reader.Close();
 
                dataGridView1.Columns[0].HeaderText = "아이디";
                dataGridView1.Columns[1].HeaderText = "이름";
                dataGridView1.Columns[2].HeaderText = "생일";
 
                connection.Close();
 
                label4.Text = "총 회원수: " + dataGridView1.Rows.Count;
            }
            catch (Exception exc)
            {
                MessageBox.Show(exc.Message);
            }
        }
 
        private void button1_Click(object sender, EventArgs e)
        {
            try // 회원 정보 수정
            {
                foreach (DataGridViewRow row in dataGridView1.Rows) // 아이디(변경불가 상황 가정)를 바꾸려 시도하는 경우 체크
                {
                    if (row.Cells[0].Value.ToString() == textBox1.Text.Trim()) // 아이디 비교
                    {
                        if (MessageBox.Show(row.Cells[1].Value + "의 데이터를 수정 합니다. 수정하시겠습니까?",
                            "수정", MessageBoxButtons.YesNo) == DialogResult.Yes)
                        {
                            connection = new SQLiteConnection("Data Source=" + Application.StartupPath + "/member.db");
                            connection.Open();
 
                            command = new SQLiteCommand(connection);
                            command.CommandText = "UPDATE member set name=:name, birthday=:birthday WHERE id=:id";
                            command.Parameters.Add("name", DbType.String).Value = textBox2.Text.Trim();
                            command.Parameters.Add("birthday", DbType.String).Value = textBox3.Text.Trim();
                            command.Parameters.Add("id", DbType.String).Value = textBox1.Text.Trim();
                            command.ExecuteNonQuery();
 
                            connection.Close();
 
                            row.Cells[0].Value = textBox1.Text.Trim();
                            row.Cells[1].Value = textBox2.Text.Trim();
                            row.Cells[2].Value = textBox3.Text.Trim();
 
                            return;
                        }
                        else
                        {
                            //MessageBox.Show("바뀌지 않았습니다.");
                            return;
                        }
                    }
                }
                MessageBox.Show(textBox1.Text + "는 존재하지 않는 ID 입니다.");
            }
            catch (Exception exc)
            {
                MessageBox.Show(exc.Message);
            }
        }
 
        private void dataGridView1_SelectionChanged(object sender, EventArgs e)
        {
            // 프로그램 시작 시 인덱스 에러 방지
            if (dataGridView1.SelectedRows.Count < 1)
                return;
 
            DataGridViewRow row = dataGridView1.SelectedRows[0];
            textBox1.Text = row.Cells[0].Value.ToString();
            textBox2.Text = row.Cells[1].Value.ToString();
            textBox3.Text = row.Cells[2].Value.ToString();
        }
 
        private void button2_Click(object sender, EventArgs e)
        {
            try // 회원 추가
            {
                connection = new SQLiteConnection("Data Source=" + Application.StartupPath + "/member.db");
                connection.Open();
 
                command = new SQLiteCommand(connection);
                command.CommandText = $"INSERT INTO member (id, name, birthday) VALUES (" +
                    $"'{textBox1.Text.Trim()}', '{textBox2.Text.Trim()}', '{textBox3.Text.Trim()}')";
                command.ExecuteNonQuery();
 
                connection.Close();
 
                dataTable.Rows.Add(textBox1.Text.Trim(), textBox2.Text.Trim(), textBox3.Text.Trim());
                label4.Text = "총 회원수: " + dataGridView1.Rows.Count;
            }
            catch (Exception exc)
            {
                MessageBox.Show(exc.Message);
            }
        }
 
        private void button3_Click(object sender, EventArgs e)
        {
            try // 회원 삭제
            {
                if (MessageBox.Show($"{dataGridView1.SelectedRows[0].Cells[1].Value}의 데이터를 정말 삭제 하시겠습니까?",
                    "삭제", MessageBoxButtons.YesNo) == DialogResult.Yes)
                {
                    connection = new SQLiteConnection("Data Source=" + Application.StartupPath + "/member.db");
                    connection.Open();
 
                    command = new SQLiteCommand(connection);
                    command.CommandText = "DELETE from member WHERE id=:id";
                    command.Parameters.Add("id", DbType.String).Value = textBox1.Text.Trim();
                    command.ExecuteNonQuery();
 
                    connection.Close();
 
                    DataGridViewRow row = dataGridView1.SelectedRows[0];
                    dataGridView1.Rows.Remove(row);
 
                    label4.Text = "총 회원수: " + dataGridView1.Rows.Count;
                }
                else
                {
                    //MessageBox.Show("삭제하지 않았습니다");
                }
            }
            catch (Exception exc)
            {
                MessageBox.Show(exc.Message);
            }
        }
 
        private void button4_Click(object sender, EventArgs e)
        {
            try // 검색
            {
                string filter;
                switch (comboBox1.SelectedIndex)
                {
                    case 0:
                        filter = "id";
                        break;
 
                    case 1:
                        filter = "name";
                        break;
 
                    case 2:
                        filter = "birthday";
                        break;
 
                    default:
                        filter = "id";
                        break;
                }
 
                connection = new SQLiteConnection("Data Source=" + Application.StartupPath + "/member.db");
                connection.Open();
                command = new SQLiteCommand(connection);
 
                if (textBox4.Text.Trim().Length == 0)
                {
                    command.CommandText = $"SELECT * FROM member";
                }
                else
                {
                    command.CommandText = $"SELECT * FROM member where {filter}='{textBox4.Text.Trim()}'";
                }
                SQLiteDataReader reader = command.ExecuteReader();
                dataTable = new DataTable();
                dataTable.Load(reader);
                dataGridView1.DataSource = dataTable;
                reader.Close();
 
                connection.Close();
            }
            catch (Exception exc)
            {
                MessageBox.Show(exc.Message);
            }
        }
 
        private void dataGridView1_RowPostPaint(object sender, DataGridViewRowPostPaintEventArgs e)
        {
            // 항목 번호 그리기
            String rowIndex = (e.RowIndex + 1).ToString();
 
            StringFormat centerFormat = new StringFormat()
            {
                Alignment = StringAlignment.Center,
                LineAlignment = StringAlignment.Center
            };
 
            Rectangle headerBound = new Rectangle(e.RowBounds.Left, e.RowBounds.Top,
                dataGridView1.RowHeadersWidth, e.RowBounds.Height);
            e.Graphics.DrawString(rowIndex, Font, SystemBrushes.ControlText, headerBound, centerFormat);
        }
    }
}


소스를 입력하고 빌드한다.


프로그램을 실행하면 빈 데이터베이스가 생성된다.


회원 추가, 수정, 삭제, 검색등을 해 본다.


반응형
Posted by J-sean
:
반응형

C# WinForm의 DataGridView와 SQLite를 연동해 보자.


윈폼에 DataGridView를 적당히 배치한다.


1
2
3
4
5
6
7
8
9
10
11
12
13
14
15
16
17
18
19
20
21
22
23
24
25
26
27
28
29
30
31
32
33
34
35
36
37
38
39
40
41
42
43
44
45
46
47
48
49
50
51
52
53
54
55
56
57
58
59
60
61
62
63
64
65
66
67
68
69
70
71
72
73
74
75
76
77
78
using System;
using System.Collections.Generic;
using System.ComponentModel;
using System.Data;
using System.Drawing;
using System.Linq;
using System.Text;
using System.Threading.Tasks;
using System.Windows.Forms;
 
using System.Data.SQLite;
 
namespace WindowsFormsApp1
{
    public partial class Form1 : Form
    {
        public Form1()
        {
            InitializeComponent();
 
            try
            {
                SQLiteConnection connection = new SQLiteConnection("Data Source=" + Application.StartupPath + "/test.db");
                connection.Open();
 
                SQLiteCommand command = new SQLiteCommand(connection);
                command.CommandText = "CREATE TABLE IF NOT EXISTS test (" +
                    "id INTEGER PRIMARY KEY, " +
                    "name TEXT NOT NULL, " +
                    "birthday TEXT NOT NULL)";
                command.ExecuteNonQuery();
 
                command.CommandText = "INSERT OR IGNORE INTO test (id, name, birthday) VALUES (1, 'sean', '2020-01-20'), " +
                    "(2, 'david', '2021-11-03'), " +
                    "(3, 'john', '2022-05-17')";
                command.ExecuteNonQuery();
 
                command.CommandText = "SELECT * FROM test";
                SQLiteDataReader dataReader = command.ExecuteReader();
                DataTable dataTable = new DataTable();
                dataTable.Load(dataReader);
                dataGridView1.DataSource = dataTable;
                dataReader.Close();
 
                // 각 컬럼의 HeaderText를 변경하지 않으면 SQLite에 지정된 컬럼명 그대로 사용된다.
                dataGridView1.Columns[0].HeaderText = "아이디";
                dataGridView1.Columns[1].HeaderText = "이름";
                dataGridView1.Columns[2].HeaderText = "생일";
 
                connection.Close();
            }
            catch (Exception exc)
            {
                MessageBox.Show(exc.Message);
            }
        }
 
        // DataGridView에 번호를 그려주는(DrawString) 함수.
        private void dataGridView1_RowPostPaint(object sender, DataGridViewRowPostPaintEventArgs e)
        {
            //DataGridView dataGridView = sender as DataGridView;
            // 'sender as DataGridView' 는 dataGridView1과 동일.
 
            String rowIndex = (e.RowIndex + 1).ToString();
            //String rowIdx = (e.RowIndex + 1).ToString("D4"); // 10진수 4자리 표기(0001~9999). 16진수4자리는 'X4'.
 
            StringFormat centerFormat = new StringFormat()
            {
                Alignment = StringAlignment.Center,
                LineAlignment = StringAlignment.Center
            };
 
            Rectangle headerBound = new Rectangle(e.RowBounds.Left, e.RowBounds.Top,
                dataGridView1.RowHeadersWidth, e.RowBounds.Height);
            e.Graphics.DrawString(rowIndex, Font, SystemBrushes.ControlText, headerBound, centerFormat);
        }
    }
}


소스를 입력하고 빌드한다.


실행하면 데이터가 표시된다.


반응형
Posted by J-sean
:
반응형

C#에 SQLite 데이터베이스를 연동해 보자.


System.Data.SQLite를 설치한다.


1
2
3
4
5
6
7
8
9
10
11
12
13
14
15
16
17
18
19
20
21
22
23
24
25
26
27
28
29
30
31
32
33
34
35
36
37
38
39
40
41
42
43
44
45
46
47
48
49
50
51
52
53
54
55
56
57
58
59
60
61
using System;
using System.Collections.Generic;
using System.Linq;
using System.Text;
using System.Threading.Tasks;
 
using System.Data.SQLite;
 
namespace ConsoleApp1
{
    class Program
    {
        static void Main(string[] args)
        {
            try
            {
                // 데이터베이스 생성 및 열기. 생성하려는 데이터베이스가 존재하면 열기만 한다.
                SQLiteConnection connection = new SQLiteConnection("Data Source=" + Environment.CurrentDirectory + "/test.db");
                connection.Open();
 
                SQLiteCommand command = new SQLiteCommand(connection);
                command.CommandText = "CREATE TABLE IF NOT EXISTS test (" +
                    "id INTEGER PRIMARY KEY, " +
                    "name TEXT NOT NULL, " +
                    "birthday TEXT NOT NULL)";
                // Execute the command and return the number of rows inserted/updated affected by it. 
                command.ExecuteNonQuery();
 
                // 이미 존재하는 데이터는 'OR IGNORE'에 의해 무시된다.
                command.CommandText = "INSERT OR IGNORE INTO test (id, name, birthday) VALUES (1, 'sean', '2020-01-20'), " +
                    "(2, 'david', '2021-11-03'), " +
                    "(3, 'john', '2022-05-17')";
                int rowCount = command.ExecuteNonQuery();
                Console.WriteLine("The number of rows inserted/updated affected by it: " + rowCount + "\n");
 
                command.CommandText = "SELECT * FROM test";
                SQLiteDataReader reader = command.ExecuteReader();
                // Reads the next row from the resultset. True if a new row was successfully loaded and is ready for processing
                while (reader.Read())
                {
                    Console.WriteLine($"ID: {reader.GetInt32(0)}, Name: {reader.GetString(1)}, Birthday: {reader.GetString(2)}");
                }
                // 다음 SQLiteCommand 사용을 위해 SQLiteDataReader 사용이 끝나면 종료해야 한다.
                reader.Close();
 
                // The date() function returns the date in this format: YYYY-MM-DD.
                // The julianday() function returns the Julian day - the number of days since noon in Greenwich
                // on November 24, 4714 B.C. (Proleptic Gregorian calendar).
                command.CommandText = "SELECT JULIANDAY(DATE('NOW')) - JULIANDAY(DATE(birthday)) FROM test WHERE id=2";
                int days = Convert.ToInt32(command.ExecuteScalar());
                Console.WriteLine("David's birthday was " + days + " days ago.");
 
                connection.Close();
            }
            catch (Exception exc)
            {
                Console.WriteLine(exc.Message);
            }
        }
    }
}


소스를 입력하고 빌드한다.


실행하면 데이터가 출려된다.


다시 한 번 실행하면 'OR IGNORE'에 의해 INSERT 명령어는 무시된다.


실행파일 폴더에 test.db가 생성되었다.

※ 참고

SQLite Download Page for Documentaion and Commend-Line Tools.


반응형
Posted by J-sean
:
반응형

C# WinForm 으로 구글 클라우드 비전 API를 이용해 Detect localized objects in a single image 를 진행해 보자. 아래 링크를 참고해 기본 준비를 한다.

2022.02.11 - [C#] - C# Google Cloud Vision API - 구글 클라우드 비전 API 2


1
2
3
4
5
6
7
8
9
10
11
12
13
14
15
16
17
18
19
20
21
22
23
24
25
26
27
28
29
30
31
32
33
34
35
36
37
38
39
40
41
42
43
44
45
46
47
48
49
50
51
52
53
54
55
56
57
58
59
60
61
62
63
64
65
66
67
68
69
70
71
72
73
74
75
76
77
78
79
80
81
82
83
84
85
86
87
88
89
90
91
92
93
using System;
using System.Collections.Generic;
using System.ComponentModel;
using System.Data;
using System.Drawing;
using System.Linq;
using System.Text;
using System.Threading.Tasks;
using System.Windows.Forms;
 
using Google.Cloud.Vision.V1;
 
namespace WindowsFormsApp1
{
    public partial class Form1 : Form
    {
        ImageAnnotatorClient client;
 
        public Form1()
        {
            InitializeComponent();
 
            try
            {
                client = new ImageAnnotatorClientBuilder
                {
                    CredentialsPath = "your_credentials.json"
                }.Build();
            }
            catch (Exception exc)
            {
                MessageBox.Show(exc.Message);
                Close();
            }
        }
 
        private void button1_Click(object sender, EventArgs e)
        {
            try
            {
                System.Drawing.Image systemImage;
 
                OpenFileDialog dlg = new OpenFileDialog();
                if (dlg.ShowDialog() == DialogResult.OK)
                {
                    systemImage = System.Drawing.Image.FromFile(dlg.FileName);
                    pictureBox1.Image = systemImage;
 
                    pictureBox1.Refresh();
 
                    Graphics graphics = pictureBox1.CreateGraphics();
 
                    Google.Cloud.Vision.V1.Image visionImage = Google.Cloud.Vision.V1.Image.FromFile(dlg.FileName);
 
                    IReadOnlyList<LocalizedObjectAnnotation> annotations = client.DetectLocalizedObjects(visionImage);
                    foreach (LocalizedObjectAnnotation annotation in annotations)
                    {
                        Google.Protobuf.Collections.RepeatedField<NormalizedVertex> normalizedVertices =
                            annotation.BoundingPoly.NormalizedVertices;
 
                        int imageWidth = systemImage.Width;
                        int imageHeight = systemImage.Height;
                        // Google.Cloud.Vision.V1.Image 는 Width, Height 필드가 없다.
 
                        Rectangle rectangle = new Rectangle(
                            (int)(normalizedVertices[0].X * imageWidth),
                            (int)(normalizedVertices[0].Y * imageHeight),
                            (int)((normalizedVertices[2].X - normalizedVertices[0].X) * imageWidth),
                            (int)((normalizedVertices[2].Y - normalizedVertices[0].Y) * imageHeight)
                            );
                        // BoundingPoly.NormalizedVertices 는 0~1의 범위를 가지는 값이다.
 
                        StringFormat stringFormat = new StringFormat
                        {
                            Alignment = StringAlignment.Center,
                            LineAlignment = StringAlignment.Center
                        };
 
                        graphics.DrawRectangle(System.Drawing.Pens.Red, rectangle);
                        graphics.DrawString($"Name: {annotation.Name}\n ID: {annotation.Mid}\n Score: {annotation.Score}",
                            Font, Brushes.Red, rectangle, stringFormat);
                    }
 
                    graphics.Dispose();
                }
            }
            catch (Exception exc)
            {
                MessageBox.Show(exc.Message);
            }
        }
    }
}


소스를 입력하고 빌드한다.


반응형
Posted by J-sean
:
반응형

C# WinForm 으로 구글 클라우드 비전 API 결과를 확인해 보자. 아래 링크를 참고해 기본적인 구글 클라우드 비전 API 사용 준비를 한다.

2022.02.11 - [C#] - C# Google Cloud Vision API - 구글 클라우드 비전 API 1


Visual Studio - NuGet Package Manager에서 Google.Cloud.Vision.V1을 설치한다.


PictureBox, Button을 적당히 배치한다.


1
2
3
4
5
6
7
8
9
10
11
12
13
14
15
16
17
18
19
20
21
22
23
24
25
26
27
28
29
30
31
32
33
34
35
36
37
38
39
40
41
42
43
44
45
46
47
48
49
50
51
52
53
54
55
56
57
58
59
60
61
62
63
64
65
66
67
68
69
70
71
72
73
74
75
76
77
78
79
80
81
82
83
84
85
86
87
88
89
90
91
using System;
using System.Collections.Generic;
using System.ComponentModel;
using System.Data;
using System.Drawing;
using System.Linq;
using System.Text;
using System.Threading.Tasks;
using System.Windows.Forms;
 
using System.IO;
using Google.Cloud.Vision.V1;
 
namespace WindowsFormsApp1
{
    public partial class Form1 : Form
    {
        ImageAnnotatorClient client;
 
        public Form1()
        {
            InitializeComponent();
 
            try
            {                
                client = new ImageAnnotatorClientBuilder
                {
                    CredentialsPath = "./values-324913-58dd97f8b8ec.json"                    
                }.Build();
            }
            catch (Exception exc)
            {
                MessageBox.Show(exc.Message);
                Close();
            }
        }
 
        private void button1_Click(object sender, EventArgs e)
        {
            try
            {
                System.Drawing.Image systemImage;
 
                OpenFileDialog dlg = new OpenFileDialog();
                if (dlg.ShowDialog() == DialogResult.OK)
                {
                    systemImage = System.Drawing.Image.FromFile(dlg.FileName);
                    pictureBox1.Image = systemImage;
 
                    pictureBox1.Refresh();
                    //Forces the control to invalidate its client area and immediately redraw itself and any child controls.
                    // 미리 Refresh()를 호출하지 않으면 아래 얼굴 영역 사각형, 신뢰도 텍스트 출력이 보이지 않는다.
 
                    Graphics graphics = pictureBox1.CreateGraphics();
 
                    Google.Cloud.Vision.V1.Image visionImage = Google.Cloud.Vision.V1.Image.FromFile(dlg.FileName);
                    //MemoryStream memoryStream = new MemoryStream();
                    //pictureBox1.Image.Save(memoryStream, System.Drawing.Imaging.ImageFormat.Png);
                    //Google.Cloud.Vision.V1.Image visionImage = Google.Cloud.Vision.V1.Image.FromBytes(memoryStream.ToArray());                    
                    // Google.Cloud.Vision.V1.Image와 System.Drawing.Image는 서로 호환되지 않는다.
                    
                    IReadOnlyList<FaceAnnotation> result = client.DetectFaces(visionImage);
                    foreach (FaceAnnotation face in result)
                    {
                        Google.Protobuf.Collections.RepeatedField<Vertex> vertices = face.BoundingPoly.Vertices;
                        
                        Rectangle rectangle = new Rectangle(vertices[0].X, vertices[0].Y, vertices[2].X - vertices[0].X,
                            vertices[2].Y - vertices[0].Y);
                        // 얼굴 영역 (vertices[0]: 좌상단, vertices[1]:우상단, vertices[2]:우하단, vertices[3]:좌하단)
                        StringFormat stringFormat = new StringFormat
                        {
                            Alignment = StringAlignment.Center,
                            LineAlignment = StringAlignment.Center
                        };
                        // 신뢰도 문자열 센터 정렬
 
                        graphics.DrawRectangle(System.Drawing.Pens.Red, rectangle);
                        graphics.DrawString($"Confidence: {(int)(face.DetectionConfidence * 100)}%", Font,
                            Brushes.Red, rectangle, stringFormat);
                    }
 
                    graphics.Dispose();
                }
            }
            catch (Exception exc)
            {
                MessageBox.Show(exc.Message);
            }
        }
    }
}


소스를 입력하고 빌드한다.


버튼을 클릭하고 이미지 파일을 불러온다.


불러온 이미지의 얼굴 영역에 사각형과 신뢰도가 표시된다.


얼굴 이미지가 잘리거나 명확하지 않으면 제대로 검출되지 않는다.


반응형
Posted by J-sean
:
반응형

C#에서 구글 클라우드 비전 API를 사용해 보자.


Google Could Platform - APIs&amp;amp;amp;Services 에서 Cloud Vision API를 활성화(Enable)한다.


Service account key를 생성하고 JSON파일로 다운로드한다.


Visual Studio - NuGet Package Manager에서 Google.Cloud.Vision.V1을 설치한다.


1
2
3
4
5
6
7
8
9
10
11
12
13
14
15
16
17
18
19
20
21
22
23
24
25
26
27
28
29
30
31
32
33
34
35
36
37
38
39
40
41
using System;
using System.Collections.Generic;
using System.Linq;
using System.Text;
using System.Threading.Tasks;
 
using System.IO;
using Google.Cloud.Vision.V1;
 
namespace ConsoleApp1
{
    class Program
    {
        static void Main(string[] args)
        {
            try
            {
                Image image = Image.FromFile("./barbara.png");
                string credentialsString = File.ReadAllText("./your_jsoncredentials.json");
 
                ImageAnnotatorClient client = new ImageAnnotatorClientBuilder
                {
                    JsonCredentials = credentialsString
                    //CredentialsPath = "./your_jsoncredentials.json"
                    // 간단히 CredentialsPath에 서비스 계정 키(json) 파일을 직접 대입해도 된다.
                }.Build();
 
                IReadOnlyList<FaceAnnotation> result = client.DetectFaces(image);
                foreach (FaceAnnotation face in result)
                {
                    string poly = string.Join(" - ", face.BoundingPoly.Vertices.Select(v => $"({v.X}, {v.Y})"));
                    Console.WriteLine($"Confidence: {(int)(face.DetectionConfidence * 100)}%; BoundingPoly: {poly}");
                }
            }
            catch (Exception e)
            {
                Console.WriteLine(e.Message);
            }
        }
    }
}


소스를 입력하고 빌드한다.


분석 이미지


분석 이미지의 얼굴 좌표와 신뢰도가 함께 표시된다.


1
2
3
4
5
6
7
8
9
10
11
12
13
14
15
16
17
18
19
20
21
22
23
24
25
26
27
28
29
30
31
32
33
34
35
36
37
38
39
40
41
42
43
44
45
46
47
48
49
50
51
52
53
54
55
56
57
58
59
60
61
62
63
64
65
66
using System;
using System.Collections.Generic;
using System.Linq;
using System.Text;
using System.Threading.Tasks;
 
using Google.Cloud.Vision.V1;
using Newtonsoft.Json;
 
namespace ConsoleApp1
{
    class Program
    {
        static void Main(string[] args)
        {
            try
            {
                Image image = Image.FromFile("./barbara.png");
                Credentials credentials = new Credentials
                {
                    type = "your_type",
                    project_id = "your_project_id",
                    private_key_id = "your_key_id",
                    private_key = "-----BEGIN PRIVATE KEY-----your_key-----END PRIVATE KEY-----\n",
                    client_email = "your_email",
                    client_id = "your_client_id",
                    auth_uri = "your_auth_uri",
                    token_uri = "your_token_uri",
                    auth_provider_x509_cert_url = "your_auth_cert_url",
                    client_x509_cert_url = "your_client_cert_url"
                };
 
                ImageAnnotatorClient client = new ImageAnnotatorClientBuilder
                {
                    JsonCredentials = JsonConvert.SerializeObject(credentials)
 
                }.Build();
 
                IReadOnlyList<FaceAnnotation> result = client.DetectFaces(image);
                foreach (FaceAnnotation face in result)
                {
                    string poly = string.Join(" - ", face.BoundingPoly.Vertices.Select(v => $"({v.X}, {v.Y})"));
                    Console.WriteLine($"Confidence: {(int)(face.DetectionConfidence * 100)}%; BoundingPoly: {poly}");
                }
            }
            catch (Exception e)
            {
                Console.WriteLine(e.Message);
            }
        }
    }
 
    class Credentials
    {
        public string type;
        public string project_id;
        public string private_key_id;
        public string private_key;
        public string client_email;
        public string client_id;
        public string auth_uri;
        public string token_uri;
        public string auth_provider_x509_cert_url;
        public string client_x509_cert_url;
    }
}


위 소스처럼 서비스 계정 키(json)의 내용을 코드에 직접 삽입 할 수도 있다.


※ 참고

Google.Cloud.Vision.V1


반응형
Posted by J-sean
: