반응형

파이게임과 2D Rigid Body Simulation Library Box2D를 사용해 보자.


다음 명령어로 Box2D를 설치한다.

pip install box2d


설치중 에러가 발생한다면 SWIG를 설치하고 설치 디렉토리를 시스템 변수 Path에 등록한다.

SWIG


SWIG를 설치하면 에러가 발생하지 않는다.


추가로 box2d-kengz를 설치한다.


player.png
0.00MB


1
2
3
4
5
6
7
8
9
10
11
12
13
14
15
16
17
18
19
20
21
22
23
24
25
26
27
28
29
30
31
32
33
34
35
36
37
38
39
40
41
42
43
44
45
46
47
48
49
50
51
52
53
54
55
56
57
58
59
60
61
62
63
64
65
66
67
68
69
70
71
72
73
74
75
76
77
78
79
80
81
82
83
84
85
86
87
88
89
import math
import pygame
from Box2D import *
 
pygame.init()
pygame.display.set_caption("Physics Test")
screen = pygame.display.set_mode((640480))
running = True
player = pygame.image.load("player.png").convert()
 
# World 정의
world = b2World(gravity=(09.8), doSleep=True)
 
# Ground 정의
groundBodyDef = b2BodyDef()
groundBodyDef.position = (0400)
groundBody = world.CreateBody(groundBodyDef)
groundShape = b2PolygonShape()
groundShape.SetAsBox(5000)
groundBody.CreateFixture(shape=groundShape)
#groundBody = world.CreateStaticBody(position=(0, 400), shapes=b2PolygonShape(box=(500, 0)))
# 위 정의와 동일
 
# Wall 정의
wallBodyDef = b2BodyDef()
wallBodyDef.position = (3000)
wallBody = world.CreateBody(wallBodyDef)
wallShape = b2PolygonShape()
wallShape.SetAsBox(0400)
wallBody.CreateFixture(shape=wallShape)
#wallBody = world.CreateStaticBody(position=(300, 0), shapes=b2PolygonShape(box=(0, 400)))
# 위 정의와 동일
 
# Player 정의
playerBodyDef = b2BodyDef()
playerBodyDef.type = b2_dynamicBody;
playerBodyDef.position = (00)
playerBodyDef.linearVelocity = (500)
playerBodyDef.angularVelocity = 0.2
playerBody = world.CreateBody(playerBodyDef)
playerShape = b2PolygonShape()
playerShape.SetAsBox(player.get_width()/2, player.get_height()/2)
playerFixtureDef = b2FixtureDef(shape=playerShape)
playerFixtureDef.density = 1
playerFixtureDef.friction = 0.5
playerFixtureDef.restitution = 0.7
playerBody.CreateFixture(playerFixtureDef)
#playerBody = world.CreateDynamicBody(position=(0, 0), linearVelocity=(50, 0),
#                                     angularVelocity=0.2)
#playerFixtureDef = playerBody.CreatePolygonFixture(box=(player.get_width()/2,
#                          player.get_height()/2), density=1, friction=0.5, restitution=0.7)
# 위 정의와 동일
 
timeStep = 1.0 / 300
vel_iters, pos_iters = 62
  
while running:
    for event in pygame.event.get():
        if event.type == pygame.QUIT:
            running = False
        elif event.type == pygame.KEYDOWN and event.key == pygame.K_SPACE:
            playerBody.transform = ((00), 0)
            playerBody.linearVelocity = (500)
            playerBody.angularVelocity = 0.2
        elif event.type == pygame.KEYDOWN and event.key == pygame.K_ESCAPE:
            running = False
    
    # Instruct the world to perform a single step of simulation. It is
    # generally best to keep the time step and iterations fixed.
    world.Step(timeStep, vel_iters, pos_iters)
    # Clear applied body forces. We didn't apply any forces, but you
    # should know about this function.
    world.ClearForces()
     
    screen.fill("white")
    pygame.draw.rect(screen, "brown", (040060020)) # Ground 그리기
    pygame.draw.rect(screen, "black", (300020400)) # Wall 그리기
 
    rotated_player = pygame.transform.rotate(player, playerBody.angle * 180/math.pi)
    # Unless rotating by 90 degree increments, the image will be padded larger to hold
    # the new size. If the image has pixel alphas, the padded area will be transparent.
    # Otherwise pygame will pick a color that matches the Surface colorkey or the topleft
    # pixel value.
    screen.blit(rotated_player, (playerBody.position[0- rotated_player.get_width()/2,
                                 playerBody.position[1- rotated_player.get_height()/2))
 
    pygame.display.flip()
    
pygame.quit()


코드를 입력하고 실행한다.


GIF 캡쳐 과정에서 화질이 많이 떨어졌지만 강체들의 물리 반응을 확인할 수 있다.


pygame.transform.rotate()

rotate an image
rotate(surface, angle) -> Surface

Unfiltered counterclockwise rotation. The angle argument represents degrees and can be any floating point value. Negative angle amounts will rotate clockwise.
Unless rotating by 90 degree increments, the image will be padded larger to hold the new size. If the image has pixel alphas, the padded area will be transparent. Otherwise pygame will pick a color that matches the Surface colorkey or the topleft pixel value.


배경을 바꾸거나 Colorkey를 설정하면 캐릭터 주변 패딩을 없앨 수 있다.


아래 링크에서 GUI를 구현해 본다.

2024.01.29 - [Python] - [Pygame] Pygame GUI 파이게임 그래픽 유저 인터페이스


※ 참고

PyBox2D

PyBox2D Manual


반응형
Posted by J-sean
:
반응형

SDL과 2D Rigid Body Simulation Library Box2D를 사용해 보자.


아래 링크에서 Box2D를 다운로드 받고 빌드한다. (CMake를 설치하고 build.bat를 실행하면 된다)

빌드가 완료되면 비주얼 스튜디오 프로젝트를 만들고 Include, Library 디렉토리를 적당히 설정한다.

Box2D


1
2
3
4
5
6
7
8
9
10
11
12
13
14
15
16
17
18
19
20
21
22
23
24
25
26
27
28
29
30
31
32
33
34
35
36
37
38
39
40
41
42
43
44
45
46
47
48
49
50
51
52
53
54
55
56
57
58
59
60
61
62
63
64
65
66
67
68
69
70
71
72
73
74
75
76
77
78
79
80
81
82
83
84
85
86
87
88
89
90
91
92
93
94
95
96
97
98
99
100
101
102
103
104
105
106
107
108
109
110
111
112
113
114
115
116
117
118
119
120
121
122
#include <iostream>
#include "SDL.h"
#include "box2d/box2d.h"
 
int main(int argc, char* argv[]) {
    SDL_Init(SDL_INIT_VIDEO);
    SDL_Window* window = SDL_CreateWindow("SDL Test", SDL_WINDOWPOS_UNDEFINED,
        SDL_WINDOWPOS_UNDEFINED, 640480, SDL_WINDOW_RESIZABLE);
    SDL_Renderer* renderer = SDL_CreateRenderer(window, -10);
    SDL_Surface* playerSurface = SDL_LoadBMP("player.bmp");
    SDL_Texture* texture = SDL_CreateTextureFromSurface(renderer, playerSurface);
 
    // World 정의
    b2Vec2 gravity(0.0f, 9.8f);
    b2World world(gravity);
 
    // Player 정의
    b2BodyDef playerBodyDef;
    playerBodyDef.type = b2_dynamicBody;
    playerBodyDef.position.Set(0.0f, 0.0f);
    playerBodyDef.linearVelocity = b2Vec2(50.0f, 0.0f);
    playerBodyDef.angularVelocity = 0.2f;
    b2Body* playerBody = world.CreateBody(&playerBodyDef);
 
    b2PolygonShape dynamicBox;
    dynamicBox.SetAsBox((float)playerSurface->/ 2, (float)playerSurface->/ 2);
 
    b2FixtureDef fixtureDef;
    fixtureDef.shape = &dynamicBox;
    fixtureDef.density = 1.0f;
    fixtureDef.friction = 0.3f;
    fixtureDef.restitution = 0.5f;
 
    playerBody->CreateFixture(&fixtureDef);
 
    // Ground 정의
    b2BodyDef groundBodyDef;
    groundBodyDef.position.Set(0.0f, 400.0f);
    b2Body* groundBody = world.CreateBody(&groundBodyDef);
 
    b2PolygonShape groundBox;
    groundBox.SetAsBox(500.0f, 0.0f);
 
    SDL_Rect groundRect = { 040050010 };
 
    groundBody->CreateFixture(&groundBox, 0.0f);
 
    // Wall 정의
    b2BodyDef wallBodyDef;
    wallBodyDef.position.Set(300.0f, 0.0f);
    b2Body* wallBody = world.CreateBody(&wallBodyDef);
 
    b2PolygonShape wallBox;
    wallBox.SetAsBox(0.0f, 480.0f);
 
    SDL_Rect wallRect = { 300010480 };
 
    wallBody->CreateFixture(&wallBox, 0.0f);
 
    float timeStep = 1.0f / 500.0f;
    int velocityIterations = 6;
    int positionIterations = 2;
 
    SDL_Event event;
    bool quit = false;
 
    while (!quit) {
        while (SDL_PollEvent(&event)) {
            switch (event.type) {
            case SDL_QUIT:
                quit = true;
                break;
            case SDL_KEYDOWN:
                printf("Key pressed: %s\n", SDL_GetKeyName(event.key.keysym.sym));
                if (event.key.keysym.sym == SDLK_SPACE) {
                    playerBody->SetTransform(b2Vec2(0.0f, 0.0f), 0.0f);
                    playerBody->SetLinearVelocity(b2Vec2(50.0f, 0.0f));
                    playerBody->SetAngularVelocity(0.2f);
                }
                if (event.key.keysym.sym == SDLK_ESCAPE)
                    quit = true;
                break;
 
            default:
                break;
            }
        }
 
        world.Step(timeStep, velocityIterations, positionIterations);
 
        SDL_SetRenderDrawColor(renderer, 255255255, SDL_ALPHA_OPAQUE);
        SDL_RenderClear(renderer);
 
        // Ground 그리기
        SDL_SetRenderDrawColor(renderer, 22014020, SDL_ALPHA_OPAQUE);
        SDL_RenderFillRect(renderer, &groundRect);
 
        // Wall 그리기
        SDL_SetRenderDrawColor(renderer, 646464, SDL_ALPHA_OPAQUE);
        SDL_RenderFillRect(renderer, &wallRect);
 
        // Player 그리기        
        b2Vec2 playerPosition = playerBody->GetPosition();
        SDL_Rect destRect = { (int)playerPosition.x - playerSurface->/ 2,
            (int)playerPosition.y - playerSurface->/ 2, playerSurface->w, playerSurface->h };
        SDL_RendererFlip flip = SDL_FLIP_NONE;
        float angle = playerBody->GetAngle() * (180 / (float)M_PI);
 
        //printf("%4.2f %4.2f %4.2f\n", playerPosition.x, playerPosition.y, angle);
 
        SDL_RenderCopyEx(renderer, texture, NULL&destRect, angle, NULL, flip);
        SDL_RenderPresent(renderer);
    }
 
    SDL_DestroyTexture(texture);
    SDL_FreeSurface(playerSurface);
    SDL_DestroyRenderer(renderer);
    SDL_DestroyWindow(window);
    SDL_Quit();
 
    return 0;
}


코드를 입력하고 빌드한다.


GIF 캡쳐 과정에서 화질이 많이 떨어졌지만 강체들의 물리 반응을 확인할 수 있다.


1
2
3
4
5
6
7
8
9
10
11
12
13
14
15
16
17
18
19
20
    // Player 정의
    b2BodyDef playerBodyDef;
    playerBodyDef.type = b2_dynamicBody;
    playerBodyDef.position.Set(0.0f, 0.0f);
    playerBodyDef.linearVelocity = b2Vec2(30.0f, 0.0f);
    playerBodyDef.angularVelocity = 1.0f;
    b2Body* playerBody = world.CreateBody(&playerBodyDef);
 
    //b2PolygonShape dynamicBox;
    //dynamicBox.SetAsBox((float)playerSurface->w / 2, (float)playerSurface->h / 2);
    b2CircleShape dynamicBox;
    dynamicBox.m_radius = (float)playerSurface->/ 2;
 
    b2FixtureDef fixtureDef;
    fixtureDef.shape = &dynamicBox;
    fixtureDef.density = 1.0f;
    fixtureDef.friction = 0.3f;
    fixtureDef.restitution = 0.5f;
 
    playerBody->CreateFixture(&fixtureDef);


Player 캐릭터의 충돌을 감지하는 Shape을 원으로 바꿔보자.


스프라이트는 사각형이지만 Circle Shape의 움직임을 보여준다.


※ 참고

Box2D Documentation


반응형
Posted by J-sean
:
반응형

2022.09.17 - [Electronics] - 직류 전원 공급 장치 DC Power Supply

위 링크에서 LTSpice로 시뮬레이션 한 DC Power Supply를 PSpice로 시뮬레이션 해 보자.


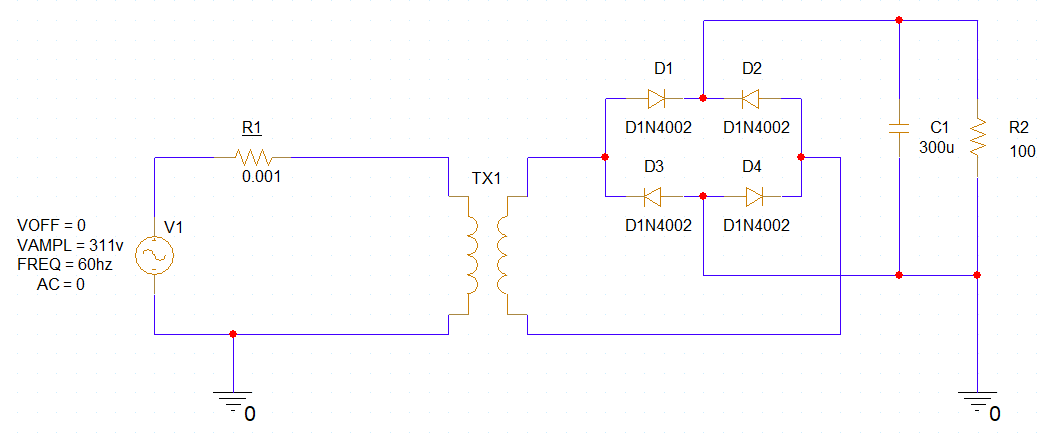
위 그림처럼 구성한다.

● Power: VSIN으로 추가한다. Serial Resistance로 R1(0.001Ω)도 추가해야 한다.

● Transformer: L로 추가한다. 두 개(L1, L2)를 추가하고 K-Linear를 추가해서 우클릭 - Edit Part - Part Properties - L1에 L1, L2에 L2를 입력한다.


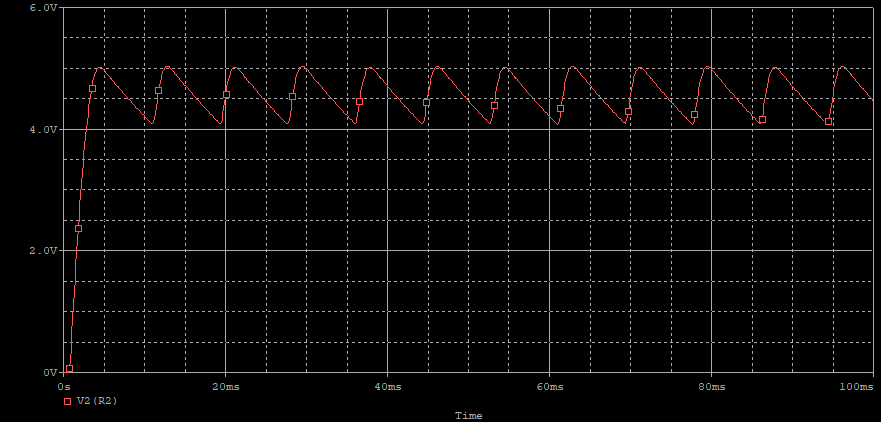
시뮬레이션 하면 약간 거친 그래프가 표시된다. 좀 더 부드러운 곡선으로 만들어 보자.


PSpice - Edit Simulation Profile - Transient options - Maximum Step Size 를 0.1m(or 더 작은 수)으로 변경한다.


부드러운 곡선으로 표시된다.


PSpice는 Transformer를 좀 더 간단히 만들 수 있다.

● XFRM_Linear로 추가하고 우클릭 - Edit Part - Part Properties - L1 VALUE에 2200µH, L2 VALUE에 1µH를 입력한다.


결과는 위와 같다.


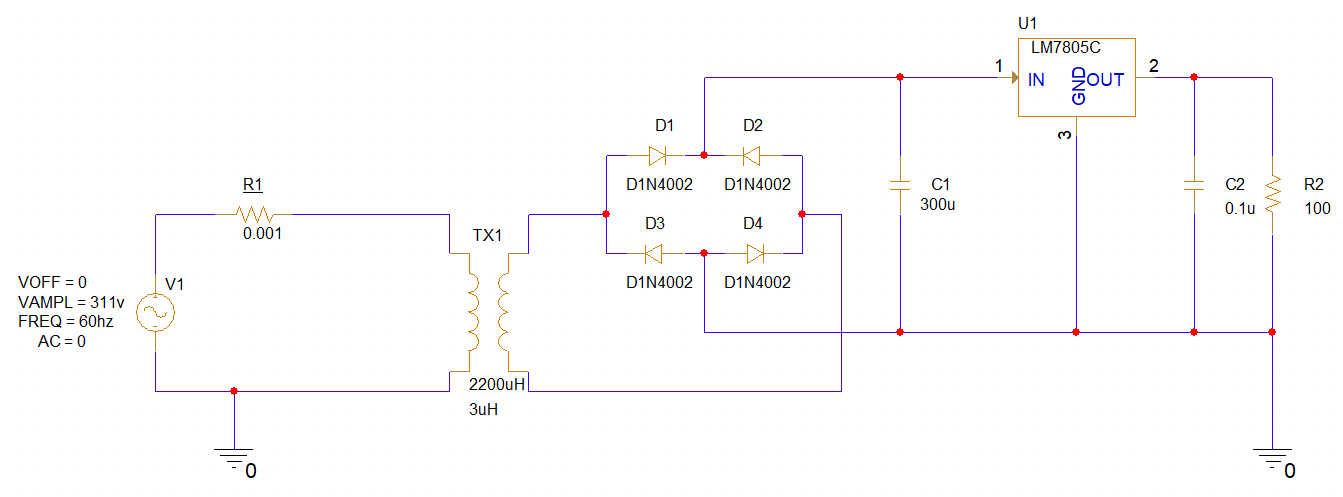
완벽한 직류 5V를 공급하기 위해 LM7805를 추가한다.

● Transformer: L2 VALUE는 3µH로 수정한다. 1µH로 출력되는 전압은 너무 작아 LM7805로 제대로 정류할 수 없다.

● C2: LM7805 OUT에 0.1µF Capacitor를 추가 연결한다.


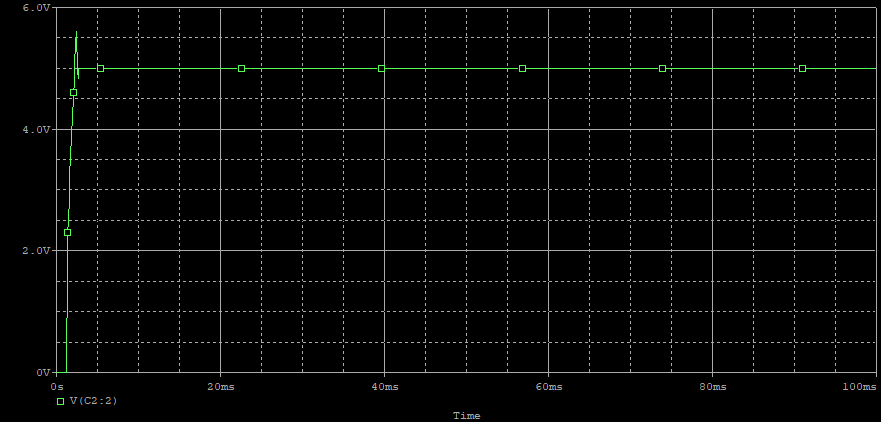
깨끗한 5VDC 전압이 출력된다.


반응형
Posted by J-sean
:
반응형

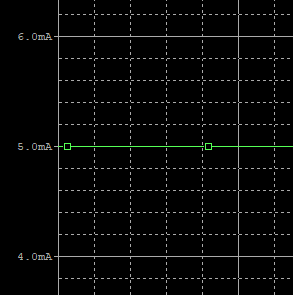
PSpice로 시뮬레이션 하면 전류 값이 음수로 나오는 경우가 있다.


R7 저항의 플러스 핀을 찍고 전류 값을 시뮬레이션 해 보자.


양수 값으로 제대로 표현된다.


이번엔 마이너스 핀에 찍고 시뮬레이션 해 보자.


전류 값이 음수로 표현된다.


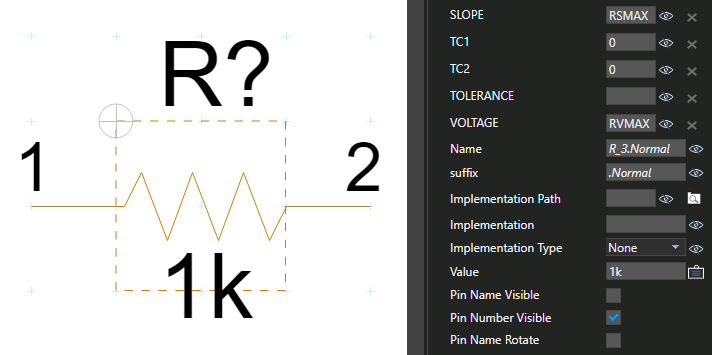
측정 위치가 플러스 인지 마이너스 인지에 따라서 부호가 바뀌는 거 같지만 다른 조건이 하나 더 있다. 1번 핀이 플러스 쪽에 연결되어야 한다. 핀 번호를 확인해보자.


저항을 우클릭하고 Edit Part를 선택한다.


Pin Number Visible을 선택하고 저장한다.


Pin Number가 표시된다.

시뮬레이션 결과에 전류 값이 음수로 나오거나 양수로 나오더라도 Legend에 -I(RX) 등으로 표시된다면 측정 위치와 핀 번호를 확인해 보자.


반응형
Posted by J-sean
:
반응형

간단한 전압분배기를 시뮬레이션 해 보자.


회로를 구성한다.


시뮬레이션 결과 Output의 전압은 3V이다.

V(output) = 3K/(3K+7K) X 10V


반응형
Posted by J-sean
:
반응형

What is meshing?

메쉬(meshing)는 모델을 finite elements라 불리는 작고 간단한 모양으로 분해하는 과정이다.

  • finite: 한정된, 유한한
  • element: 요소, 성분


elements는 모델의 기본 구성이다. Meshing은 복잡한 문제(모델)를 계산하기 쉬운 유한한(finite) 갯수의 요소(element)로 분해하는 것이라 할 수 있다. 시뮬레이션 소프트웨어는 복잡한 모델의 응력(stress)등을 계산하기 위해 방정식을 사용한다. 하지만 하나의 큰 모델을 한번의 계산할 수는 없다. 아래 그림과 같이 큰 모델을 수천, 수만개의 작은 요소로 분해하여 계산한다.


Creating Mesh

솔리드웍스 시뮬레이션에서 mesh를 만드는건 어렵지 않다. 시뮬레이션 트리 메쉬 아이콘에서 오른쪽 클릭하고 Create Mesh...를 선택하자.


메쉬 인터페이스가 열린다. 메쉬 만들기에는 2가지 방법이 있다. 솔리드웍스 공식 용어는 아니지만 Quck Mesh와 Advanced Mesh라는 방법이 있다고 생각하자. 두 방법 모두 이 메쉬 인터페이스를 사용한다.


Quick Mesh - The Simplest Way to Mesh Your Model

Qiuck Mesh는 복잡한 옵션이나 숫자를 생각할 필요가 없다. 요소의 밀도를 컨트롤 하는 슬라이더만 조정하면 된다. 슬라이더를 오른쪽으로 움직이면 미세하고 고운(fine) 요소를, 왼쪽으로 움직이면 굵고 거친(coarse) 요소를 얻을 수 있다. 미세하고 고운 요소로 이루어진 메쉬는 굵고 거친 요소의 메쉬보다 훨씬 많은 요소를 가진다.


모델의 평균적인 요소 사이즈는 슬라이더로 간단히 조정할 수 있다. 이 슬라이더에 숨겨진 강력한 알고리즘 덕분에 모든 요소의 사이즈를 변경하는건 굉장히 쉬워 졌지만 당신은 이 알고리즘이 모든걸 잘 해줄것이라 믿고 의지하는게 된다.


Advanced Mesh - Have Control Over the Mesh

Advanced Mesh는 Mesh Parameters 옵션을 선택하면 나타난다. 다양한 옵션으로 메쉬를 컨트롤 할 수 있다.


첫 번째 옵션은 사용할 메쉬 알고리즘이다. 이것은 CAD geometry에서 mesh를 생성할 방법을 결정한다. 사용 가능한 메쉬 알고리즘은 3가지가 있다: Standard mesh, Curvature-based mesh, Blended curvature-based mesh.


각 메쉬 생성 알고리즘은 다양한 세팅값을 제공한다.


Standard Mesh

Standard mesh는 솔리드웍스 시뮬레이션의 기본 메쉬 생성 방법이며 초보가 시작하기 좋은 방법이다. 간단한 구조의 모델에 잘 작동한다.


Curvature-based Mesh

Curvature-based Mesh는 요소의 최대, 최소 사이즈 값을 지정할 수 있다. 이 알고리즘은 작은 feature가 많은 구조에 적합하지만 단순한 구조에는 불필요한 요소가 추가될 수도 있다. 각기둥(prismatic) 모양에서 곡선(curved) 형태로 변화되는 구조에 매우 유용하다.


Blended Curvature-based Mesh

솔리드웍스 2016에 처음 소개된 Blended Curvature-based Mesh는 아주 작은 구조의 feature까지 meshing 할 수 있는 옵션을 제공하는 Curvature-based Mesh 알고리즘 확장판이라 할 수 있다. Calculate Minimum Element Size 옵션을 통해 자동으로 작은 구조의 feature 사이즈를 결정할 수 있다.


Mesh Controls

Mesh Control은 솔리드웍스 mesh 생성법 중 가장 수동적인(manually) 방법이다. Mesh Control은 특정 영역의 요소 사이즈를 지정함으로써 시스템 자원을 모델 전체가 아닌 특정 영역에 집중 할 수 있도록 해준다.


Mesh Control은 아래 그림의 바퀴 살과 같이 모델의 한 부분만 작은 feature를 가지는 경우 특히 유용하다.


크고 복잡한 모델을 시뮬레이션 하는 경우 Mesh Control은 필수적이다. 아래 그림의 중장비 예에서 하위 부품인 붐(boom)이 작동 중 하중을 충분히 견디는지 확인하기 위해 시뮬레이션이 진행 되었다. 모든 구조를 meshing 하기 위해 다양한 사이즈의 부품들과 함께 8개의 Mesh Control이 사용되었다.


붐(boom)에서 1개의 브라켓만 시물레이션시 그 구조가 간단하고 일관적이므로 Mesh Control은 필요 없다. 하지만 붐 전체는 크고 작은 다양한 사이즈의 많은 부품이 포함되기 때문에 적절한 mesh를 생성하기 위해 많은 Mesh Control이 필요하다. Mesh Control이 없다면 mesh 생성에 실패 하거나 운이 좋아 성공 하더라도 적절하지 않은 mesh를 생성하게 된다.


What's a good mesh?

좋은 메쉬 만들기는 어려운 작업이지만 솔리드웍스 시뮬레이션은 이를 쉽게 만들었다. Mesh를 오른쪽 클릭하고 Details...를 클릭하자. Mesh 품질을 결정하는 여러가지 항목의 리스트가 나타난다.


  • Maximum Aspect Ratio
  • Percentage of elements with Aspect Ratio < 3
  • Percentage of elements with Aspect Ratio > 10


What's the Aspect Ratio?

Aspect Ratio는 요소의 모양을 의미한다. 1이 가장 이상적인 상태다. 숫자가 커질수록 요소의 모양은 이상적인 상태에서 벗어나게 된다.


물론 Aspect Ratio가 단순히 모양만을 의미하지는 않지만 이를 이해하는 좋은 방법은 이것을 요소의 모양이라 가정하는 것이다. Aspect Ratio는 한 면(face)에서 맞은편 꼭지점(vertex)까지 잇는 법선(normal)들의 비율이라 정의할 수 있다. 아래 그림에서 볼 수 있듯이 Aspect Ratio가 높을수록 요소의 모양은 편향되게(비뚤어지게) 된다.


그럼 좋은 메쉬를 생성했다는건 어떻게 알 수 있을까? 완벽한 Aspect Ratio가 1이라는것은 알았으니 모든 요소의 Aspect Ratio가 1이 되면 된다. 하지만 그건 현실적으로 불가능하다. 그보다는 전체적인 요소의 Aspect Ratio가 낮은 값을 가지도록 하면 된다. 이는 Mesh Details에서 Percentage of elements with Aspect Ratio < 3, > 10 항목을 보면 확인할 수 있다.


이제 우리는 어떻게 Mesh를 생성하는지, 어떻게 Mesh Control을 이용해 Mesh를 향상시키는지 또, 좋은 Mesh를 생성했는지 판단할 수 있게 되었다. 이 3가지 내용이 솔리드웍스 시뮬레이션 Meshing의 기본이다.


출처: SOLIDWORKS Simulation Makes Meshing Easy. Too Easy?


반응형
Posted by J-sean
:

보호되어 있는 글입니다.
내용을 보시려면 비밀번호를 입력하세요.

보호되어 있는 글입니다.
내용을 보시려면 비밀번호를 입력하세요.