C# Default Value - 기본값

C# 2021. 12. 19. 13:00 |
반응형

default 키워드로 각 타입의 기본값을 확인 할 수 있다.


1
2
3
4
5
6
7
8
9
10
11
12
13
14
15
16
17
18
19
20
21
22
23
24
25
26
27
28
29
30
31
32
using System;
using System.Collections.Generic;
using System.Linq;
using System.Text;
using System.Threading.Tasks;
 
namespace CS
{
    using static System.Console;
 
    class Program
    {
        static void Main(string[] args)
        {
            int a = default;
            int b = default(int);
            WriteLine($"a: {a}");
            WriteLine($"b: {b}");
            WriteLine($"default(float): {default(float)}");
            WriteLine($"default(bool): {default(bool)}");
 
            WriteLine($"default(string): {default(string) ?? "null"}");
            string s = null;
            WriteLine($"string.IsNullOrEmpty(s): {string.IsNullOrEmpty(s)}");
 
            WriteLine("default(char): {0}"default(char== '\0' ? @"\0" : @"not \0");
            // char는 기본값으로 '\0'이 대입 되기 때문에 아래 명령은 아무것도 표시하지 않는다.
            // WriteLine($"default(char): {default(char)}");
            WriteLine("default(int[]): {0}"default(int[]) == null ? "null" : "not null");
        }
    }
}


반응형
Posted by J-sean
:

C# typeof - 타입 정보 확인

C# 2021. 12. 15. 14:36 |
반응형

타입의 정보를 알 수 있는 typeof 연산자는 System.Type 객체를 리턴한다.


1
2
3
4
5
6
7
8
9
10
11
12
13
14
15
16
17
18
19
20
21
22
23
24
25
26
27
28
29
30
31
32
33
34
35
36
37
38
39
40
41
42
43
44
45
46
47
48
49
50
51
52
53
54
55
56
using System;
using System.Collections.Generic;
using System.Linq;
using System.Text;
using System.Threading.Tasks;
 
using System.Reflection;
 
namespace CS
{
    using static System.Console;
 
    class Program
    {
        static void Main(string[] args)
        {
            Test testInstance = new Test();
            Type t = typeof(Test);
            MemberInfo[] members = t.GetMembers(BindingFlags.Instance | BindingFlags.Public | BindingFlags.NonPublic);
 
            WriteLine($"Class Full Name: {t.FullName}\n");
            foreach (MemberInfo member in members)
            {
                WriteLine($"Member: {member.ToString()}"); // == WriteLine($"({member})");
                WriteLine($"Name: {member.Name},\tType: {member.MemberType},\tClass: {member.DeclaringType}\n");
            }
 
            WriteLine($"testInstance.GetType(): {testInstance.GetType()}");
            WriteLine($"typeof(Test): {typeof(Test)}");
            WriteLine($"testInstance.GetType() == typeof(Test): {testInstance.GetType() == typeof(Test)}");
        }
    }
 
    class Test
    {
        int _a;
        int _b;
 
        public Test()
        {
            _a = 1;
            _b = 2;
        }
 
        public Test(int a, int b)
        {
            _a = a;
            _b = b;
        }
 
        private void Info()
        {
            WriteLine("Test Info.");
        }
    }
}


소스를 입력하고 빌드한다.


타입의 정보가 표시된다.


반응형
Posted by J-sean
:
반응형

Property Grid를 사용해 보자.


폼에 프로퍼티 그리드를 적당히 배치한다.


1
2
3
4
5
6
7
8
9
10
11
12
13
14
15
16
17
18
19
20
21
22
23
24
25
26
27
28
29
30
31
32
33
34
35
36
37
38
39
40
41
42
43
44
45
46
47
48
49
50
51
52
53
54
55
56
57
58
59
60
61
62
63
64
65
66
67
68
69
70
71
72
73
74
75
76
77
78
79
80
81
82
83
84
85
86
87
88
89
90
91
92
93
94
95
96
97
98
99
100
101
102
103
104
105
106
107
108
109
110
111
112
113
using System;
using System.Collections.Generic;
using System.ComponentModel;
using System.Data;
using System.Drawing;
using System.Linq;
using System.Text;
using System.Threading.Tasks;
using System.Windows.Forms;
 
namespace WindowsFormsApp1
{
    public partial class Form1 : Form
    {
        private Transcript ts = new Transcript();
 
        public Form1()
        {
            InitializeComponent();
 
            propertyGrid1.SelectedObject = ts;
        }
 
        private void propertyGrid1_PropertyValueChanged(object s, PropertyValueChangedEventArgs e)
        {
            switch (e.ChangedItem.Label)
            {
                case "Score_Math":
                    MessageBox.Show("수학 점수: " + e.ChangedItem.Value.ToString());
                    break;
 
                case "Score_Korean":
                    MessageBox.Show("국어 점수: " + e.ChangedItem.Value.ToString());
                    break;
 
                case "Score_English":
                    MessageBox.Show("영어 점수: " + e.ChangedItem.Value.ToString());
                    break;
 
                case "Rank_Math":
                    MessageBox.Show("수학 등수: " + e.ChangedItem.Value.ToString());
                    break;
 
                case "Rank_Korean":
                    MessageBox.Show("국어 등수: " + e.ChangedItem.Value.ToString());
                    break;
 
                case "Rank_English":
                    MessageBox.Show("영어 등수: " + e.ChangedItem.Value.ToString());
                    break;
 
                default:
                    MessageBox.Show("N/A");
                    break;
            }
        }
    }
 
    class Transcript
    {
        [Category("Score"), Description("수학 점수"), DisplayName("Score_Math")]
        public int Score_Math
        {
            get;
            set;
        }
 
        [Category("Score"), Description("국어 점수"), DisplayName("Score_Korean")]
        public int Score_Korean
        {
            get;
            set;
        }
 
        [Category("Score"), Description("영어 점수"), DisplayName("Score_English")]
        public int Score_English
        {
            get;
            set;
        }
 
        [Category("Rank"), Description("수학 등수"), DisplayName("Rank_Math")]
        public int Rank_Math
        {
            get;
            set;
        }
 
        [Category("Rank"), Description("국어 등수"), DisplayName("Rank_Korean")]
        public int Rank_Korean
        {
            get;
            set;
        }
 
        [Category("Rank"), Description("영어 등수"), DisplayName("Rank_English")]
        public int Rank_English
        {
            get;
            set;
        }
 
        public Transcript()
        {
            Score_Math = 96;
            Score_Korean = 94;
            Score_English = 98;
            Rank_Math = 2;
            Rank_Korean = 5;
            Rank_English = 3;
        }
    }
}


프로퍼티 그리드에 지정할 오브젝트로 만들 클래스를 정의하고 프로퍼티 값 변경 이벤트등 위와 같은 소스를 작성한다.


빌드하고 실행하면 위와 같은 화면이 나타난다.


각 항목의 값을 변경하면 지정된 이벤트가 발생한다.


프로퍼티 그리드 오브젝트 클래스 선언시 Default Property를 지정할 수 도 있다.


Default Property로 지정한 항목이 선택된 채 실행 된다.


반응형
Posted by J-sean
:
반응형

기존 타입에 메소드를 추가할 수 있는 확장 메소드를 사용해 보자.


1
2
3
4
5
6
7
8
9
10
11
12
13
14
15
16
17
18
19
20
21
22
23
24
25
26
27
28
29
using System;
using System.Collections.Generic;
using System.Linq;
using System.Text;
using System.Threading.Tasks;
 
namespace CS
{
    using static System.Console;
 
    class Program
    {
        static void Main(string[] args)
        {
            Random R = new Random();
            WriteLine($"myNumber: {R.myNumber(7)}.");
        }
    }
 
    static class RandomExtension
    {
        public static int myNumber(this Random r, int n)
        {
            int temp = r.Next(010);
            WriteLine($"temp: {temp}");
            return temp + n;
        }
    }
}


소스를 입력하고 빌드한다.


실행화면


Extension Methods


반응형
Posted by J-sean
:
반응형

입력 문자열 형식 에러 잡는 방법 두 가지를 알아보자.

Try-Catch 구문을 사용하거나 TryParse()를 사용할 수 있다.


1
2
3
4
5
6
7
8
9
10
11
12
13
14
15
16
17
18
19
20
21
22
23
24
25
26
27
28
29
30
31
32
33
34
35
36
37
38
39
40
41
42
43
44
45
46
47
48
49
50
using System;
using System.Collections.Generic;
using System.Linq;
using System.Text;
using System.Threading.Tasks;
 
namespace CS
{
    using static System.Console;
 
    class Program
    {
        static void Main(string[] args)
        {
            int age;
            string ageText;
 
            Write("Enter your age: ");
            ageText = ReadLine();
 
            // Try-Catch
            try
            {
                age = int.Parse(ageText);
                WriteLine($"You are {age * 12} months old.");
            }
            catch (FormatException exc)
            {
                WriteLine($"The age entered, {ageText}, is not valid: {exc.Message}");
            }
            catch (Exception exc)
            {
                WriteLine($"Unexpected error: {exc.Message}");
            }
            finally
            {
                WriteLine("Goodbye.");
            }
 
            // TryParse()
            if (int.TryParse(ageText, out age))
            {
                WriteLine($"You are {age * 12} months old.");
            } else
            {
                WriteLine($"The age entered, {ageText}, is not valid.");
            }
        }
    }
}


소스를 입력하고 빌드한다.


실행하고 숫자를 입력하면 아무 문제없이 출력된다.


숫자가 아닌 문자가 입력되면 에러가 발생하고 잘 처리된다.


반응형
Posted by J-sean
:
반응형

유저 컨트롤(dll)을 만들고 사용해 보자.


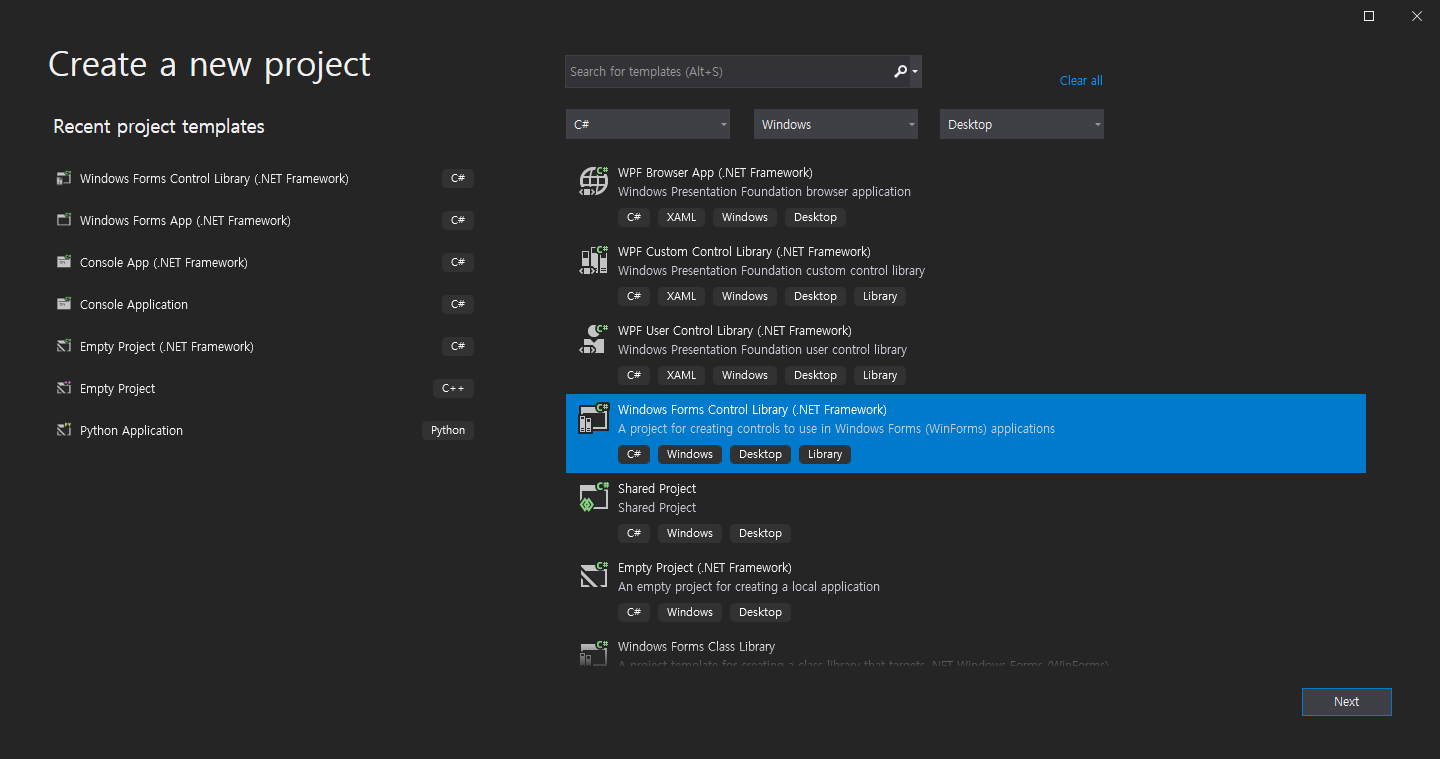
Windows Forms Control Library 프로젝트를 만든다.


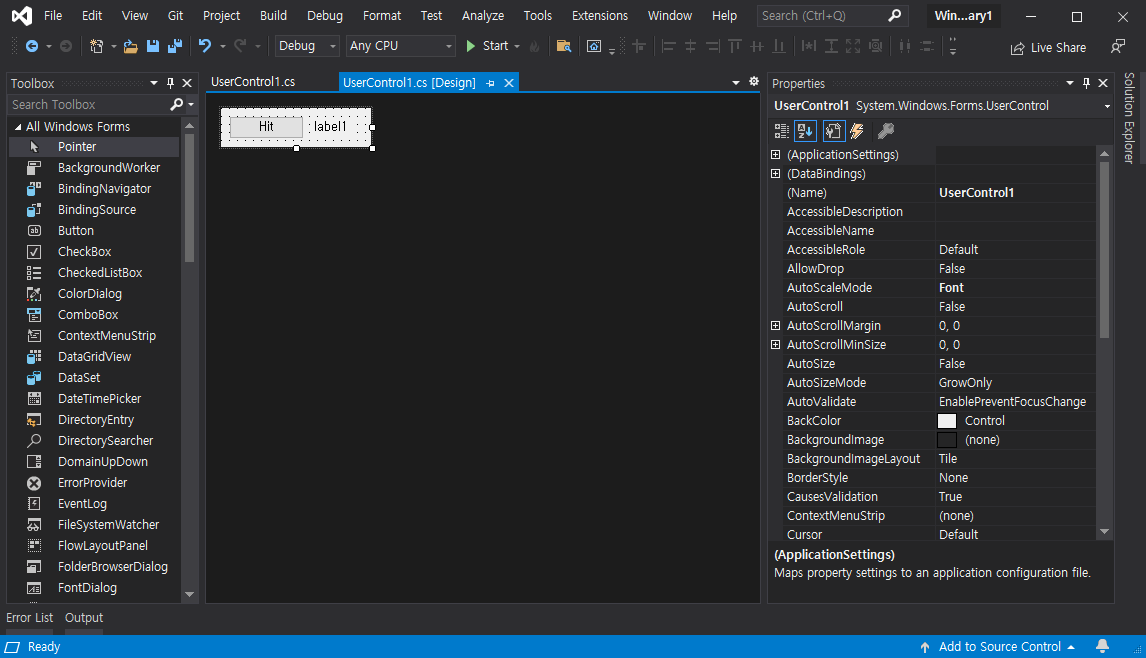
폼에 버튼과 레이블을 적당히 배치한다.


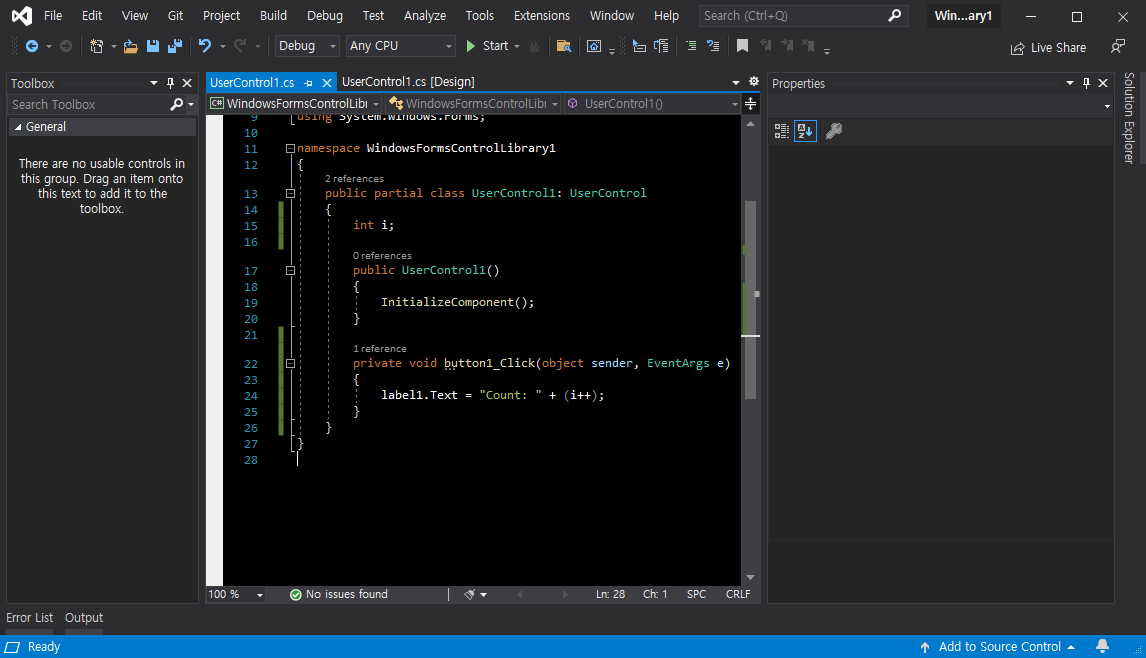
간단한 코드를 작성한다.


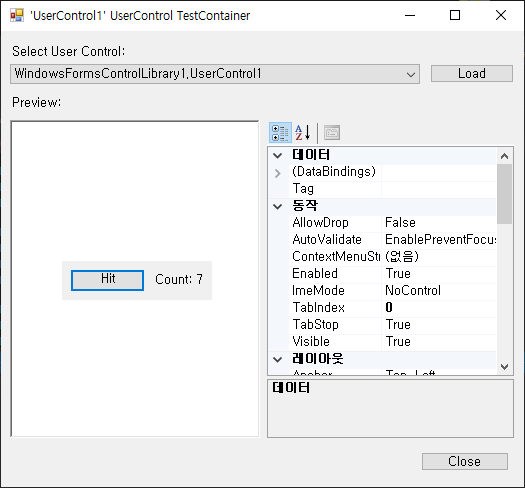
빌드하고 실행하면 컨트롤을 테스트하고 속성을 확인 할 수 있는 화면이 나타난다.


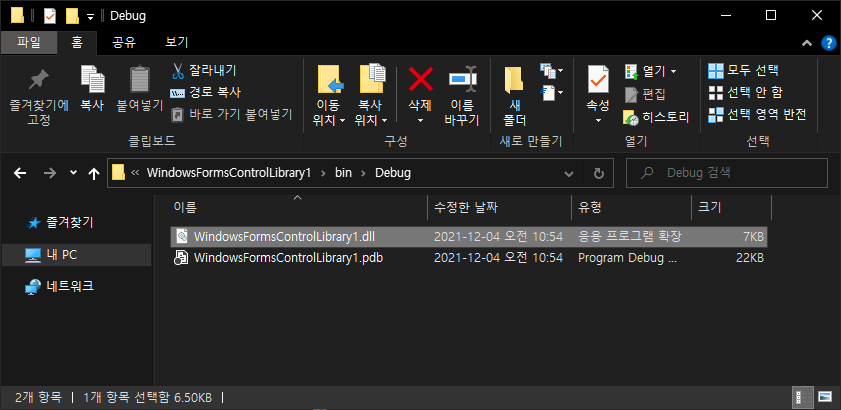
Output 폴더에 dll 파일이 생성 되었다.


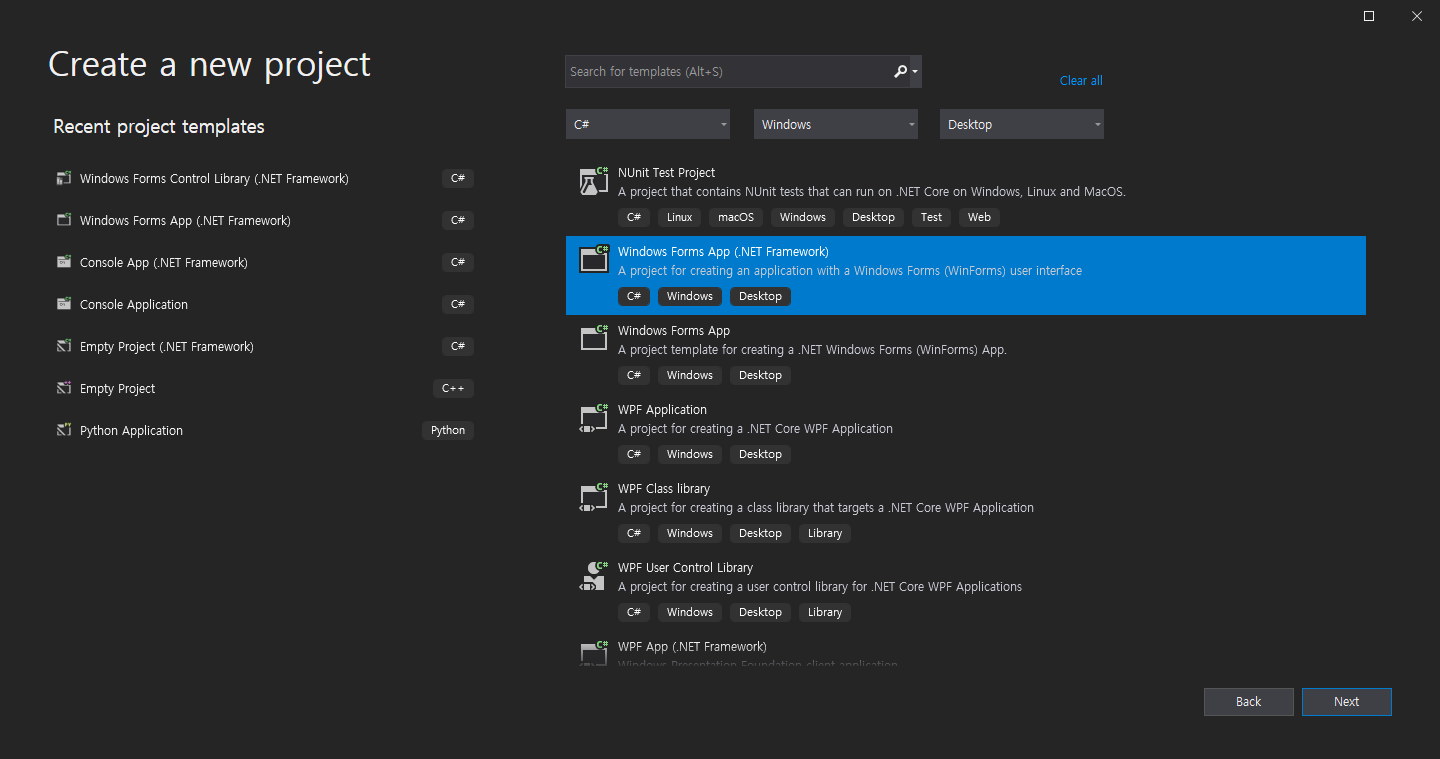
이번엔 Windows Forms App 프로젝트를 만든다.


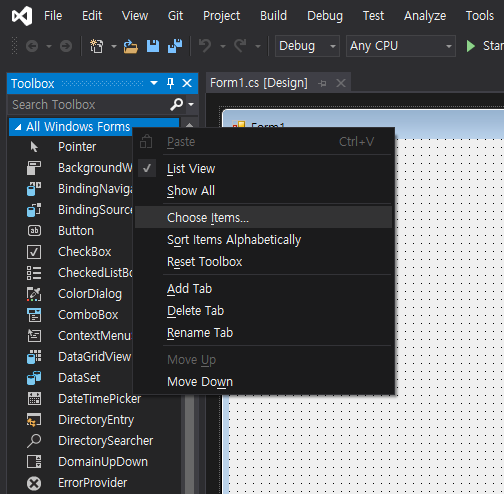
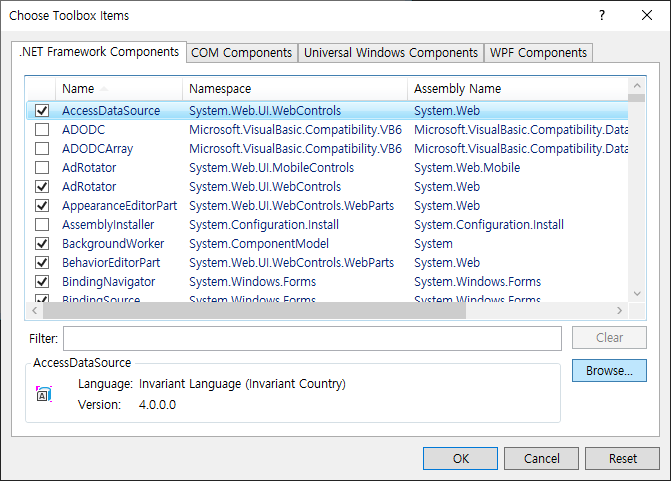
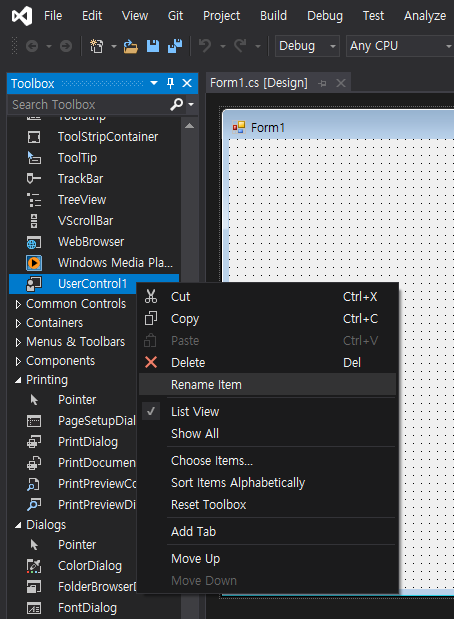
툴 박스에서 마우스 우클릭 - Choose Items... 를 선택한다.


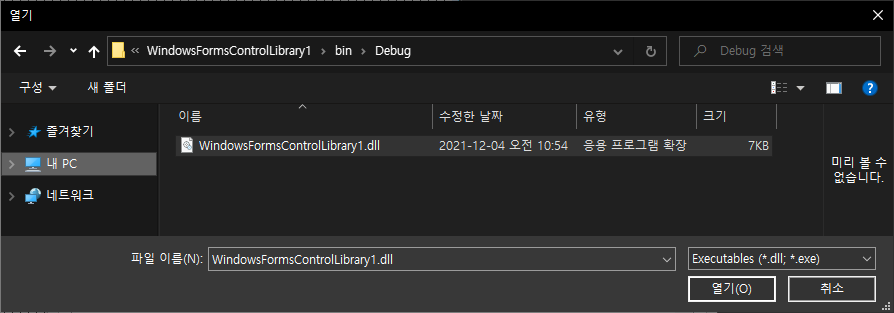
Browse... 를 클릭한다.


위에서 만든 컨트롤 dll 파일을 선택한다.


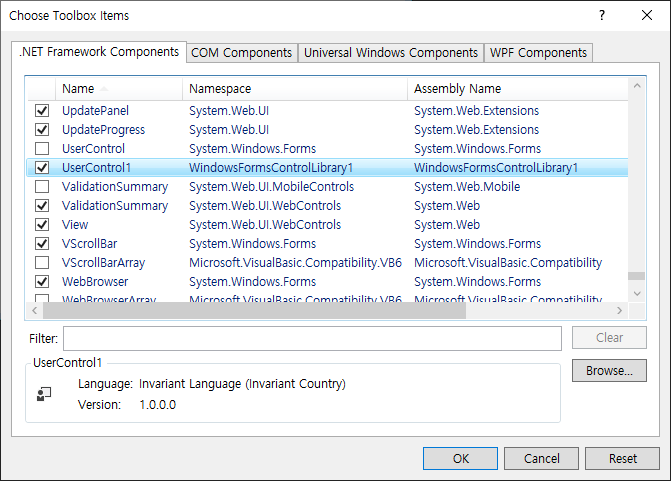
유저 컨트롤이 추가 되었다. OK를 클릭한다.


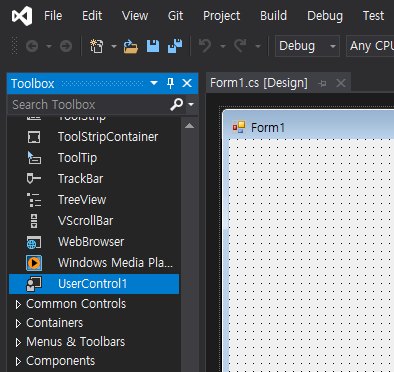
툴 박스에 자동으로 등록된다.


마우스 우클릭 - Rename Item 으로 이름을 바꿀 수 있다.


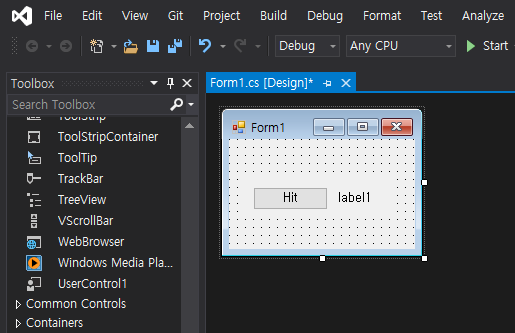
폼에 적당히 배치한다.


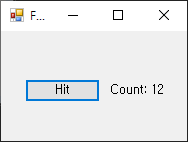
추가 코드 작성 없이 빌드하고 실행하면 잘 작동한다.

실행 파일(exe)과 컨트롤 라이브러리 파일(dll)을 함께 배포해야 한다.


반응형
Posted by J-sean
:
반응형

C# 폼 디자이너에서 폼은 더블 버퍼링 속성을 적용할 수 있지만 대부분의 컨트롤은 더블 버퍼링 속성이 보이지 않는다.

컨트롤에 더블 버퍼링을 적용해 보자.


폼 속성에 있는 더블 버퍼링


폼에 PictureBox, Panel, Timer, Button을 적당히 배치한다.


1
2
3
4
5
6
7
8
9
10
11
12
13
14
15
16
17
18
19
20
21
22
23
24
25
26
27
28
29
30
31
32
33
34
35
36
37
38
39
40
41
42
43
44
45
46
47
48
49
50
51
52
53
54
55
56
57
58
59
60
61
62
63
64
using System;
using System.Collections.Generic;
using System.ComponentModel;
using System.Data;
using System.Drawing;
using System.Linq;
using System.Text;
using System.Threading.Tasks;
using System.Windows.Forms;
 
namespace WindowsFormsApp1
{
    public partial class Form1 : Form
    {
        Bitmap myBitmap;
 
        public Form1()
        {
            InitializeComponent();
 
            timer1.Enabled = true;
            timer1.Interval = 100;
        }
 
        private void button1_Click(object sender, EventArgs e)
        {
            try
            {
                OpenFileDialog dlg = new OpenFileDialog();
                if (dlg.ShowDialog() == DialogResult.OK)
                {
                    myBitmap = new Bitmap(dlg.FileName);
                }
                dlg.Dispose();
            }
            catch (Exception exc)
            {
                MessageBox.Show(exc.Message);
            }
        }
 
        private void pictureBox1_Paint(object sender, PaintEventArgs e)
        {
            if (myBitmap != null)
            {
                e.Graphics.DrawImage(myBitmap, 00);
            }
        }
 
        private void panel1_Paint(object sender, PaintEventArgs e)
        {
            if (myBitmap != null)
            {
                e.Graphics.DrawImage(myBitmap, 00);
            }
        }
 
        private void timer1_Tick(object sender, EventArgs e)
        {
            pictureBox1.Invalidate();
            panel1.Invalidate();
        }
    }
}


소스를 입력하고 빌드한다.


실행하면 PictureBox는 깜빡이지 않지만 Panel에 그려진 이미지는 심하게 깜빡인다.

PictureBox는 기본적으로 더블 버퍼링이 적용되어 있다.


1
2
3
System.Reflection.PropertyInfo controlProperty = typeof(System.Windows.Forms.Control).GetProperty("DoubleBuffered",
    System.Reflection.BindingFlags.NonPublic | System.Reflection.BindingFlags.Instance);
Text = controlProperty.GetValue(pictureBox1).ToString();


위 명령어를 실행하면 타이틀 바에 True가 표시된다.


Panel 클래스를 상속하고 더블 버퍼링 속성을 적용한 클래스를 정의해 보자.


Panel 클래스를 상속하는 DoubleBufferedPanel 클래스를 정의한다.

DoubleBuffered 프로퍼티는 protected로 지정되어 있기 때문에 자식 클래스에서 접근이 가능하다.

protected virtual bool DoubleBuffered { get; set; }


디자이너 소스에서 DoubleBufferedPanel 클래스로 Panel 오브젝트를 생성하도록 수정한다.

다시 컴파일 하고 실행하면 Panel에 표시된 이미지도 더 이상 깜빡이지 않는다.


하지만 컴파일 에러는 없지만 폼 디자이너에서 위와 같은 에러가 발생한다.

The service System.Windows.Forms.Design.ISelectionUIService already exists in the service container. Parameter name: serviceType


이번엔 컨트롤에 더블 버퍼링을 적용할 수 있는 함수를 만들어 보자.


1
2
3
4
5
6
7
// This helper method will not turn on double buffering if the person is running in remote desktop.
public static void SetDoubleBuffering(System.Windows.Forms.Control control, bool value)
{
    System.Reflection.PropertyInfo controlProperty = typeof(System.Windows.Forms.Control).GetProperty("DoubleBuffered",
        System.Reflection.BindingFlags.NonPublic | System.Reflection.BindingFlags.Instance);
    controlProperty.SetValue(control, value, null);
}


DoubleBufferedPanel 클래스 관련 내용을 삭제하고 SetDoubleBuffering()을 정의한다.

생성자나 다른 필요한 곳에서 SetDoubleBuffering(panel1, true)와 같이 설정하면 컨트롤에 더블 버퍼링이 적용되고 폼 디자이너도 에러가 발생하지 않는다.


반응형
Posted by J-sean
:
반응형

시스템 정보를 모두 확인해 보자.


폼에 리스트 박스와 텍스트 박스를 적절히 배치한다.

텍스트 박스 속성

Multiline = True

ScrollBars = Vertical


1
2
3
4
5
6
7
8
9
10
11
12
13
14
15
16
17
18
19
20
21
22
23
24
25
26
27
28
29
30
31
32
33
34
35
36
37
38
39
40
41
42
43
44
45
46
47
48
49
50
51
52
53
54
55
56
57
58
59
60
61
62
63
64
65
66
67
68
69
70
using System;
using System.Collections.Generic;
using System.ComponentModel;
using System.Data;
using System.Drawing;
using System.Linq;
using System.Text;
using System.Threading.Tasks;
using System.Windows.Forms;
 
using System.Reflection;
 
namespace WindowsFormsApp1
{
    public partial class Form1 : Form
    {
        public Form1()
        {
            InitializeComponent();
 
            Type t = typeof(System.Windows.Forms.SystemInformation);
            PropertyInfo[] pi = t.GetProperties();
            for (int i = 0; i < pi.Length; i++)
                listBox1.Items.Add(pi[i].Name);
 
            textBox1.Text = "The SystemInformation class has " + pi.Length.ToString() + " properties.\r\n";
 
            // 한 가지 프로퍼티만 필요하다면 아래와 같이 알아낼 수 있다.
            //string propertyName = "CaptionHeight";
            //PropertyInfo propertyValue = t.GetProperty(propertyName);
            //textBox1.Text = "The value of the " + propertyName + " property is: " + propertyValue.GetValue(null, null).ToString();
        }
 
        private void listBox1_SelectedIndexChanged(object sender, EventArgs e)
        {
            // Return if no list item is selected.
            if (listBox1.SelectedIndex == -1return;
            // Get the property name from the list item.
            string propname = listBox1.Text;
 
            if (propname == "PowerStatus")
            {
                // Cycle and display the values of each property of the PowerStatus property.
                textBox1.Text += "\r\nThe value of the PowerStatus property is:";
                Type t = typeof(System.Windows.Forms.PowerStatus);
                PropertyInfo[] pi = t.GetProperties();
                for (int i = 0; i < pi.Length; i++)
                {
                    object propval = pi[i].GetValue(SystemInformation.PowerStatus, null);
                    textBox1.Text += "\r\n    PowerStatus." + pi[i].Name + " is: " + propval.ToString();
                }
            }
            else
            {
                // Display the value of the selected property of the SystemInformation type.
                Type t = typeof(System.Windows.Forms.SystemInformation);
                PropertyInfo[] pi = t.GetProperties();
                PropertyInfo prop = null;
                for (int i = 0; i < pi.Length; i++)
                    if (pi[i].Name == propname)
                    {
                        prop = pi[i];
                        break;
                    }
                object propval = prop.GetValue(nullnull);
                textBox1.Text += "\r\nThe value of the " + propname + " property is: " + propval.ToString();
            }
        }
    }
}


소스를 입력하고 빌드한다.


실행하면 위와 같은 화면이 나온다.


리스트 박스의 속성 아이템을 선택하면 텍스트 박스에 속성값이 표시된다.


1
2
3
4
5
6
7
8
9
10
11
12
13
14
15
16
17
18
19
20
21
22
23
24
25
26
27
using System;
using System.Collections.Generic;
using System.ComponentModel;
using System.Data;
using System.Drawing;
using System.Linq;
using System.Text;
using System.Threading.Tasks;
using System.Windows.Forms;
 
namespace WindowsFormsApp1
{
    public partial class Form1 : Form
    {
        public Form1()
        {
            InitializeComponent();            
        }
 
        private void Form1_Paint(object sender, PaintEventArgs e)
        {
            e.Graphics.DrawString(System.Windows.Forms.SystemInformation.BorderSize.ToString(), Font, Brushes.Black, 1010);
            e.Graphics.DrawString(System.Windows.Forms.SystemInformation.CursorSize.ToString(), Font, Brushes.Black, 1030);
            e.Graphics.DrawString(System.Windows.Forms.SystemInformation.CaptionHeight.ToString(), Font, Brushes.Black, 1050);
        }
    }
}


위와 같이 간단히 몇 개만 조사할 수도 있다.


반응형
Posted by J-sean
: