반응형

콘솔 환경에서 키 입력을 확인해 보자.


1
2
3
4
5
6
7
8
9
10
11
12
13
14
15
16
17
18
19
20
21
22
23
24
25
26
27
28
29
30
31
32
33
34
35
36
37
38
39
40
using System;
using System.Collections.Generic;
using System.Linq;
using System.Text;
using System.Threading.Tasks;
 
namespace ConsoleApp1
{
    class Program
    {
        static void Main(string[] args)
        {
            Console.TreatControlCAsInput = true;
            // Prevent example from ending if CTL+C is pressed.
            ConsoleKeyInfo consoleKeyInfo;
 
            for (int i = 0; i < 10; i++)
            {
                while (Console.KeyAvailable)
                {
                    consoleKeyInfo = Console.ReadKey(true);
                    // Obtains the next character or function key pressed by the user.
                    // 'true' to not display the pressed key; otherwise, false.
 
                    if ((consoleKeyInfo.Modifiers & ConsoleModifiers.Control) != 0
                        && consoleKeyInfo.Key == ConsoleKey.C)
                    // if (consoleKeyInfo.Key == ConsoleKey.Escape)
                    {
                        Console.WriteLine("Stopped.");
                        return;
                    }
                }
                // 모든 입력을 바로 처리하기 위해(입력 버퍼 비우기) if()가 아닌 while() 사용.
 
                Console.WriteLine(i + 1);
                System.Threading.Thread.Sleep(1000);
            }
        }
    }
}


소스를 입력하고 빌드한다.


프로그램을 실행하고 Ctrl+C를 누르면 정지된다.


반응형
Posted by J-sean
:
반응형

콘솔에서 간단한 메세지를 주고 받는 서버, 클라이언트를 만들어 보자.


1
2
3
4
5
6
7
8
9
10
11
12
13
14
15
16
17
18
19
20
21
22
23
24
25
26
27
28
29
30
31
32
33
34
35
36
37
38
39
40
41
42
43
44
45
46
47
48
49
50
51
52
53
54
55
56
57
58
59
using System;
using System.Collections.Generic;
using System.Linq;
using System.Text;
using System.Threading.Tasks;
 
using System.Net;
using System.Net.Sockets;
 
namespace Server
{
    class Program
    {
        static void Main(string[] args)
        {
            IPEndPoint serverEndPoint = new IPEndPoint(IPAddress.Parse("192.168.0.100"), 7777);
            Socket server = new Socket(AddressFamily.InterNetwork, SocketType.Stream, ProtocolType.Tcp);
 
            Console.WriteLine("■ Server Info:");
            Console.WriteLine("IP Address : {0}", serverEndPoint.Address);
            Console.WriteLine("Port Number: {0}", serverEndPoint.Port);
            Console.WriteLine("AddressFamily : {0}", serverEndPoint.AddressFamily);
 
            // Associates a Socket with a local endpoint.
            server.Bind(serverEndPoint);
 
            // Places a Socket in a listening state.
            // Parameter: The maximum length of the pending connections queue.
            server.Listen(5);
 
            Console.WriteLine("Waiting for a client...");
 
            // Creates a new Socket for a newly created connection.
            Socket client = server.Accept();
 
            IPEndPoint clientEndPoint = (IPEndPoint)client.RemoteEndPoint;
            Console.WriteLine("Client connected: {0}", clientEndPoint.Address);
 
            byte[] sendBuff = Encoding.UTF8.GetBytes("Connected to the server.");
            // Sends the specified number of bytes of data to a connected Socket, using the specified SocketFlags.
            client.Send(sendBuff, sendBuff.Length, SocketFlags.None);
 
            byte[] recvBuff = new byte[256];
            // Receives data from a bound Socket into a receive buffer.
            // Return: The number of bytes received.
            if (client.Receive(recvBuff) != 0)
            {
                Console.WriteLine("Message from a client: " + Encoding.UTF8.GetString(recvBuff));
            } else
            {
                Console.WriteLine("No message.");
            }
 
            // Closes the Socket connection and releases all associated resources.
            client.Close();
            server.Close();
        }
    }
}


서버 소스


1
2
3
4
5
6
7
8
9
10
11
12
13
14
15
16
17
18
19
20
21
22
23
24
25
26
27
28
29
30
31
32
using System;
using System.Collections.Generic;
using System.Linq;
using System.Text;
using System.Threading.Tasks;
 
using System.Net;
using System.Net.Sockets;
 
namespace Client
{
    class Program
    {
        static void Main(string[] args)
        {
            IPEndPoint serverEndPoint = new IPEndPoint(IPAddress.Parse("192.168.0.100"), 7777);
            Socket client = new Socket(AddressFamily.InterNetwork, SocketType.Stream, ProtocolType.Tcp);
 
            // Establishes a connection to a remote host.
            client.Connect(serverEndPoint);
            Console.WriteLine("Connecting to the server...");
 
            byte[] recvBuff = new byte[256];
            client.Receive(recvBuff);
            Console.WriteLine("Message from the server: " + Encoding.UTF8.GetString(recvBuff));
 
            client.Send(Encoding.UTF8.GetBytes("Hello."));
 
            client.Close();
        }
    }
}


클라이언트 소스


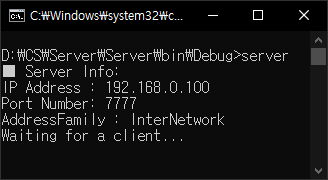
서버를 실행 시키면 클라이언트를 기다린다.


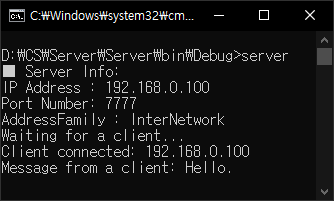
클라이언트를 실행 시키면 대기중인 서버와 연결되고 메세지를 주고 받는다.


서버에도 클라이언트로부터 받은 메세지가 표시된다.


반응형
Posted by J-sean
:
반응형

리눅스(우분투) 서버 같은 콘솔 환경에서도 비디오 플레이어를 사용할 수 있다.


mpv를 설치한다.


--vo=drm 옵션, 영상 파일 이름과 함께 실행한다.


자막 파일이 있다면 자막도 표시된다. 주요 단축키 목록은 아래와 같다.


  • LEFT and RIGHT: Seek backward/forward 5 seconds. Shift+arrow does a 1 second exact seek

  • UP and DOWN: Seek forward/backward 1 minute. Shift+arrow does a 5 second exact seek

  • p / SPACE: Pause (pressing again unpauses).

  • q: Stop playing and quit.

  • Q: Like q, but store the current playback position. Playing the same file later will resume at the old playback position if possible.

  • 9 and 0: Decrease/increase volume.

  • m: Mute sound.

  • o (also P): Show progression bar, elapsed time and total duration on the OSD.

  • O: Toggle OSD states between normal and playback time/duration.

  • v: Toggle subtitle visibility.

  • z and Z: Adjust subtitle delay by +/- 0.1 seconds. The x key does the same as Z currently, but use is discouraged.

  • r and R: Move subtitles up/down. The t key does the same as R currently, but use is discouraged.

  • s: Take a screenshot.

  • S: Take a screenshot, without subtitles. (Whether this works depends on VO driver support.)

  • Shift+PGUP and Shift+PGDWN: Seek backward or forward by 10 minutes. (This used to be mapped to PGUP/PGDWN without Shift.)

  • 1 and 2: Adjust contrast.

  • 3 and 4: Adjust brightness.

  • 5 and 6: Adjust gamma.

  • 7 and 8: Adjust saturation.


반응형
Posted by J-sean
:
반응형

리눅스(우분투) 서버 같은 콘솔 환경에서도 Ogg, MP3, WAV 등의 음악 파일을 재생 할 수 있다.


cmus(C* Music Player)를 설치한다.


설치가 완료되면 cmus를 실행한다.


cmus가 실행되고 아무것도 표시되지 않는다. 방향키, 엔터등을 눌러도 아무런 반응이 없지만 당황하지 말고 숫자 5를 누른다.


Browser가 표시된다. 음악 파일이 있는 디렉토리로 이동한다.


원하는 파일에서 엔터키를 누르면 플레이 된다. 하지만 선택한 1개의 파일만 플레이 되므로 간단한 사용방법을 알아 보자.


각 파일에서 a키(add to library)를 눌러 준다. (y키를 누르면 playlist로 추가된다)


숫자 1을 누른다. Library 화면이 표시되고 위에서 add한 파일이 모두 추가 되었다. 원하는 곡에서 엔터키를 눌러 플레이 할 수 있다. (Artist/Album과 Track은 Tab키로 이동한다)


숫자 2를 누르면 Sorted 화면이 표시된다.


숫자 3을 누르면 Playlist 화면이 표시된다.


숫자 4를 누르면 Queue 화면이 표시된다. Queue에 추가(e)되는 노래는 순서를 무시하고 지금 재생되는 노래 다음에 재생된다. 재생 후 queue에서 자동 삭제된다.


숫자 5를 누르면 Browser 화면이 표시된다.


숫자 6을 누르면 Filters 화면이 표시된다.


숫자 7을 누르면 Settings 화면이 표시된다. 각 단축키를 확인할 수 있다. 아래는 주요 단축키 목록이다.

  • x: play

  • v: stop

  • c: pause

  • b: next

  • z: prev

  • right: seek +5

  • left: seek -5

  • -: vol -10%

  • +/=: vol +10%

  • C(대문자): toggle continue

  • r: toggle repeat

  • s: toggle shuffle

  • t: toggle show_remaining_time

  • a: add(to library)

  • e: add(to queue)

  • y: add(to playlist)

  • delete: remove

  • q: quit


WAV 파일은 aplay로 간단히 재생할 수 있다.


반응형
Posted by J-sean
:
반응형

Console에 이미지를 디스플레이 하는 간단한 코드.

윈도우 어플리케이션처럼 이미지가 지워졌을때 다시 그려주는 코드가 없기 때문에 커서 이동, 마우스 클릭등으로 이미지가 지워져도 다시 그려주지는 않는다.


1
2
3
4
5
6
7
8
9
10
11
12
13
14
15
16
17
18
19
20
21
22
23
24
25
26
27
28
29
30
31
#include<stdio.h>
#include<Windows.h>
 
int main(void)
{
    printf("Image loading...\n");
    Sleep(100); // 콘솔이 나타날때까지 잠시 멈추지 않으면 이미지가 표시되지 않는 경우가 생긴다.
 
    HWND hWnd = GetConsoleWindow();
    // Retrieves the window handle used by the console associated with the calling process.
 
    HBITMAP hImage, hOldBitmap;
 
    HDC hDC = GetDC(hWnd);
    HDC hMemDC = CreateCompatibleDC(hDC);
 
    hImage = (HBITMAP)LoadImage(NULL, TEXT("cat.bmp"), IMAGE_BITMAP, 00, LR_LOADFROMFILE | LR_CREATEDIBSECTION);
    // Loads an icon, cursor, animated cursor, or bitmap.
 
    hOldBitmap = (HBITMAP)SelectObject(hMemDC, hImage);
    BitBlt(hDC, 505050 + 61250 + 409, hMemDC, 00, SRCCOPY); // Image(612, 409) at (50, 50)
    // The BitBlt function performs a bit-block transfer of the color data corresponding to a rectangle of pixels
    // from the specified source device context into a destination device context.
 
    SelectObject(hMemDC, hOldBitmap);
    DeleteObject(hImage);
    DeleteDC(hMemDC);
    ReleaseDC(hWnd, hDC);
 
    return 0;
}
cs


결과:


반응형

'C, C++' 카테고리의 다른 글

Qt 스프라이트 애니매이션  (0) 2019.02.21
Qt 설치 및 간단한 사용 예  (4) 2019.01.16
How to install and use JsonCpp - JsonCpp 설치 및 사용  (2) 2019.01.08
Python C API  (0) 2018.11.21
MySQL C API  (0) 2018.11.20
Posted by J-sean
: