

[raylib] Particle 파티클 (Snow)
SDL, raylib 2025. 5. 4. 01:21 |raylib로 간단한 파티클 시스템을 만들어 보자.
|
1
2
3
4
5
6
7
8
9
10
11
12
13
14
15
16
17
18
19
20
21
22
23
24
25
26
27
28
29
30
31
32
33
34
35
36
37
38
39
40
41
42
43
44
45
46
47
48
49
50
51
52
53
54
55
56
57
58
59
60
61
62
63
64
65
66
67
68
69
|
#include "raylib.h"
const int screenWidth = 640;
const int screenHeight = 480;
Texture2D texture;
class Particles {
private:
Vector2 position;
Vector2 velocity;
public:
Particles() {
Reset();
}
void Draw_particle() {
//DrawPixel(position.x, position.y, WHITE);
//DrawCircle(position.x, position.y, 10, WHITE);
DrawTexture(texture, position.x, position.y, WHITE);
position.x += velocity.x;
position.y += velocity.y;
if (position.x > screenWidth || position.y > screenHeight)
Reset();
}
void Reset() {
position.x = GetRandomValue(-screenWidth * 0.4f, screenWidth);
position.y = GetRandomValue(-screenHeight * 2, 0);
float max = 10000.0f;
velocity.x = (GetRandomValue(1, (int)max) / max) * 0.5f;
velocity.y = (GetRandomValue(1, (int)max) / max) + 0.8f;
}
};
int main(void)
{
//SetConfigFlags(FLAG_WINDOW_TRANSPARENT | FLAG_WINDOW_UNDECORATED);
InitWindow(screenWidth, screenHeight, "raylib example");
// InitWindow() 실행시 내부에서 SetRandomSeed()를 time(NULL)로 초기화 한다.
// particle 생성시 GetRandomValue()를 사용하므로 InitWindow() 이후에 생성한다.
SetTargetFPS(60);
texture = LoadTexture("snow.png");
// NOTE: Textures MUST be loaded after Window initialization (OpenGL context is required)
const int number_particles = 400;
Particles particles[number_particles];
while (!WindowShouldClose())
{
BeginDrawing();
ClearBackground(BLACK);
for (int i = 0; i < number_particles; i++)
particles[i].Draw_particle();
DrawFPS(0, 0);
EndDrawing();
}
UnloadTexture(texture);
CloseWindow();
return 0;
}
|
특별한 설정 없이도 png 파일의 알파 채널을 인식한다.
소스를 입력하고 빌드한다.
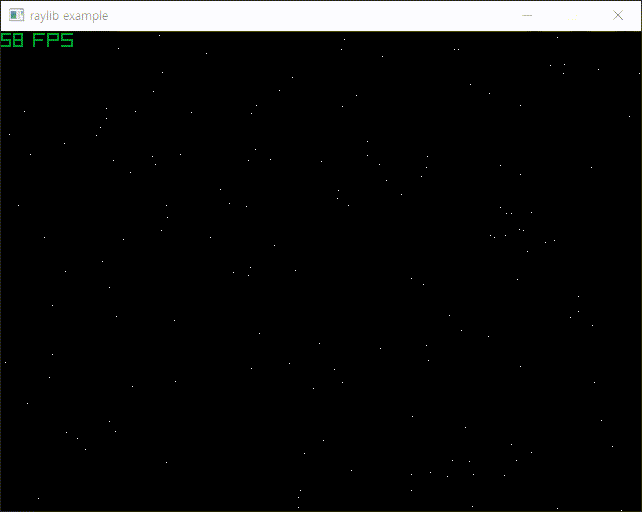
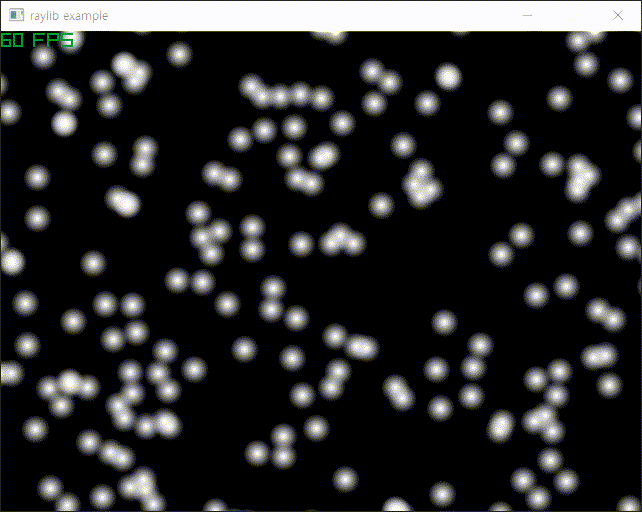
실제 실행하면 텍스쳐가 많이 깜빡인다. (아래 동영상 참고)
DrawPixel() 을 실행할 때는 크게 눈에 띄지 않지만 DrawTexture() 를 실행하면 눈에 띈다.
윈도우 사이즈를 크게 할수록 깜빡이는 현상이 줄어드는거 같다. 아니면 snow.png 파일을 LoadImage()로 로드하고 ImageResize()로 크게 바꾼 다음 LoadTextureFromImage()로 로드하면 깜빡임이 약간 줄어드는거 같다. (ImageResize()로 이미지 확대가 핵심)
Vector2로 정의된 위치값을 사용하는 DrawTextureV()를 이용해도 차이가 없다.
정확한 원인을 모르겠다.
RenerTexture2D를 사용하니까 조금 덜 깜빡이는거 같기도 한데.. 아닌거 같다.
|
1
2
3
4
5
6
7
8
9
10
11
12
13
14
15
16
17
18
19
20
21
22
23
24
25
26
27
28
29
30
31
32
33
34
35
36
37
38
39
40
41
42
43
44
45
46
47
48
49
50
51
52
53
54
55
56
57
58
59
60
61
62
63
64
65
66
67
68
69
70
71
72
73
74
75
76
77
78
79
80
81
|
#include "raylib.h"
const int screenWidth = 640;
const int screenHeight = 480;
Texture2D texture;
class Particles {
private:
Vector2 position;
Vector2 velocity;
public:
Particles() {
Reset();
}
void Draw_particle() {
//DrawPixel(position.x, position.y, WHITE);
//DrawCircle(position.x, position.y, 10, WHITE);
DrawTexture(texture, position.x, position.y, WHITE);
position.x += velocity.x;
position.y += velocity.y;
if (position.x > screenWidth || position.y > screenHeight)
Reset();
}
void Reset() {
position.x = GetRandomValue(-screenWidth * 0.4f, screenWidth);
position.y = GetRandomValue(-screenHeight * 2, 0);
float max = 10000.0f;
velocity.x = (GetRandomValue(1, (int)max) / max) * 0.5f;
velocity.y = (GetRandomValue(1, (int)max) / max) + 0.8f;
}
};
int main(void)
{
//SetConfigFlags(FLAG_WINDOW_TRANSPARENT | FLAG_WINDOW_UNDECORATED);
InitWindow(screenWidth, screenHeight, "raylib example");
// InitWindow() 실행시 내부에서 SetRandomSeed()를 time(NULL)로 초기화 한다.
// particle 생성시 GetRandomValue()를 사용하므로 InitWindow() 이후에 생성한다.
SetTargetFPS(60);
RenderTexture2D target = LoadRenderTexture(screenWidth, screenHeight);
texture = LoadTexture("snow.png");
// NOTE: Textures MUST be loaded after Window initialization (OpenGL context is required)
const int number_particles = 400;
Particles particles[number_particles];
while (!WindowShouldClose())
{
BeginTextureMode(target);
{
ClearBackground(BLACK);
for (int i = 0; i < number_particles; i++)
particles[i].Draw_particle();
DrawFPS(0, 0);
}
EndTextureMode();
BeginDrawing();
{
//ClearBackground(BLACK);
//DrawTexture(target.texture, 0, 0, WHITE); // 위아래가 뒤집혀 보인다.
DrawTextureRec(target.texture, { 0, 0, screenWidth, -screenHeight }, { 0, 0 }, WHITE);
// OpenGL의 좌표 체계가 다르기 때문에 위아래를 뒤집어야 제대로 표시된다.
}
EndDrawing();
}
UnloadTexture(texture);
UnloadRenderTexture(target);
CloseWindow();
return 0;
}
|
Raylib 파티클 예제에 나오는 것 처럼 구조체를 이용해 봐도 별 차이가 없다.
|
1
2
3
4
5
6
7
8
9
10
11
12
13
14
15
16
17
18
19
20
21
22
23
24
25
26
27
28
29
30
31
32
33
34
35
36
37
38
39
40
41
42
43
44
45
46
47
48
49
50
51
52
53
54
55
56
57
58
59
60
61
62
63
64
65
66
67
68
69
70
|
#include "raylib.h"
const int screenWidth = 640;
const int screenHeight = 480;
Texture2D texture;
typedef struct {
Vector2 position;
Vector2 velocity;
} s_particle;
const int number_particles = 400;
s_particle particles[number_particles];
void spawn_particle(s_particle* pt) {
pt->position.x = GetRandomValue(-screenWidth * 0.4f, screenWidth);
pt->position.y = GetRandomValue(-screenHeight * 2, 0);
float max = 10000.0f;
pt->velocity.x = (GetRandomValue(1, (int)max) / max) * 0.5f;
pt->velocity.y = (GetRandomValue(1, (int)max) / max) + 0.8f;
}
void draw_particle(s_particle pt[]) {
for (int i = 0; i < number_particles; i++) {
s_particle* particle = &pt[i];
particle->position.x += particle->velocity.x;
particle->position.y += particle->velocity.y;
if (particle->position.x > screenWidth || particle->position.y > screenHeight)
spawn_particle(particle);
DrawTexture(texture, particle->position.x, particle->position.y, WHITE);
}
}
int main(void)
{
//SetConfigFlags(FLAG_WINDOW_TRANSPARENT | FLAG_WINDOW_UNDECORATED);
InitWindow(screenWidth, screenHeight, "raylib example");
// InitWindow() 실행시 내부에서 SetRandomSeed()를 time(NULL)로 초기화 한다.
// particle 생성시 GetRandomValue()를 사용하므로 InitWindow() 이후에 생성한다.
SetTargetFPS(60);
texture = LoadTexture("snow.png");
// NOTE: Textures MUST be loaded after Window initialization (OpenGL context is required)
for (int i = 0; i < number_particles; i++) {
spawn_particle(&particles[i]);
}
while (!WindowShouldClose())
{
BeginDrawing();
{
ClearBackground(BLACK);
draw_particle(particles);
DrawFPS(0, 0);
}
EndDrawing();
}
UnloadTexture(texture);
CloseWindow();
return 0;
}
|
한 가지 확인한 것은 velocity->x, velocity->y의 값을 임의의 소수가 아닌 (1이나 2같은)정수로 바꾸면 깜빡임이 없다.
Raylib 렌더링 함수에서 소수 처리 부분에 문제가 있는게 아닐까 싶다.
매 프레임마다 눈 이동 거리를 delta time으로 계산해도 별 의미가 없는거 같다.
|
1
2
3
4
5
6
7
8
9
10
11
12
13
14
15
16
17
18
19
20
21
22
23
24
25
26
27
28
29
30
31
32
33
34
35
36
37
38
39
40
41
42
43
44
45
46
47
48
49
50
51
52
53
54
55
56
57
58
59
60
61
62
63
64
65
66
67
68
69
70
71
72
73
74
75
76
|
#include "raylib.h"
const int screenWidth = 640;
const int screenHeight = 480;
Texture2D texture;
typedef struct {
Vector2 position;
Vector2 velocity;
} s_particle;
const int number_particles = 400;
s_particle particles[number_particles];
void spawn_particle(s_particle* pt) {
pt->position.x = GetRandomValue(-screenWidth * 0.4f, screenWidth);
pt->position.y = GetRandomValue(-screenHeight * 2, 0);
//float max = 10000.0f;
//pt->velocity.x = (float)(GetRandomValue(1, (int)max) / max) * 0.5f;
//pt->velocity.y = (float)(GetRandomValue(1, (int)max) / max) + 0.8f;
pt->velocity.x = (float)GetRandomValue(0, 30) + 10;
// 눈이 오른쪽으로 이동하는 속도를 초당 10~40 픽셀로 설정
pt->velocity.y = (float)GetRandomValue(20, 80) + 40;
// 눈이 아래로 떨어지는 속도를 초당 60~120 픽셀로 설정
}
void draw_particle(s_particle pt[], float delta) {
for (int i = 0; i < number_particles; i++) {
s_particle* particle = &pt[i];
particle->position.x += particle->velocity.x * delta;
particle->position.y += particle->velocity.y * delta;
if (particle->position.x > screenWidth || particle->position.y > screenHeight)
spawn_particle(particle);
DrawTexture(texture, particle->position.x, particle->position.y, WHITE);
}
}
int main(void)
{
//SetConfigFlags(FLAG_WINDOW_TRANSPARENT | FLAG_WINDOW_UNDECORATED);
InitWindow(screenWidth, screenHeight, "raylib example");
// InitWindow() 실행시 내부에서 SetRandomSeed()를 time(NULL)로 초기화 한다.
// particle 생성시 GetRandomValue()를 사용하므로 InitWindow() 이후에 생성한다.
SetTargetFPS(60);
texture = LoadTexture("snow.png");
// NOTE: Textures MUST be loaded after Window initialization (OpenGL context is required)
for (int i = 0; i < number_particles; i++) {
spawn_particle(&particles[i]);
}
while (!WindowShouldClose())
{
BeginDrawing();
{
ClearBackground(BLACK);
draw_particle(particles, GetFrameTime());
// GetFrameTime() : Get time in seconds for last frame drawn (delta time)
DrawFPS(0, 0);
}
EndDrawing();
}
UnloadTexture(texture);
CloseWindow();
return 0;
}
|
'SDL, raylib' 카테고리의 다른 글
| [SDL3] Display Information 디스플레이 정보 가져오기 (0) | 2025.06.02 |
|---|---|
| [raylib] Window Handle 윈도우 핸들 (0) | 2025.05.04 |
| [raylib] Transparent Window(Window Flags) (0) | 2025.05.03 |
| [raylib] raylib with opencv (0) | 2025.05.03 |
| [raylib] raylib 설정하고 사용하기 (0) | 2025.05.02 |
