C# Drag & Drop - 드래그 & 드롭 1
C# 2022. 3. 31. 12:24 |반응형
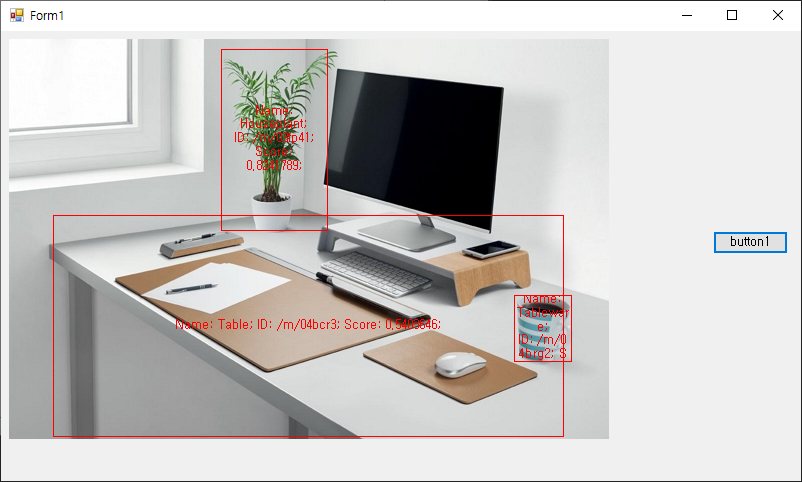
간단한 Drag & Drop을 구현해 보자.

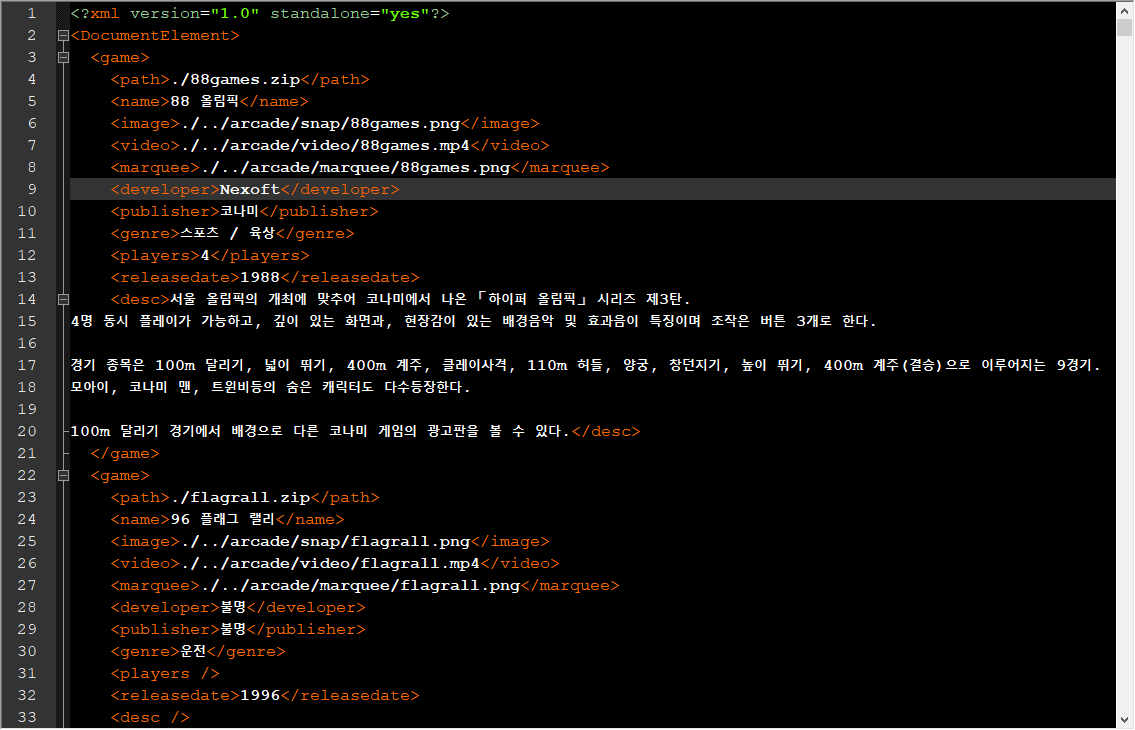
|
1
2
3
4
5
6
7
8
9
10
11
12
13
14
15
16
17
18
19
20
21
22
23
24
25
26
27
28
29
30
31
32
33
34
35
36
37
38
39
40
41
42
43
44
45
46
47
48
49
50
51
52
53
54
55
56
57
58
59
60
61
62
63
64
65
66
67
68
69
70
71
72
73
74
75
76
77
78
79
80
81
82
83
84
85
86
87
88
|
using System;
using System.Collections.Generic;
using System.ComponentModel;
using System.Data;
using System.Drawing;
using System.Linq;
using System.Text;
using System.Threading.Tasks;
using System.Windows.Forms;
namespace WindowsFormsApp1
{
public partial class Form1 : Form
{
public Form1()
{
InitializeComponent();
listBox2.AllowDrop = true;
listBox1.Items.Add("모니터");
listBox1.Items.Add("키보드");
listBox1.Items.Add("스피커");
listBox1.Items.Add("마우스");
listBox1.Items.Add("카메라");
}
private void listBox1_MouseDown(object sender, MouseEventArgs e)
{
DragDropEffects effect;
int index = listBox1.IndexFromPoint(e.X, e.Y);
// listBox1.SelectedIndex을 사용하지 않으므로
// 오른쪽 마우스 버튼의 드래그&드롭도 처리 가능
if (index != ListBox.NoMatches)
{
string item = (string)listBox1.Items[index];
effect = DoDragDrop(item, DragDropEffects.Copy | DragDropEffects.Move);
if (effect == DragDropEffects.Move)
{
listBox1.Items.RemoveAt(index);
}
}
}
private void listBox1_QueryContinueDrag(object sender, QueryContinueDragEventArgs e)
{
if (e.EscapePressed)
{
e.Action = DragAction.Cancel;
// 드래그&드롭 중 ESC키가 눌리면 취소된다.
}
}
private void listBox2_DragOver(object sender, DragEventArgs e)
{
if (e.Data.GetDataPresent(DataFormats.StringFormat))
{
// StringFormat 형식을 허용하기 때문에 다른 프로그램(노트패드 등)
// 의 문자열을 선택하고 드래그&드롭도 가능하다.
if ((e.KeyState & 8) != 0)
{
e.Effect = DragDropEffects.Copy;
// 1 (bit 0) The left mouse button.
// 2 (bit 1) The right mouse button.
// 4 (bit 2) The SHIFT key.
// 8 (bit 3) The CTRL key.
// 16 (bit 4) The middle mouse button.
// 32 (bit 5) The ALT key.
}
else
{
e.Effect = DragDropEffects.Move;
}
}
}
private void listBox2_DragDrop(object sender, DragEventArgs e)
{
if (e.Data.GetDataPresent(DataFormats.StringFormat))
{
listBox2.Items.Add(e.Data.GetData(DataFormats.StringFormat));
}
}
}
}
|
소스를 입력하고 빌드한다.


반응형
'C#' 카테고리의 다른 글
| C# Console Key Input Check - 콘솔 키 입력 확인 (0) | 2022.04.05 |
|---|---|
| C# Drag & Drop - 드래그 & 드롭 2 (0) | 2022.03.31 |
| C# DataTable, DataSet, DataGridView, and XML 2 (0) | 2022.02.20 |
| C# DataTable, DataSet, DataGridView, and XML 1 (0) | 2022.02.20 |
| C# with SQLite - 데이터베이스 연동 3 (0) | 2022.02.19 |