반응형

어셈블리 언어로 작성된 프로그램 실행 시 인수를 확인해 보자.


소스를 입력하고 빌드한다.


1
2
3
4
5
6
7
8
9
10
11
12
include masm32rt.inc
 
.data
    strTitle db "Command Line Arguments",0
    strMessage db 128 dup(?)
 
.code
start:
    invoke GetCL, 1, ADDR strMessage
    invoke MessageBox, 0, ADDR strMessage, ADDR strTitle, MB_OK
    invoke ExitProcess, 0
end start


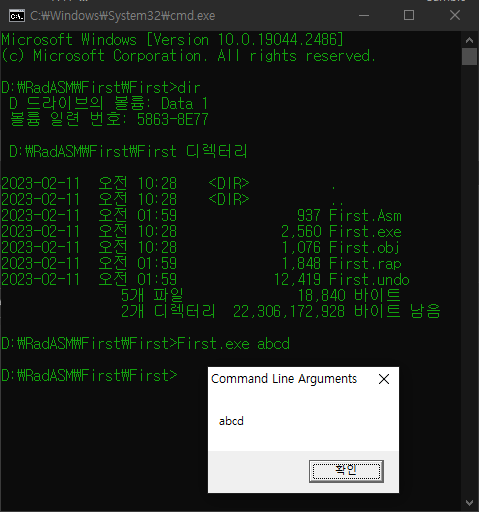
GetCL 함수의 첫 번째 인수로 1을 주면 프로그램의 첫 번째 인수가 저장된다.


첫 번째 인수 'abcd'가 출력된다.


1
2
3
4
5
6
7
8
9
10
11
12
include masm32rt.inc
 
.data
    strTitle db "Command Line Arguments",0
    strMessage db 128 dup(?)
 
.code
start:
    invoke GetCL, 0, ADDR strMessage
    invoke MessageBox, 0, ADDR strMessage, ADDR strTitle, MB_OK
    invoke ExitProcess, 0
end start


GetCL 함수의 첫 번째 인수로 0을 주면 프로그램 파일명이 저장된다.


파일 이름 First.exe가 출력된다.


반응형
Posted by J-sean
:
반응형

안드로이드 리눅스 커널 명령을 실행해 보자.


레이아웃에 에디트박스, 버튼, 텍스트뷰를 적당히 배치한다.


1
2
3
4
5
6
7
8
9
10
11
12
13
14
15
16
17
18
19
20
21
22
23
24
25
26
27
28
29
30
31
32
33
34
35
36
37
38
39
40
41
42
43
44
45
46
47
48
49
50
51
52
53
package com.example.myapplication;
 
import androidx.appcompat.app.AppCompatActivity;
 
import android.os.Bundle;
import android.view.View;
import android.widget.Button;
import android.widget.EditText;
import android.widget.TextView;
 
import java.io.BufferedReader;
import java.io.InputStreamReader;
 
public class MainActivity extends AppCompatActivity {
 
    EditText editText;
    Button button;
    TextView textView;
 
    @Override
    protected void onCreate(Bundle savedInstanceState) {
        super.onCreate(savedInstanceState);
        setContentView(R.layout.activity_main);
 
        editText = findViewById(R.id.editTextTextPersonName);
        button = findViewById(R.id.button);
        textView = findViewById(R.id.textView);
 
        button.setOnClickListener(new View.OnClickListener() {
            @Override
            public void onClick(View view) {
                StringBuffer stringBuffer = new StringBuffer();
 
                java.lang.Process process;
                try {
                    process = Runtime.getRuntime().exec(editText.getText().toString());
                    process.waitFor();
                    // Causes the current thread to wait, if necessary, until the process
                    // represented by this Process object has terminated.
                    BufferedReader bufferedReader = new BufferedReader(new InputStreamReader(process.getInputStream()));
                    String line = "";
                    while ((line = bufferedReader.readLine()) != null) {
                        stringBuffer.append(line + "\n");
                    }
                } catch (Exception e) {
                    e.printStackTrace();
                }
                String result = stringBuffer.toString();
                textView.setText(result);
            }
        });
    }
}


소스를 입력하고 빌드한다.


실행하면 위와같은 화면이 나타난다.


간단한 명령어를 입력하고 결과를 확인한다.


명령어 실행시 매번 새로운 프로세스에서 실행되기 때문에 연속적인 작업을 할 수 는 없다.

예) cd /proc, pwd를 차례로 실행해도 결과는 항상 /이다.


1
2
3
4
5
6
7
8
9
10
11
12
13
14
15
16
17
18
19
20
21
22
23
24
25
26
27
28
29
30
31
32
33
34
35
36
37
package com.example.myapplication;
 
import androidx.appcompat.app.AppCompatActivity;
 
import android.os.Bundle;
import android.view.View;
import android.widget.Button;
import android.widget.EditText;
import android.widget.TextView;
 
public class MainActivity extends AppCompatActivity {
 
    EditText editText;
    Button button;
    TextView textView;
 
    @Override
    protected void onCreate(Bundle savedInstanceState) {
        super.onCreate(savedInstanceState);
        setContentView(R.layout.activity_main);
 
        editText = findViewById(R.id.editTextTextPersonName);
        button = findViewById(R.id.button);
        textView = findViewById(R.id.textView);
 
        button.setOnClickListener(new View.OnClickListener() {
            @Override
            public void onClick(View view) {
                try {
                    Runtime.getRuntime().exec(editText.getText().toString());
                } catch (Exception e) {
                    e.printStackTrace();
                }
            }
        });
    }
}


소스를 위와 같이 바꾸고 input 명령어를 사용해 보자.

(process.waitFor() 를 사용하면 아래 예에서 제대로 동작하지 않는다)


input keyevent KEYCODE_BACK 명령을 실행하면 Back 버튼이 눌린것 처럼 동작한다.


input keyevent KEYCODE_CALL 명령을 실행하면 전화 화면이 나타난다.

※ 참고

KeyEvent


반응형
Posted by J-sean
:
반응형

'Open Command Line' opens a command line at the root of the project. Support for all consoles such as CMD, PowerShell, Bash, etc. Provides syntax highlighting, Intellisense and execution of .cmd and .bat files.


This extension adds a new command to the project context menu that will open a command prompt on the project's path. If the solution node is selected in Solution Explorer, then a console will open at the root of the .sln file.


Open Command LIne은 작업 중인 Visual Studio 프로젝트 폴더에서 바로 command prompt를 열 수 있게 해주는 extension 입니다.

CMD, PowerShell, Bash등을 지원합니다.


Run Tools - Extensions and Updates...


Search 'Open Command Line' on Online tab and click Download.


Installation starts when Visual Studio closes.


Close Visual Studio and click Modify on VSIX Installer.


Install it.


Click Close.


Right-click on Solution Explorer - Open Command Line - Default(cmd) (Shortcut: Alt + Space)


Command Prompt opens on the project's path.


Right-click on Solution Explorer - Open Command Line - Settings...


You can change settings.


반응형
Posted by J-sean
: