

[AI] 한국어 형태소 분석기 Kiwipiepy & 워드 클라우드 Word Cloud
AI, ML, DL 2025. 11. 13. 23:25 |반응형
Kiwipiepy를 이용해 한국어 형태소를 분석해 보자.
from kiwipiepy import Kiwi

kiwi = Kiwi()
kiwi.add_user_word("AI", "NNP")  # 사용자 단어 추가 예시

text = "안녕하세요. 저는 AI 언어 모델입니다."
result = kiwi.analyze(text)

# 출력 형태 확인
print(result)

print("-" * 30)

# 형태소와 품사 출력
for word in result[0][0]:
	print(f"{word.form}\t{word.tag}")

print("-" * 30)

# 명사만 출력
print("명사만 출력:")
for word in result[0][0]:
	if word.tag.startswith('N'):
		print(f"{word.form}\t{word.tag}")

nouns = [word.form for word in result[0][0] if word.tag.startswith('N')]
print("명사 리스트:", nouns)

print("-" * 30)

# 동사만 출력
print("동사만 출력:")
for word in result[0][0]:
	if word.tag.startswith('V'):
		print(f"{word.form}\t{word.tag}")

verbs = [word.form for word in result[0][0] if word.tag.startswith('V')]
print("동사 리스트:", verbs)

이번엔 간단한 Word Cloud 예제를 살펴보자.
from wordcloud import WordCloud
import matplotlib.pyplot as plt

text = "인공지능은 현대 기술의 핵심입니다.\
인공지능은 다양한 분야에서 활용되고 있으며,\
우리의 삶을 변화시키고 있습니다. 인공지능\
기술은 빠르게 발전하고 있으며, 미래에는 더욱\
중요한 역할을 할 것입니다."

# 워드클라우드 생성
wordcloud = WordCloud(font_path='malgun.ttf',\
width=640, height=480, max_words=100,\
background_color='white', colormap='hsv')\
.generate(text)

# 워드클라우드 시각화
plt.figure(figsize=(10, 5))
plt.imshow(wordcloud, interpolation='bilinear')
plt.axis('off')
plt.show()

마지막으로 긴 텍스트에서 형태소 분석기를 이용해 명사를 추출하고 최다 빈도 명사 10개로 워드 클라우드를 생성해 보자.
from kiwipiepy import Kiwi
from wordcloud import WordCloud
from collections import Counter
import matplotlib.pyplot as plt
kiwi = Kiwi()
text = "《시간의 역사》(A Brief History of Time)는 스티븐 호킹에 의해 쓰여진 저명한 과학책으로\
1988년 벤탐 델 출판사에 의해 출판된 책이다. 이 책은 베스트셀러로 천 만 부 이상이 팔렸으며, 또한\
런던 선데이 타임즈에 베스트셀러로 4년 이상 랭크되었다. <시간의 역사>는 갈릴레이, 뉴턴, 아인슈타인\
등의 과거 과학자들의 우주에 대한 연구 내용을 핵심적으로 짚어주고, 우주가 대폭발에서 시작했다는\
빅뱅 이론, 블랙홀과 특이점에 대한 내용, 우주의 역사를 통해 우주의 미래와 종말을 전망한다. 이 책을\
통해 '시간'이라는 개념에 대해서도 새로운 인식을 하게 만들었다. 지구에서만 적용되는 물리적인 법칙이\
깨지거나 변화하는 우주 다른 공간에서는 우리가 쓰는 '시간'의 의미가 완전히 달라짐을 말해준다."
result = kiwi.analyze(text)
# 명사만 출력
# print("명사만 출력:")
# for word in result[0][0]:
# if word.tag.startswith('N'):
# print(f"{word.form} : {word.tag}")
# 명사 리스트 생성
nouns = [word.form for word in result[0][0] if word.tag.startswith('N')]
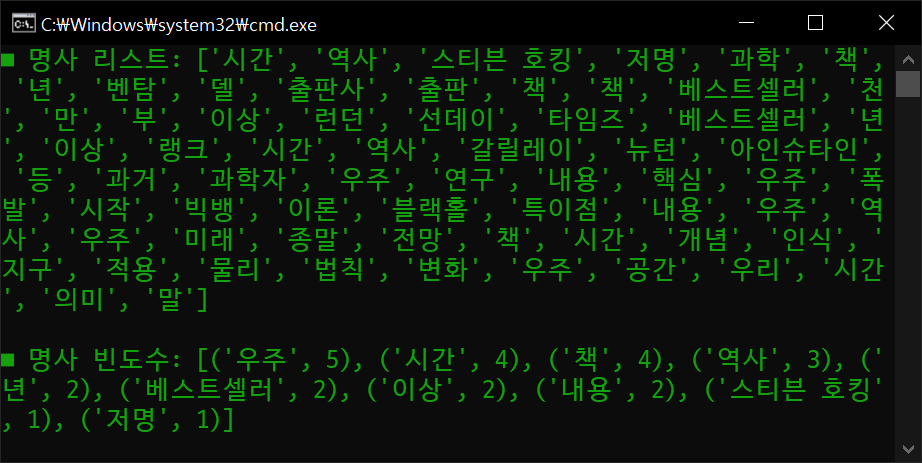
print("■ 명사 리스트:", nouns)
# 명사 빈도수 10위까지 출력
counts = Counter(nouns)
print("\n■ 명사 빈도수:", counts.most_common(10))
# 명사 워드 클라우드 생성
wordcloud = WordCloud(font_path='malgun.ttf', width=640, height=480, max_words=100,\
background_color='white', colormap='hsv').generate_from_frequencies(counts)
# 워드 클라우드 시각화
plt.figure(figsize=(10, 5))
plt.imshow(wordcloud, interpolation='bilinear')
plt.axis('off')
plt.show()

반응형
'AI, ML, DL' 카테고리의 다른 글
| [MediaPipe] Async Pose Landmark Detection 비동기 자세 특징 감지 (0) | 2025.02.12 |
|---|---|
| [MediaPipe] Face Landmark Detection 얼굴 특징 감지 (1) | 2025.02.11 |
| [MediaPipe] Pose Landmark Detection 자세 특징 감지 (0) | 2025.02.11 |
| [MediaPipe] Face Detection 얼굴 감지 (0) | 2025.02.11 |
| [MediaPipe] Hand Landmark Detection 손 특징 감지 (0) | 2025.02.11 |