반응형

파이썬에서 Google Speech to Text를 사용해 보자.


SpeechRecognition을 설치한다.


마이크 사용을 위해 PyAudio를 설치한다.


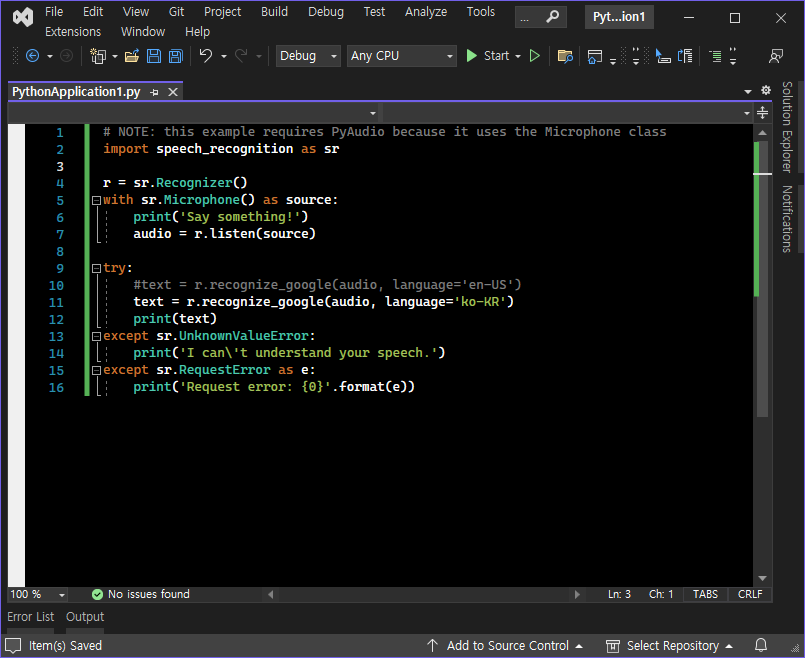
소스를 입력하고 실행한다.


완벽하지는 않지만 꽤 잘 인식한다. ('현'이 아니라 '션'이었다)


마이크가 아닌 음성 파일을 이용하는 경우 위와 같이 소스를 수정한다.


get_XXX_data()를 이용하면 오디오 데이터를 raw, wav, flac 등의 파일로 저장할 수 있다.


※ 참고

SpeechRecognition


반응형
Posted by J-sean
:

Text To Speech - gTTS

Python 2023. 4. 30. 22:26 |
반응형

파이썬에서 Google Text to Speech를 사용해 보자.


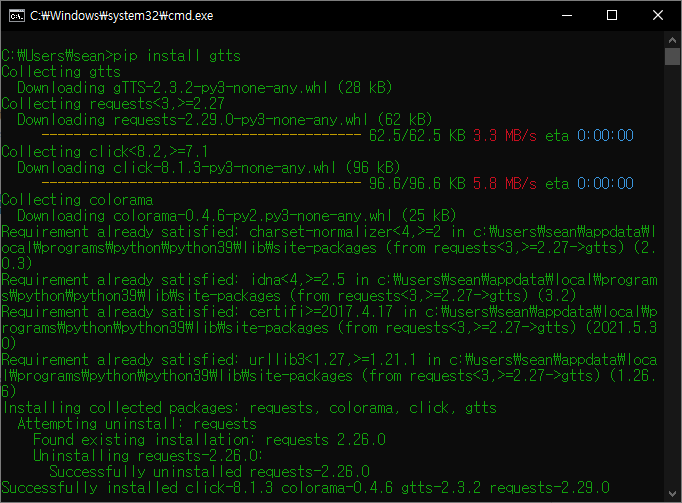
gTTS를 설치한다.


playsound를 설치한다.

playsound 1.3.0이 정상 작동 하지 않으면 1.2.2를 설치한다.

pip install playsound==1.2.2


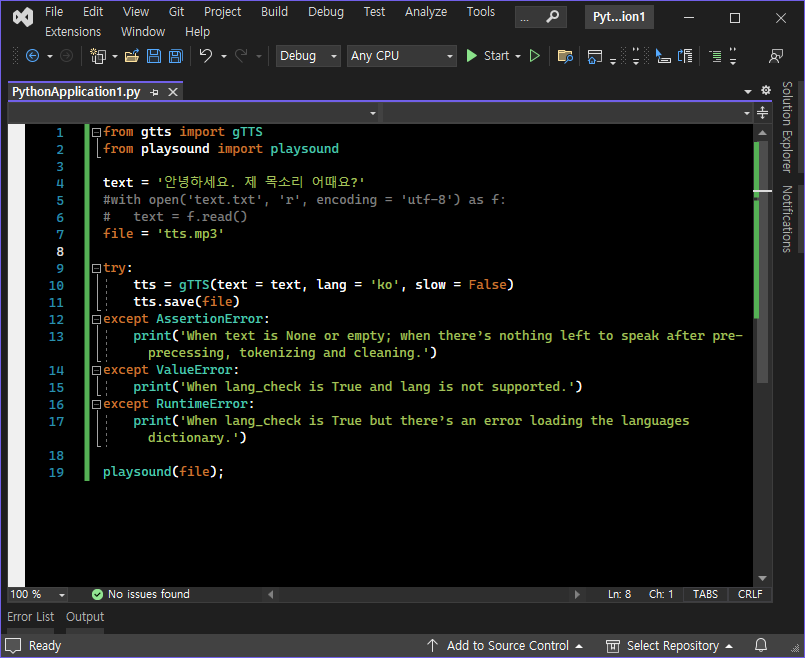
소스를 입력하고 실행한다.


tts.mp3
0.01MB


※ 참고

gTTS Documentation


반응형
Posted by J-sean
:

MySQL(MariaDB) Connector

Python 2022. 5. 5. 00:15 |
반응형

2018.11.19 - [Python] - PyMySQL


Python에서 원격으로 MySQL(MariaDB)을 사용해 보자.

아래 링크를 참고해 데이터베이스를 준비한다.

2021.08.28 - [Linux] - Linux(Ubuntu) MariaDB(MySQL) Server Remote Access - 데이터베이스 원격 접속


mysql-connector-python을 설치한다.


데이터베이스에는 위와 같은 데이터를 준비한다.


1
2
3
4
5
6
7
8
9
10
11
12
13
14
15
16
17
18
19
20
21
22
23
24
25
26
27
28
29
import mysql.connector
from mysql.connector import errorcode
 
try:
    cnx = mysql.connector.connect(host="192.168.171.20", user="root",
                                  passwd="1234", database="test_db",
                                  connection_timeout=5)
except mysql.connector.Error as err:
    if err.errno == errorcode.ER_ACCESS_DENIED_ERROR:
        print("Something is wrong with your user name or password")
    elif err.errno == errorcode.ER_BAD_DB_ERROR:
        print("Database does not exist")
    elif err.errno == 2003# 호스트 주소가 틀리거나 문제가 있다면
        print("Connection error(Timeout)")
    else:
        print(err)
else:   # 데이터베이스 접속 오류가 없다면
    cursor = cnx.cursor()
    
    query = ("SELECT * FROM test_tb")
    cursor.execute(query)
    for (id, name, age) in cursor:
        print("id: {}, name: {}, age: {}".format(id, name, age))
            
    #for row in cursor:
    #    print(row)
 
    cursor.close()
    cnx.close()


소스를 입력하고 실행한다.


데이터베이스의 내용이 출력된다.


※ 참고

MySQL Connector/Python Developer Guide

반응형
Posted by J-sean
:
반응형

Numpy 배열 평균을 구할때 축(axis)의 의미를 알아보자.


1
2
3
4
5
6
7
8
9
10
11
12
13
14
15
16
17
18
data = np.array([[[1111],
                [1111],
                [1111]],
 
                [[2222],
                [2222],
                [2222]]])
 
# 2X3X4 행렬 (3행4열2그룹)
 
print(data)
print(data.shape) # (2, 3, 4)
 
print(np.mean(data, axis=0)) # 각 그룹의 같은 원소끼리 평균(3X4)
print(np.mean(data, axis=1)) # 각 그룹의 열 평균(2X4)
print(np.mean(data, axis=2)) # 각 그룹의 행 평균(2X3)
 
print(np.mean(data, axis=(12))) # 각 그룹의 평균(1X2)


반응형
Posted by J-sean
:
반응형

파이썬으로 이메일(Gmail)을 보내보자.


Gmail 설정 화면. IMAP 사용으로 설정되어 있다. 이메일 클라이언트 구성 설정 방법을 확인해 보자.


발신 메일(SMTP) 서버 내용을 사용한다.


Gmail은 계정 비밀번호를 그대로 사용할 수 없다. Google 계정에서 앱 비밀번호를 생성해 사용해야 한다.


'생성할 앱 - 메일', '기기 - Windows 컴퓨터'를 선택하고 생성한다.


생선된 앱 비밀번호를 복사해 둔다.


1
2
3
4
5
6
7
8
9
10
11
12
13
14
15
16
17
18
19
20
21
import smtplib
from email.mime.text import MIMEText
 
email_from = 'your email address'
email_to = 'recipient's email address'
email_subject = 'Email Test.'
email_content = 'Sending an email test.'
 
msg = MIMEText(email_content)
msg['From'= email_from
msg ['To'= email_to
msg['Subject'= email_subject
 
smtp = smtplib.SMTP('smtp.gmail.com'587)
smtp.starttls()
smtp.login('your email address''password')
smtp.sendmail("your email address""recipient's email address", msg.as_string())
 
print(msg.as_string())
 
smtp.quit()


위 코드를 입력하고 실행한다. smtp.login()의 'password'에는 위에서 생성한 앱 비밀번호를 입력한다.


에러 없이 실행되면 이메일이 보내진다.


1
2
3
4
5
6
7
8
9
10
11
12
13
14
15
16
17
18
19
20
21
22
23
24
25
26
27
28
29
30
# Import smtplib for the actual sending function
import smtplib
 
# Import the email modules we'll need
from email.message import EmailMessage
 
email_from = 'your email address'
email_to = 'recipient's email address'
email_subject = 'Email Test.'
email_content = 'Sending an email test.'
 
# Create a text/plain message
msg = EmailMessage()
msg.set_content(email_content)
 
# From == the sender's email address
# To == the recipient's email address
msg['From'= email_from
msg['To'= email_to
msg['Subject'= email_subject
 
# Send the message via our own SMTP server.
smtp = smtplib.SMTP('smtp.gmail.com'587)
smtp.starttls()
smtp.login('your email address''password')
smtp.send_message(msg)
 
print(msg.as_string())
 
smtp.quit()


위 코드로도 동일하게 진행 할 수 있다.


내용은 동일하지만 실행 결과를 확인해 보면 charset이 utf-8로 설정된다는 차이가 있다.


1
2
3
4
5
6
7
8
9
10
11
12
13
14
15
16
17
18
19
20
21
22
23
24
25
26
27
28
29
30
31
32
33
34
35
36
# Import smtplib for the actual sending function
import smtplib
# Import the email modules we'll need
from email.message import EmailMessage
# And imghdr to find the types of our images
import imghdr
 
email_from = 'your email address'
email_to = 'recipient's email address'
email_cc = 'cc1 email address, cc2 email address, ...'
email_subject = 'Email Test.'
email_content = 'Sending an email test.'
 
# Create a text/plain message
msg = EmailMessage()
msg.set_content(email_content)
 
# From == the sender's email address
# To == the recipient's email address
msg['From'= email_from
msg['To'= email_to
msg['Cc'= email_cc
msg['Subject'= email_subject
 
# Open the file in binary mode. Use imghdr to figure out the MIME subtype for the image.
with open('image.png''rb') as fp:
    img_data = fp.read()
    msg.add_attachment(img_data, maintype = 'image', subtype = imghdr.what(None, img_data), filename = 'image.png')
 
# Send the message via SMTP server.
smtp = smtplib.SMTP('smtp.gmail.com'587)
smtp.starttls()
smtp.login('your email address''password')
smtp.send_message(msg)
 
smtp.quit()


이번엔 Cc(Carbon copy)와 첨부파일을 추가해 보자.


참조와 첨부파일 모두 잘 처리 되었다. (feat. Lena)


반응형
Posted by J-sean
:
반응형

유튜브를 시청하다 보면 갑자기 튀어나오는 짜증나는 광고.


아무리 한예슬이 나온다고 해도 어쩔 수 없다. 광고는 짜증난다.


'광고 건너뛰기' 버튼이 나올때 까지 기다렸다 클릭 해야만 다시 시청하던 영상으로 돌아 갈 수 있다. 파이썬 으로 '광고 건너뛰기' 버튼을 자동으로 클릭하는 프로그램을 만들어 보자.


1
2
3
4
5
6
7
8
9
10
11
12
13
14
15
16
17
18
19
20
21
22
23
24
25
26
27
28
import pyautogui
import datetime
import time
 
size = pyautogui.size()  
print('Screen Size: {0}'.format(size))
 
while True:
    try :
        nowTime = datetime.datetime.now()
        location = pyautogui.locateCenterOnScreen('adskip.png', region = (1200750300100), confidence = 0.7)
        # region = (left, top, width, height)
        # You need to have OpenCV installed for the confidence keyword to work.
 
        if location == None:            
            print("[{0}] Ad not found. (Press 'Ctrl + C' to quit)".format(nowTime.strftime('%H:%M:%S')))
            time.sleep(2.0)
 
            continue
 
        print('[{0}] Ad found at {1}'.format(nowTime.strftime('%H:%M:%S'), location))
        pyautogui.moveTo(location[0], location[1], 1)
        pyautogui.click(button = 'left')
        time.sleep(5.0)
    
    except KeyboardInterrupt :
        print("Thank You.")
        break


Python Source Code


'광고 건너뛰기' 버튼을 찾기 위해 이 그림을 adskip.png로 저장 한다.


실행 로그


영상으로 확인 하자.


반응형
Posted by J-sean
:
반응형

Python comes preinstalled on most Linux distributions and is available as a package on all others. However, there are certain features you might want to use that are not available on your distro’s package. You can easily compile the latest version of Python from the source.


대부분의 리눅스에는 파이썬이 포함되어 있어 바로 사용할 수 있지만 최신 버전의 파이썬 소스를 직접 컴파일해 사용할 수 도 있다.


파이썬 홈페이지에서 소스 파일 링크 주소를 확인 한다.


wget으로 소스코드를 다운 받는다.


다운 받은 소스 코드 확인.


--enable-optimizations 옵션과 함께 configure를 실행 한다.


make가 없다면 설치 한다.


make로 컴파일 한다. 지정된 디렉토리에 설치 하고 싶다면 make 실행 후 make altinstall 까지 진행 한다.


Warning: make install can overwrite or masquerade the python3 binary. make altinstall is therefore recommended instead of make install since it only installs exec_prefix/bin/pythonversion.


exec_prefix (${exec_prefix}) is installation-dependent and should be interpreted as for GNU software. For example, on most Linux systems, the default is /usr.


./python을 실행하면 컴파일된 파이썬이 실행 된다.


간단히 python명령어로 실행하기 위해 /usr/bin에 소프트 링크를 만들어 준다.


파이썬 홈페이지에서 다운 받았던 압축 파일은 삭제 한다.


dnf로 최신 버전 파이썬을 간단히 설치 할 수 도 있다.


설치가 완료되면 파이썬[버전] 형식으로 실행 할 수 있다.


Python package installer인 pip도 설치 한다. 


pip3 --version 명령으로 pip버전을 확인할 수 있다.


반응형
Posted by J-sean
:
반응형

Visual Studio 설치 시 'Python 개발' 항목을 선택 하면 Python 언어 지원, Python miniconda등 여러 가지 프로그램이 함께 설치 된다. 다른 응용 프로그램 설치 시 또 다른 버전의 Python이 설치 되기도 하고 업데이트 하기 위해 Python 홈페이지에서 받은 최신 버전 Python을 설치 했다면 최신 버전의 또 다른 Python이 컴퓨터에 설치된다.


Visual Studio에서 컴퓨터에 설치된 여러가지 Python 중 원하는 버전을 선택해 사용할 수 있다.


Python 프로젝트를 만들고 Solution Explorer - Python Environments 마우스 우클릭 - Add Environments... 를 선택 한다.


Existing environment - Environment - 원하는 버전의 Python을 선택 한다. (3.8)


다시 Solution Explorer에서 확인해 보면 원하는 Python이 선택되어 있다. (3.8)


Visual Studio 설치 시 'Python 개발' 항목을 선택하면 'Python 언어 지원'외 특정 버전의 Python이 몇 가지 항목과 함께 설치 된다.


특정 버전의 Python과 기타 항목을 모두 선택 해제 한다.


Python 프로젝트를 만들면 따로 설치한 최신 버전의 Python으로 환경이 구성 된다.


반응형
Posted by J-sean
: