

[SDL3] Particle 파티클
C, C++ 2025. 4. 18. 20:50 |반응형
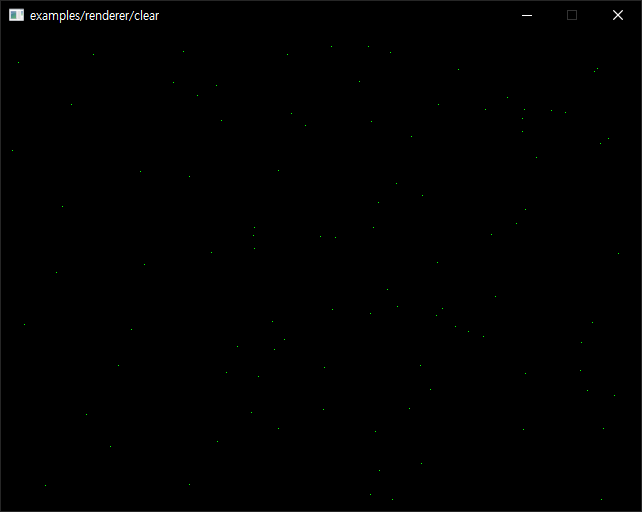
픽셀 파티클 시스템을 만들어 보자.
|
1
2
3
4
5
6
7
8
9
10
11
12
13
14
15
16
17
18
19
20
21
22
23
24
25
26
27
28
29
30
31
32
33
34
35
36
37
38
39
40
41
42
43
44
45
46
47
48
49
50
51
52
53
54
55
56
57
58
59
60
61
62
63
64
65
66
67
68
69
70
71
72
73
74
75
76
77
78
79
80
81
82
83
84
85
86
87
88
89
90
91
92
93
94
95
96
97
98
99
100
101
102
103
104
105
106
107
108
109
110
111
112
113
|
#define SDL_MAIN_USE_CALLBACKS 1
#include <SDL3/SDL.h>
#include <SDL3/SDL_main.h>
#include <stdio.h>
SDL_Window* window = NULL;
SDL_Renderer* renderer = NULL;
int screen_width = 640;
int screen_height = 480;
float speed = 0.001f;
Uint64 start;
Uint64 end;
float fps = 3000;
typedef struct {
float x, y;
float vx, vy;
int life;
} s_particle;
const int number_particles = 100;
s_particle particles[number_particles];
void spawn_particle(s_particle* pt) {
pt->x = SDL_randf() * screen_width;
pt->y = SDL_randf() * screen_height;
pt->vx = (SDL_randf() * 2 - 1) * speed;
pt->vy = (SDL_randf() * 2 - 1) * speed;
// '* 2 - 1' 의 의미: 음의 방향으로도 움직이기 위해서.
pt->life = (int)fps + SDL_rand((int)fps * 2);
}
void draw_particle(s_particle pt[]) {
for (int i = 0; i < number_particles; i++) {
s_particle* particle = &particles[i];
particle->x += particle->vx;
particle->y += particle->vy;
particle->life--;
if (particle->life <= 0)
spawn_particle(particle);
SDL_SetRenderDrawColor(renderer, 0, 255, 0, SDL_ALPHA_OPAQUE);
SDL_RenderPoint(renderer, particle->x, particle->y);
}
}
SDL_AppResult SDL_AppInit(void** appstate, int argc, char* argv[])
{
SDL_SetAppMetadata("Example", "1.0", "sean");
if (!SDL_Init(SDL_INIT_VIDEO)) {
SDL_Log("Couldn't initialize SDL: %s", SDL_GetError());
return SDL_APP_FAILURE;
}
if (!SDL_CreateWindowAndRenderer("examples/renderer/clear", screen_width, screen_height, 0, &window, &renderer)) {
SDL_Log("Couldn't create window/renderer: %s", SDL_GetError());
return SDL_APP_FAILURE;
}
for (int i = 0; i < number_particles; i++) {
spawn_particle(&particles[i]);
}
return SDL_APP_CONTINUE;
}
SDL_AppResult SDL_AppEvent(void* appstate, SDL_Event* event)
{
switch (event->type) {
case SDL_EVENT_QUIT:
return SDL_APP_SUCCESS;
case SDL_EVENT_KEY_DOWN:
printf("Key pressed: %s\n", SDL_GetKeyName(event->key.key));
if (event->key.key == SDLK_ESCAPE)
return SDL_APP_SUCCESS;
break;
default:
break;
}
return SDL_APP_CONTINUE;
}
SDL_AppResult SDL_AppIterate(void* appstate)
{
// FPS 계산. 사용하지는 않음.
start = SDL_GetPerformanceCounter();
{
SDL_SetRenderDrawColor(renderer, 0, 0, 0, SDL_ALPHA_OPAQUE);
SDL_RenderClear(renderer);
draw_particle(particles);
SDL_RenderPresent(renderer);
}
end = SDL_GetPerformanceCounter();
fps = 1.0f / ((end - start) / (float)SDL_GetPerformanceFrequency());
return SDL_APP_CONTINUE;
}
void SDL_AppQuit(void* appstate, SDL_AppResult result)
{
SDL_DestroyRenderer(renderer);
SDL_DestroyWindow(window);
SDL_Quit();
}
|
위 코드에서는 FPS를 설정하지 않고 시스템의 CPU 속도에 맞게 speed 변수를 적당히 조절했다. FPS 설정이 필요하면 아래 링크를 참고한다.
2025.04.22 - [C, C++] - [SDL] Framerate Per Second FPS
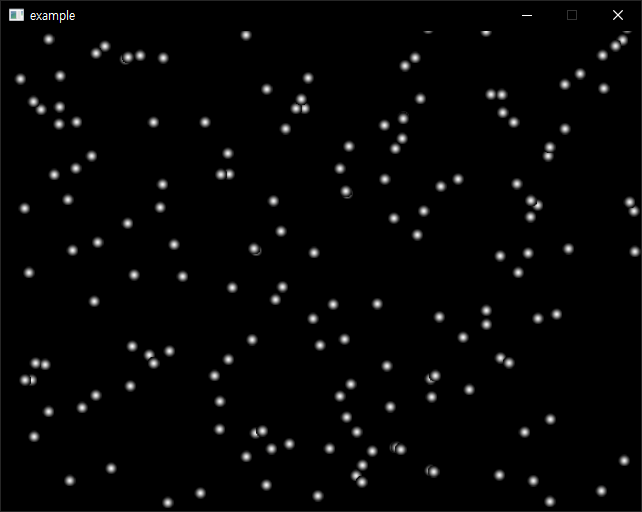
이번엔 픽셀이 아닌 비트맵 이미지로 파티클 시스템을 만들어 보자.
|
1
2
3
4
5
6
7
8
9
10
11
12
13
14
15
16
17
18
19
20
21
22
23
24
25
26
27
28
29
30
31
32
33
34
35
36
37
38
39
40
41
42
43
44
45
46
47
48
49
50
51
52
53
54
55
56
57
58
59
60
61
62
63
64
65
66
67
68
69
70
71
72
73
74
75
76
77
78
79
80
81
82
83
84
85
86
87
88
89
90
91
92
93
94
95
96
97
98
99
100
101
102
103
104
105
106
107
108
109
110
111
112
113
114
115
116
117
118
119
120
121
122
123
124
125
126
127
128
129
130
131
132
133
134
135
136
137
138
139
|
#define SDL_MAIN_USE_CALLBACKS 1
#include <SDL3/SDL.h>
#include <SDL3/SDL_main.h>
#include <stdio.h>
SDL_Window* window = NULL;
SDL_Renderer* renderer = NULL;
int screen_width = 640;
int screen_height = 480;
float speed = 0.01f;
Uint64 start;
Uint64 end;
float fps = 3000;
typedef struct {
float x, y;
float vx, vy;
int life;
} s_particle;
const int number_particles = 200;
s_particle particles[number_particles];
// 파티클 이미지 텍스쳐와 렉트
SDL_Texture* texture;
SDL_FRect rect;
void spawn_particle(s_particle* pt) {
pt->x = SDL_randf() * screen_width;
pt->y = SDL_randf() * screen_height;
pt->vx = (SDL_randf() * 2 - 1) * speed;
pt->vy = (SDL_randf() * 2 - 1) * speed;
// '* 2 - 1' 의 의미: 음의 방향으로도 움직이기 위해서.
pt->life = (int)fps + SDL_rand((int)fps * 2);
}
void draw_particle(s_particle pt[]) {
for (int i = 0; i < number_particles; i++) {
s_particle* particle = &particles[i];
particle->x += particle->vx;
particle->y += particle->vy;
particle->life--;
if (particle->life <= 0)
spawn_particle(particle);
// 텍스쳐 그리기
rect.x = particle->x - rect.w / 2;
rect.y = particle->y - rect.h / 2;
SDL_RenderTexture(renderer, texture, NULL, &rect);
//SDL_SetRenderDrawColor(renderer, 255, 0, 0, SDL_ALPHA_OPAQUE);
//SDL_RenderPoint(renderer, particle->x, particle->y);
}
}
SDL_AppResult SDL_AppInit(void** appstate, int argc, char* argv[])
{
SDL_SetAppMetadata("Example", "1.0", "sean");
if (!SDL_Init(SDL_INIT_VIDEO)) {
SDL_Log("Couldn't initialize SDL: %s", SDL_GetError());
return SDL_APP_FAILURE;
}
if (!SDL_CreateWindowAndRenderer("example", screen_width, screen_height, 0, &window, &renderer)) {
SDL_Log("Couldn't create window/renderer: %s", SDL_GetError());
return SDL_APP_FAILURE;
}
for (int i = 0; i < number_particles; i++) {
spawn_particle(&particles[i]);
}
// 비트맵 로드
SDL_Surface* bmpSurface = SDL_LoadBMP("snow.bmp");
if (!bmpSurface) {
SDL_Log("Couldn't load BMP: %s", SDL_GetError());
return SDL_APP_FAILURE;
}
// 컬러키(투명) 설정
SDL_SetSurfaceColorKey(bmpSurface, true, SDL_MapSurfaceRGB(bmpSurface, 0x00, 0x00, 0x00));
//SDL_SetSurfaceColorKey(bmpSurface, true, SDL_MapRGB(SDL_GetPixelFormatDetails(bmpSurface->format), NULL, 0x00, 0x00, 0x00));
rect = { 0, 0, (float)bmpSurface->w, (float)bmpSurface->h };
texture = SDL_CreateTextureFromSurface(renderer, bmpSurface);
SDL_DestroySurface(bmpSurface);
return SDL_APP_CONTINUE;
}
SDL_AppResult SDL_AppEvent(void* appstate, SDL_Event* event)
{
switch (event->type) {
case SDL_EVENT_QUIT:
return SDL_APP_SUCCESS;
case SDL_EVENT_KEY_DOWN:
printf("Key pressed: %s\n", SDL_GetKeyName(event->key.key));
if (event->key.key == SDLK_ESCAPE)
return SDL_APP_SUCCESS;
break;
default:
break;
}
return SDL_APP_CONTINUE;
}
SDL_AppResult SDL_AppIterate(void* appstate)
{
// FPS 계산. 사용하지는 않음.
start = SDL_GetPerformanceCounter();
{
SDL_SetRenderDrawColor(renderer, 0, 0, 0, SDL_ALPHA_OPAQUE);
SDL_RenderClear(renderer);
draw_particle(particles);
SDL_RenderPresent(renderer);
}
end = SDL_GetPerformanceCounter();
fps = 1.0f / ((end - start) / (float)SDL_GetPerformanceFrequency());
return SDL_APP_CONTINUE;
}
void SDL_AppQuit(void* appstate, SDL_AppResult result)
{
SDL_DestroyTexture(texture);
SDL_DestroyRenderer(renderer);
SDL_DestroyWindow(window);
SDL_Quit();
}
|
cs |
이번엔 진짜 눈처럼 내리는 환경을 만들어 보자.
|
1
2
3
4
5
6
7
8
9
10
11
12
13
14
15
16
17
18
19
20
21
22
23
24
25
26
27
28
29
30
31
32
33
34
35
36
37
38
39
40
41
42
43
44
45
46
47
48
49
50
51
52
53
54
55
56
57
58
59
60
61
62
63
64
65
66
67
68
69
70
71
72
73
74
75
76
77
78
79
80
81
82
83
84
85
86
87
88
89
90
91
92
93
94
95
96
97
98
99
100
101
102
103
104
105
106
107
108
109
110
111
112
113
114
115
116
117
118
119
120
121
122
123
124
125
126
127
128
129
130
131
132
133
134
135
136
137
138
139
|
#define SDL_MAIN_USE_CALLBACKS 1
#include <SDL3/SDL.h>
#include <SDL3/SDL_main.h>
#include <stdio.h>
SDL_Window* window = NULL;
SDL_Renderer* renderer = NULL;
int screen_width = 640;
int screen_height = 480;
Uint64 start;
Uint64 end;
float fps;
typedef struct {
float x, y;
float vx, vy;
} s_particle;
const int number_particles = 400;
s_particle particles[number_particles];
// 파티클 이미지 텍스쳐와 렉트
SDL_Texture* texture;
SDL_FRect rect;
void spawn_particle(s_particle* pt) {
pt->x = (SDL_randf() * 2 - 1) * screen_width * 10;
pt->y = SDL_randf() * screen_height * -2;
// 넓은 범위에서 눈이 생성되게 해서 실행 초기에 눈이 쏟아져 내리는걸 방지.
pt->vx = SDL_randf() * 0.5f; // 눈은 오른쪽으로만 흩날린다.
pt->vy = SDL_randf() + 0.8f;
}
void draw_particle(s_particle pt[]) {
for (int i = 0; i < number_particles; i++) {
s_particle* particle = &particles[i];
particle->x += particle->vx;
particle->y += particle->vy;
// 눈이 화면 왼쪽에서도 바람에 날려 올 수 있도록 생존 범위 조정.
if (particle->x > screen_width || particle->x < -screen_width || particle->y > screen_height)
spawn_particle(particle);
// 텍스쳐 그리기
rect.x = particle->x - rect.w / 2;
rect.y = particle->y - rect.h / 2;
SDL_RenderTexture(renderer, texture, NULL, &rect);
//SDL_SetRenderDrawColor(renderer, 255, 0, 0, SDL_ALPHA_OPAQUE);
//SDL_RenderPoint(renderer, particle->x, particle->y);
}
}
SDL_AppResult SDL_AppInit(void** appstate, int argc, char* argv[])
{
SDL_SetAppMetadata("Example", "1.0", "sean");
if (!SDL_Init(SDL_INIT_VIDEO)) {
SDL_Log("Couldn't initialize SDL: %s", SDL_GetError());
return SDL_APP_FAILURE;
}
SDL_SetHint(SDL_HINT_RENDER_VSYNC, "1");
// A variable controlling whether updates to the SDL screen surface should be synchronized
// with the vertical refresh, to avoid tearing.
if (!SDL_CreateWindowAndRenderer("example", screen_width, screen_height, 0, &window, &renderer)) {
SDL_Log("Couldn't create window/renderer: %s", SDL_GetError());
return SDL_APP_FAILURE;
}
for (int i = 0; i < number_particles; i++) {
spawn_particle(&particles[i]);
}
// 비트맵 로드
SDL_Surface* bmpSurface = SDL_LoadBMP("snow.bmp");
if (!bmpSurface) {
SDL_Log("Couldn't load BMP: %s", SDL_GetError());
return SDL_APP_FAILURE;
}
// 컬러키(투명) 설정
SDL_SetSurfaceColorKey(bmpSurface, true, SDL_MapSurfaceRGB(bmpSurface, 0x00, 0x00, 0x00));
//SDL_SetSurfaceColorKey(bmpSurface, true, SDL_MapRGB(SDL_GetPixelFormatDetails(bmpSurface->format), NULL, 0x00, 0x00, 0x00));
rect = { 0, 0, (float)bmpSurface->w, (float)bmpSurface->h };
texture = SDL_CreateTextureFromSurface(renderer, bmpSurface);
SDL_DestroySurface(bmpSurface);
return SDL_APP_CONTINUE;
}
SDL_AppResult SDL_AppEvent(void* appstate, SDL_Event* event)
{
switch (event->type) {
case SDL_EVENT_QUIT:
return SDL_APP_SUCCESS;
case SDL_EVENT_KEY_DOWN:
printf("Key pressed: %s\n", SDL_GetKeyName(event->key.key));
if (event->key.key == SDLK_ESCAPE)
return SDL_APP_SUCCESS;
break;
default:
break;
}
return SDL_APP_CONTINUE;
}
SDL_AppResult SDL_AppIterate(void* appstate)
{
// FPS 계산. 사용하지는 않음.
start = SDL_GetPerformanceCounter();
{
SDL_SetRenderDrawColor(renderer, 0, 0, 0, SDL_ALPHA_OPAQUE);
SDL_RenderClear(renderer);
draw_particle(particles);
SDL_RenderPresent(renderer);
}
end = SDL_GetPerformanceCounter();
fps = 1.0f / ((end - start) / (float)SDL_GetPerformanceFrequency());
return SDL_APP_CONTINUE;
}
void SDL_AppQuit(void* appstate, SDL_AppResult result)
{
SDL_DestroyTexture(texture);
SDL_DestroyRenderer(renderer);
SDL_DestroyWindow(window);
SDL_Quit();
}
|
반응형
'C, C++' 카테고리의 다른 글
| [SDL] Framerate Per Second FPS (0) | 2025.04.22 |
|---|---|
| [SDL3] Snapshot(Screenshot) 스냅샷 (0) | 2025.04.20 |
| 명령창(cmd)을 열지 않고 명령 실행하고 결과 받아오기 popen(pipe open), pclose(pipe close) (0) | 2025.04.14 |
| [SDL3] SDL3 Popup Window (0) | 2025.04.13 |
| [SDL3] SDL3 with Dear ImGui (Image rendering) (0) | 2025.04.12 |


