반응형

코드로 캐릭터를 생성해 보자.


스프라이트를 준비하고 스크립트(Player.cs)를 추가한다.


타이머를 자식노드로 추가한다. Autostart를 체크하고 Wait Time은 5초로 설정한다.


timeout 시그널을 스프라이트에 연결한다.


1
2
3
4
5
6
7
8
9
10
11
12
13
14
15
16
17
18
19
using Godot;
 
public partial class Player : Sprite2D
{
    // Called when the node enters the scene tree for the first time.
    public override void _Ready()
    {
    }
 
    // Called every frame. 'delta' is the elapsed time since the previous frame.
    public override void _Process(double delta)
    {
    }
 
    public void OnTimerTimeout()
    {
        QueueFree();
    }
}


타임아웃 시그널이 발생하면 삭제 큐에 노드를 추가하는(QueuFree) Player.cs 스크립트를 작성한다.


res:// 에 스크립트(Controls.cs)를 추가한다.


1
2
3
4
5
6
7
8
9
10
11
12
13
14
15
16
17
18
19
20
21
22
23
24
25
26
27
28
29
30
31
using Godot;
 
public partial class Control : Node
{
    public PackedScene Scene;
    public Timer timer;
 
    public override void _Ready()
    {
        // C# has no preload, so you have to always use ResourceLoader.Load<PackedScene>().
        Scene = ResourceLoader.Load<PackedScene>("res://Player.tscn");
        
        timer = new Timer();
        timer.Connect("timeout", Callable.From(OnTimeOut));
        timer.WaitTime = 1.0;
        AddChild(timer);
        timer.Start();
    }
    
    public override void _Process(double delta)
    {        
    }
 
    public void OnTimeOut()
    {
        Sprite2D Sprite = Scene.Instantiate<Sprite2D>();
        Sprite.Position = new Vector2(GD.RandRange(0, (int)GetViewport().GetVisibleRect().Size.X),
            GD.RandRange(0, (int)GetViewport().GetVisibleRect().Size.Y));
        AddChild(Sprite);
    }
}


Control.cs를 작성한다. _Ready()에서 타이머를 코드로 생성하고 타임아웃 시그널이 발생하면 씬을 생성한다.


Project Settings - Autoload 에 Controls.cs를 추가한다.


게임을 실행하면 캐릭터가 생성되고 잠시 후 사라진다.

※ 참고

Nodes and scenes

Callable


반응형
Posted by J-sean
:
반응형

타이머가 보내는 시그널을 받아보자.


Sprite2D 노드를 생성하고 Texture를 연결한다.


Sprite2D 노드의 자식 노드로 Timer 노드를 생성하고 Autostart 속성을 활성화 한다.


Sprite2D 노드에 스크립트를 생성한다.


1
2
3
4
5
6
7
8
9
10
11
12
13
14
15
16
17
18
19
20
21
using Godot;
 
public partial class player : Sprite2D
{
    // Called when the node enters the scene tree for the first time.
    public override void _Ready()
    {
        Timer timer = GetNode<Timer>("Timer");
        timer.Timeout += OnTimeout;
    }
 
    private void OnTimeout()
    {
        GD.Print("Timeout!!");
    }
 
    // Called every frame. 'delta' is the elapsed time since the previous frame.
    public override void _Process(double delta)
    {
    }
}


Timeout 시그널을 받는 스크립트를 작성한다.


Sprite2D 노드에 스크립트(player.cs)가 생성되었다.


씬을 저장하고 게임을 실행하면 Output 창에 Timeout!! 메세지가 반복해서 출력된다.


※ 참고

Using signals

C# signals


반응형
Posted by J-sean
:
반응형

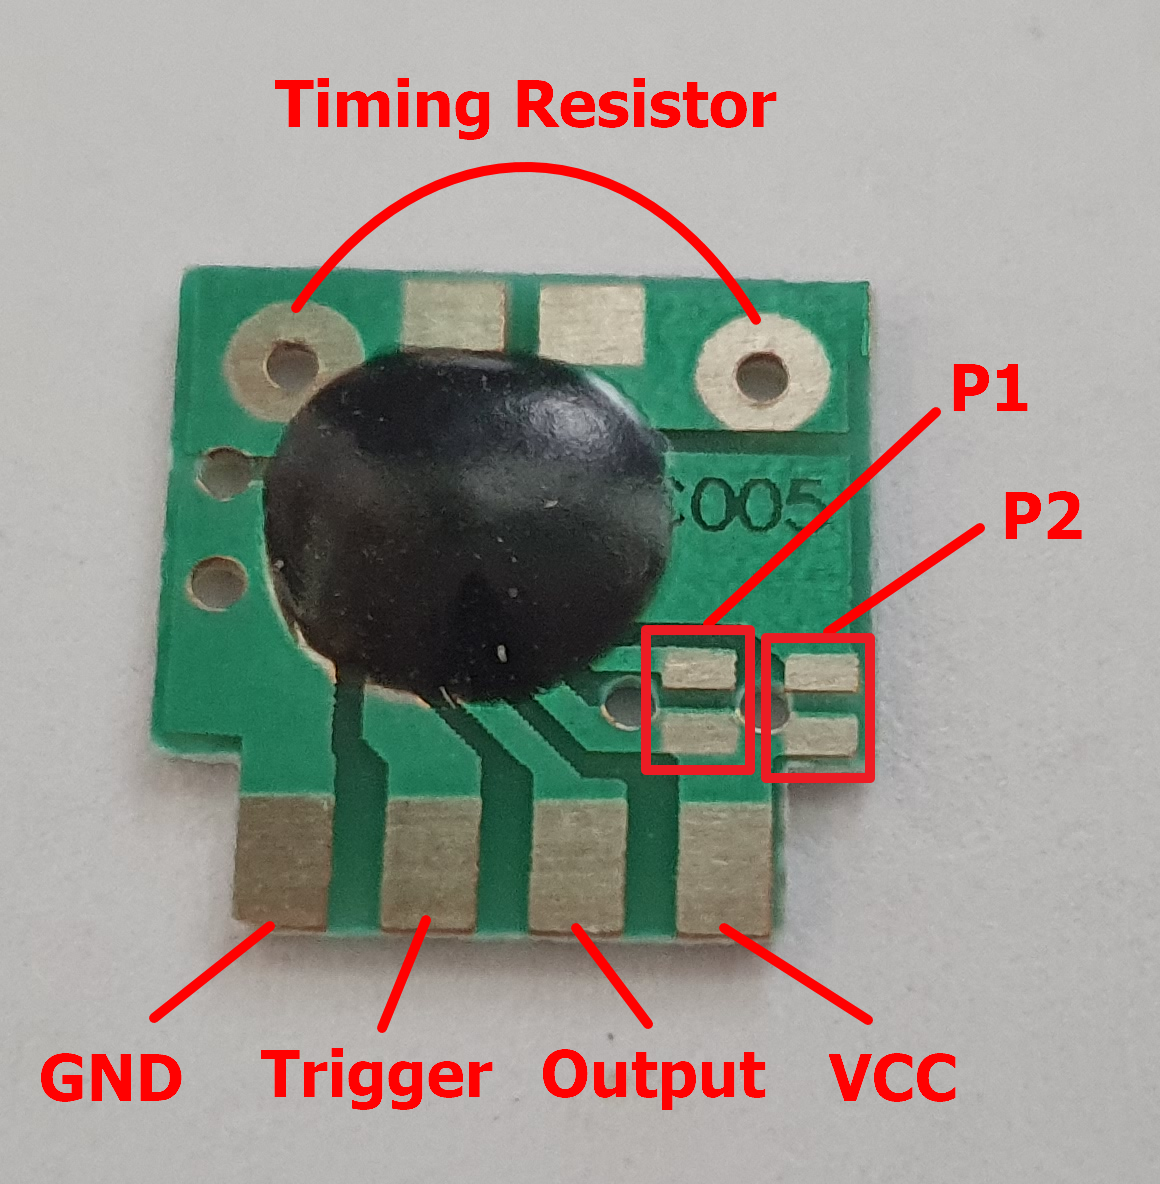
간단하고 저렴한 딜레이 타이머 C005를 사용해 보자.


가로 세로 약 1cm 정도의 작고 저렴한 딜레이 타이머.


P1 패드를 쇼트 시키면 8배, P2 패드를 쇼트 시키면 64배, 둘 다 쇼트 시키면 시간을 512배 딜레이 시킬 수 있다.


위와 같이 회로를 구성하면 타이밍 저항값에 따라 LED를 정해진 시간만큼 켤 수 있다.

좀 더 안정적인 스위칭이 필요하다면 스위치에 pull-up 저항을 구성한다.


P1, P2 패드가 모두 연결 되지 않은 경우 타이밍 저항과 전압에 따른 지연 시간.


반응형
Posted by J-sean
:
반응형

Timer와 TimerTask를 이용해 정해진 시간에 반복적인 작업을 할 수 있다.


1
2
3
4
5
6
7
8
9
10
11
12
13
14
15
16
17
18
19
20
21
22
23
24
25
26
27
28
29
30
31
32
33
34
35
36
37
public class MainActivity extends AppCompatActivity {
 
    TextView textView;
    Timer timer;
 
    @Override
    protected void onCreate(Bundle savedInstanceState) {
        super.onCreate(savedInstanceState);
        setContentView(R.layout.activity_main);
 
        textView = findViewById(R.id.textView);
        final SimpleDateFormat simpleDateFormat = new SimpleDateFormat("yyyy.MM.dd EEE HH:mm:ss");
 
        TimerTask timerTask = new TimerTask() {
            @Override
            public void run() {
                // Only the original thread that created a view hierarchy can touch its views.
                runOnUiThread(new Runnable() {
                    @Override
                    public void run() {
                        String currentTime = simpleDateFormat.format(new Date());
                        textView.setText(currentTime);
                    }
                });
            }
        };
 
        timer = new Timer();
        timer.schedule(timerTask, 01000);
    }
 
    @Override
    protected void onDestroy() {
        timer.cancel();
        super.onDestroy();
    }
}


반응형
Posted by J-sean
: