반응형

wxChartDir을 이용해 간단한 실시간 차트를 그려보자.

2026.05.05 - [C, C++] - [wxWidgets] wxChartDir 차트 그리기


#include <wx/wx.h>
#include <wxchartdir/chartdir.h>
#include <wxchartdir/wxchartviewer.h>
#include <time.h>
#include <stdlib.h>

#pragma comment(lib, "chartdir70.lib")
#pragma comment(lib, "wxchartdir.lib")

class MyApp : public wxApp
{
public:
	bool OnInit() override;
};

wxIMPLEMENT_APP(MyApp);

class MyFrame : public wxFrame
{
public:
	MyFrame();

private:
	void OnToggle(wxCommandEvent& event);
	void OnExit(wxCommandEvent& event);
	void OnAbout(wxCommandEvent& event);
	void OnTimer(wxTimerEvent& event);			// 실시간 업데이트를 위한 타이머 이벤트
	void drawChart(wxChartViewer* viewer);			// 차트를 갱신하는 함수

	wxPanel* m_panel;					// 차트를 담을 패널
	wxChartViewer* m_chartViewer;				// 차트를 담을 뷰어
	wxTimer m_timer;					// 주기적으로 차트를 갱신할 타이머

	static const int m_sampleSize = 100;			// 실시간으로 표시될 데이터 개수
	double m_timeStamps[m_sampleSize];			// X축 시간 데이터
	double m_dataSeries[m_sampleSize];			// Y축 값 데이터
};

enum
{
	ID_ToggleTimer = 1
};

bool MyApp::OnInit()
{
	MyFrame* frame = new MyFrame();
	frame->Show(true);
	return true;
}

// 메인 프레임의 위치(default position)와 크기(600x450)를 설정한다.
MyFrame::MyFrame() : wxFrame(nullptr, wxID_ANY, "Real-Time Chart Example", wxDefaultPosition, wxSize(600, 450))
{
	wxMenu* menuFile = new wxMenu;
	menuFile->Append(ID_ToggleTimer, "&Toggle Timer...\tCtrl-H", "Start/Stop the real-time update");
	menuFile->AppendSeparator();
	menuFile->Append(wxID_EXIT);

	wxMenu* menuHelp = new wxMenu;
	menuHelp->Append(wxID_ABOUT);

	wxMenuBar* menuBar = new wxMenuBar;
	menuBar->Append(menuFile, "&File");
	menuBar->Append(menuHelp, "&Help");

	SetMenuBar(menuBar);

	CreateStatusBar();
	SetStatusText("Welcome to Real-Time Chart!");

	m_panel = new wxPanel(this, wxID_ANY);

	wxButton* myButton = new wxButton(m_panel, wxID_ANY, "Toggle Timer", wxPoint(450, 10), wxSize(100, 30));
	myButton->Bind(wxEVT_BUTTON, &MyFrame::OnToggle, this); // 토글 버튼 이벤트와 타이머 토글 함수 연결

	Bind(wxEVT_MENU, &MyFrame::OnToggle, this, ID_ToggleTimer); // 토글 메뉴 아이템과 타이머 토글 함수 연결
	Bind(wxEVT_MENU, &MyFrame::OnAbout, this, wxID_ABOUT);
	Bind(wxEVT_MENU, &MyFrame::OnExit, this, wxID_EXIT);

	// 차트 뷰어 설정 및 위치/크기 고정
	m_chartViewer = new wxChartViewer(m_panel, wxID_ANY, wxPoint(10, 30), wxSize(550, 330));

	// 시간 배열과 데이터 배열 초기화
	// 현재 시간부터 과거로 100개의 타임스탬프를 생성 (250ms 간격), 데이터는 아직 없으므로 NoValue로 초기화
	double currentTime = Chart::chartTime2((int)time(0));
	// chartTime2는 int값을 차트에서 사용하는 시간 형식으로 변환하는 함수
	// time(0)은 현재 시간을 time_t 형식으로 반환하는 함수이며, 이를 int로 캐스팅하여 chartTime2에 전달한다.
	for (int i = 0; i < m_sampleSize; ++i) {
		m_timeStamps[i] = currentTime + (i - m_sampleSize) * 0.25; // 과거로 100개의 타임스탬프 생성 (250ms 간격)
		m_dataSeries[i] = Chart::NoValue; // 아직 데이터가 없으므로 NoValue 부여
	}

	// 타이머 시작 (250ms 마다 OnTimer 실행)
	m_timer.Bind(wxEVT_TIMER, &MyFrame::OnTimer, this, m_timer.GetId());
	m_timer.Start(250);

	// 초기 차트 그리기
	drawChart(m_chartViewer);
}

void MyFrame::OnExit(wxCommandEvent& event)
{
	Close(true);
}

void MyFrame::OnAbout(wxCommandEvent& event)
{
	wxMessageBox("This is a wxWidgets Hello World example", "About Hello World", wxOK | wxICON_INFORMATION);
}

void MyFrame::OnToggle(wxCommandEvent& event)
{
	// 타이머 일시정지/재시작 토글 처리
	if (m_timer.IsRunning()) {
		m_timer.Stop();
		SetStatusText("Timer Stopped.");
	}
	else {
		m_timer.Start(250);
		SetStatusText("Timer Started.");
	}
}

void MyFrame::OnTimer(wxTimerEvent& event)
{
	// 데이터를 하나씩 앞으로 이동 (Shift)
	for (int i = 1; i < m_sampleSize; ++i) {
		m_timeStamps[i - 1] = m_timeStamps[i];
		m_dataSeries[i - 1] = m_dataSeries[i];
	}

	// 가장 최신(마지막) 인덱스에 새 타임스탬프 입력
	m_timeStamps[m_sampleSize - 1] = m_timeStamps[m_sampleSize - 2] + 0.25; // 250ms 증가

	// 바로 직전 데이터에 랜덤 변화량을 주어 값을 생성 (Random Walk)
	double currentVal = (m_dataSeries[m_sampleSize - 2] == Chart::NoValue) ? 50 : m_dataSeries[m_sampleSize - 2];
	currentVal += (rand() % 11) - 5;

	// 값이 범위(10~90)를 크게 벗어나지 않게 보정
	if (currentVal < 10)
		currentVal = 10;
	if (currentVal > 90)
		currentVal = 90;

	m_dataSeries[m_sampleSize - 1] = currentVal;

	// 차트 갱신
	drawChart(m_chartViewer);
}

void MyFrame::drawChart(wxChartViewer* viewer)
{
	// 550x330 크기의 XYChart 객체 생성
	XYChart* c = new XYChart(550, 330);

	// 백그라운드 색상 및 플롯 영역, 그리드 크기 설정
	c->setBackground(0xeeeeee);
	// 플롯 영역을 설정 (x, y, width, height) 및 배경색, 대체색(-1), 엣지색(-1), 가로 그리드색, 세로 그리드색
	c->setPlotArea(40, 20, 480, 260, 0xffffff, -1, -1, 0xcccccc, 0xcccccccc);

	// X축을 시간 포맷(hh:nn:ss)으로 설정
	c->xAxis()->setLabelFormat("{value|hh:nn:ss}"); // value: 차트가 표시하는 값, hh:nn:ss: 시간 포맷	
	c->xAxis()->setTickDensity(75); // X축 눈금 간격을 조절하여 시간 간격이 일정하게 보이도록 설정 (75 픽셀마다 눈금 표시)
	c->xAxis()->setTitle("Time");

	// Y축은 실시간 데이터 변동이 보이게 크기를 고정 (0~100)
	c->yAxis()->setLinearScale(0, 100, 20); // 0부터 100까지 20 간격으로 눈금 표시
	c->yAxis()->setTitle("Value");

	// 라인 레이어를 생성하고 선 색상을 지정, "Live Data"는 범례(Legend)에 표시될 이름
	LineLayer* layer = c->addLineLayer(DoubleArray(m_dataSeries, m_sampleSize), 0xff0000, "Live Data");
	layer->setXData(DoubleArray(m_timeStamps, m_sampleSize));
	layer->setLineWidth(2); // 선의 두께를 2로 설정하여 실시간 데이터의 변동이 더 잘 보이도록 함
	// 범례(Lengend) 박스 설정 (x, y, vertical layout, font, font size) 및 배경색과 테두리 색상
	c->addLegend(430, 30, false, "Arial Bold", 9)->setBackground(0xeeeeee, 0xcccccc);

	// 생성한 차트를 뷰어에 연결하면 내부적으로 화면이 갱신됨
	viewer->setChart(c);
	//viewer->updateViewPort(true, true); // 뷰포트 업데이트 (차트가 변경되었음을 알림)
	// setchart()는 새로운 차트를 뷰어에 설정하는 함수이고, updateViewPort()는 뷰포트가 변경되었음을 알리는 함수이다.
	// setchart()를 호출하면 내부적으로 차트가 변경되었다고 인식하지만, updateViewPort()를 명시적으로 호출하여 뷰포트
	// 업데이트를 트리거하는 것이 좋다. 이렇게 하면 차트가 변경된 후에 뷰포트가 올바르게 갱신되어 화면에 최신 차트가 표시된다.
	// 지금은 마우스 휠로 확대/축소하는 기능은 없지만 그런 기능이 추가되면 차트가 변경될 때마다 명시적으로 updateViewPort()를
	// 호출하여 뷰포트를 갱신하는 것이 좋다.

	// ChartViewer에 넣은 뒤 완벽하게 안전하게 지울 수 있음
	delete c;
}


단순한 배열이 아닌 deque 자료구조를 사용해 보자.

#include <wx/wx.h>
#include <wxchartdir/chartdir.h>
#include <wxchartdir/wxchartviewer.h>
#include <time.h>
#include <stdlib.h>
#include <deque>

#pragma comment(lib, "chartdir70.lib")
#pragma comment(lib, "wxchartdir.lib")

class MyApp : public wxApp
{
public:
	bool OnInit() override;
};

wxIMPLEMENT_APP(MyApp);

class MyFrame : public wxFrame
{
public:
	MyFrame();

private:
	void OnToggle(wxCommandEvent& event);
	void OnExit(wxCommandEvent& event);
	void OnAbout(wxCommandEvent& event);
	void OnTimer(wxTimerEvent& event);			// 실시간 업데이트를 위한 타이머 이벤트
	void drawChart(wxChartViewer* viewer);			// 차트를 갱신하는 함수

	wxPanel* m_panel;					// 차트를 담을 패널
	wxChartViewer* m_chartViewer;				// 차트를 담을 뷰어
	wxTimer m_timer;					// 주기적으로 차트를 갱신할 타이머

	static const int m_sampleSize = 100;			// 실시간으로 표시될 데이터 개수
	std::deque<double> m_timeStamps;			// X축 시간 데이터
	std::deque<double> m_dataSeries;			// Y축 값 데이터
};

enum
{
	ID_ToggleTimer = 1
};

bool MyApp::OnInit()
{
	MyFrame* frame = new MyFrame();
	frame->Show(true);
	return true;
}

// 메인 프레임의 위치(default position)와 크기(600x450)를 설정한다.
MyFrame::MyFrame() : wxFrame(nullptr, wxID_ANY, "Real-Time Chart Example", wxDefaultPosition, wxSize(600, 450))
{
	wxMenu* menuFile = new wxMenu;
	menuFile->Append(ID_ToggleTimer, "&Toggle Timer...\tCtrl-H", "Start/Stop the real-time update");
	menuFile->AppendSeparator();
	menuFile->Append(wxID_EXIT);

	wxMenu* menuHelp = new wxMenu;
	menuHelp->Append(wxID_ABOUT);

	wxMenuBar* menuBar = new wxMenuBar;
	menuBar->Append(menuFile, "&File");
	menuBar->Append(menuHelp, "&Help");

	SetMenuBar(menuBar);

	CreateStatusBar();
	SetStatusText("Welcome to Real-Time Chart!");

	m_panel = new wxPanel(this, wxID_ANY);

	wxButton* myButton = new wxButton(m_panel, wxID_ANY, "Toggle Timer", wxPoint(450, 10), wxSize(100, 30));
	myButton->Bind(wxEVT_BUTTON, &MyFrame::OnToggle, this); // 토글 버튼 이벤트와 타이머 토글 함수 연결

	Bind(wxEVT_MENU, &MyFrame::OnToggle, this, ID_ToggleTimer); // 토글 메뉴 아이템과 타이머 토글 함수 연결
	Bind(wxEVT_MENU, &MyFrame::OnAbout, this, wxID_ABOUT);
	Bind(wxEVT_MENU, &MyFrame::OnExit, this, wxID_EXIT);

	// 차트 뷰어 설정 및 위치/크기 고정
	m_chartViewer = new wxChartViewer(m_panel, wxID_ANY, wxPoint(10, 30), wxSize(550, 330));

	// 시간 배열과 데이터 배열 초기화
	// 현재 시간부터 과거로 100개의 타임스탬프를 생성 (250ms 간격), 데이터는 아직 없으므로 NoValue로 초기화
	double currentTime = Chart::chartTime2((int)time(0));
	// chartTime2는 int값을 차트에서 사용하는 시간 형식으로 변환하는 함수
	// time(0)은 현재 시간을 time_t 형식으로 반환하는 함수이며, 이를 int로 캐스팅하여 chartTime2에 전달한다.
	for (int i = 0; i < m_sampleSize; ++i) {
		m_timeStamps.push_back(currentTime + (i - m_sampleSize) * 0.25); // 과거로 100개의 타임스탬프 생성 (250ms 간격)
		m_dataSeries.push_back(Chart::NoValue); // 아직 데이터가 없으므로 NoValue 부여
	}

	// 타이머 시작 (250ms 마다 OnTimer 실행)
	m_timer.Bind(wxEVT_TIMER, &MyFrame::OnTimer, this, m_timer.GetId());
	m_timer.Start(250);

	// 초기 차트 그리기
	drawChart(m_chartViewer);
}

void MyFrame::OnExit(wxCommandEvent& event)
{
	Close(true);
}

void MyFrame::OnAbout(wxCommandEvent& event)
{
	wxMessageBox("This is a wxWidgets Hello World example", "About Hello World", wxOK | wxICON_INFORMATION);
}

void MyFrame::OnToggle(wxCommandEvent& event)
{
	// 타이머 일시정지/재시작 토글 처리
	if (m_timer.IsRunning()) {
		m_timer.Stop();
		SetStatusText("Timer Stopped.");
	}
	else {
		m_timer.Start(250);
		SetStatusText("Timer Started.");
	}
}

void MyFrame::OnTimer(wxTimerEvent& event)
{
	// 데이터 업데이트: 가장 오래된 타임스탬프와 데이터 제거, 새로운 타임스탬프와 데이터 추가
	m_timeStamps.pop_front(); // 가장 오래된 타임스탬프 제거
	m_dataSeries.pop_front(); // 가장 오래된 데이터 제거

	// 새로운 타임스탬프 추가: 가장 최신 타임스탬프에 250ms를 더하여 새로운 타임스탬프 생성
	//m_timeStamps[m_sampleSize - 1] = m_timeStamps[m_sampleSize - 2] + 0.25; // 250ms 증가
	m_timeStamps.push_back(m_timeStamps.back() + 0.25); // 가장 최신 타임스탬프에 250ms 증가하여 추가


	// 바로 직전 데이터에 랜덤 변화량을 주어 값을 생성 (Random Walk)
	double currentVal = (m_dataSeries.empty() || m_dataSeries.back() == Chart::NoValue) ? 50 : m_dataSeries.back();
	currentVal += (rand() % 11) - 5;

	// 값이 범위(10~90)를 크게 벗어나지 않게 보정
	if (currentVal < 10)
		currentVal = 10;
	if (currentVal > 90)
		currentVal = 90;

	m_dataSeries.push_back(currentVal); // 가장 최신 데이터 추가

	// 차트 갱신
	drawChart(m_chartViewer);
}

void MyFrame::drawChart(wxChartViewer* viewer)
{
	// 550x330 크기의 XYChart 객체 생성
	XYChart* c = new XYChart(550, 330);

	// 백그라운드 색상 및 플롯 영역, 그리드 크기 설정
	c->setBackground(0xeeeeee);
	// 플롯 영역을 설정 (x, y, width, height) 및 배경색, 대체색(-1), 엣지색(-1), 가로 그리드색, 세로 그리드색
	c->setPlotArea(40, 20, 480, 260, 0xffffff, -1, -1, 0xcccccc, 0xcccccccc);

	// X축을 시간 포맷(hh:nn:ss)으로 설정
	c->xAxis()->setLabelFormat("{value|hh:nn:ss}"); // value: 차트가 표시하는 값, hh:nn:ss: 시간 포맷	
	c->xAxis()->setTickDensity(75); // X축 눈금 간격을 조절하여 시간 간격이 일정하게 보이도록 설정 (75 픽셀마다 눈금 표시)
	c->xAxis()->setTitle("Time");

	// Y축은 실시간 데이터 변동이 보이게 크기를 고정 (0~100)
	c->yAxis()->setLinearScale(0, 100, 20); // 0부터 100까지 20 간격으로 눈금 표시
	c->yAxis()->setTitle("Value");

	// 라인 레이어를 생성하고 선 색상을 지정, "Live Data"는 범례(Legend)에 표시될 이름
	// m_dataSeries와 m_timeStamps는 deque이므로, 이를 벡터로 변환하고 데이터만 DoubleArray로 전달하여 차트에 데이터를 설정한다.
	// 이렇게 변환해야 하기때문에 애초에 벡터로 선언하는게 나았을 수도 있지만 deque로 선언한 이유는 실시간 데이터 업데이트에서
	// 앞의 데이터를 제거하고 뒤에 새로운 데이터를 추가만하는 작업이 더 효율적이기 때문이다. 벡터는 앞의 데이터를 제거할 때 모든
	// 요소를 이동해야 하지만, deque는 양쪽에서 삽입과 삭제가 가능하므로 작업이 더 효율적이다. 그냥 내 추측이다.
	LineLayer* layer = c->addLineLayer(DoubleArray(std::vector<double>(m_dataSeries.begin(), m_dataSeries.end()).data(), m_dataSeries.size()), 0xff0000, "Live Data");
	layer->setXData(DoubleArray(std::vector<double>(m_timeStamps.begin(), m_timeStamps.end()).data(), m_timeStamps.size()));
	layer->setLineWidth(2); // 선의 두께를 2로 설정하여 실시간 데이터의 변동이 더 잘 보이도록 함
	// 범례(Lengend) 박스 설정 (x, y, vertical layout, font, font size) 및 배경색과 테두리 색상
	c->addLegend(430, 30, false, "Arial Bold", 9)->setBackground(0xeeeeee, 0xcccccc);

	// 생성한 차트를 뷰어에 연결하면 내부적으로 화면이 갱신됨
	viewer->setChart(c);
	//viewer->updateViewPort(true, true); // 뷰포트 업데이트 (차트가 변경되었음을 알림)
	// setchart()는 새로운 차트를 뷰어에 설정하는 함수이고, updateViewPort()는 뷰포트가 변경되었음을 알리는 함수이다.
	// setchart()를 호출하면 내부적으로 차트가 변경되었다고 인식하지만, updateViewPort()를 명시적으로 호출하여 뷰포트
	// 업데이트를 트리거하는 것이 좋다. 이렇게 하면 차트가 변경된 후에 뷰포트가 올바르게 갱신되어 화면에 최신 차트가 표시된다.
	// 지금은 마우스 휠로 확대/축소하는 기능은 없지만 그런 기능이 추가되면 차트가 변경될 때마다 명시적으로 updateViewPort()를
	// 호출하여 뷰포트를 갱신하는 것이 좋다.

	// ChartViewer에 넣은 뒤 완벽하게 안전하게 지울 수 있음
	delete c;
}


결과는 위 코드와 동일하다.


※ 참고

Documnetation


반응형
Posted by J-sean
:

[wxWidgets] Timer 타이머

C, C++ 2026. 5. 10. 19:41 |
반응형

타이머를 사용해 보자.


#include <wx/wx.h>

class MyApp : public wxApp
{
public:
	bool OnInit() override;
};

wxIMPLEMENT_APP(MyApp);

class MyFrame : public wxFrame
{
public:
	MyFrame();

private:
	wxTimer m_timer; // 타이머 객체 추가

	void OnHello(wxCommandEvent& event);
	void OnExit(wxCommandEvent& event);
	void OnAbout(wxCommandEvent& event);
	void OnTimer(wxTimerEvent& event); // 타이머 이벤트 핸들러 추가
};

enum
{
	ID_Hello = 1
};

bool MyApp::OnInit()
{
	MyFrame* frame = new MyFrame();
	frame->Show(true);
	return true;
}

MyFrame::MyFrame() : wxFrame(nullptr, wxID_ANY, "Hello World")
{
	wxMenu* menuFile = new wxMenu;
	menuFile->Append(ID_Hello, "&Hello...\tCtrl-H", "Help string shown in status bar for this menu item");
	menuFile->AppendSeparator();
	menuFile->Append(wxID_EXIT);

	wxMenu* menuHelp = new wxMenu;
	menuHelp->Append(wxID_ABOUT);

	wxMenuBar* menuBar = new wxMenuBar;
	menuBar->Append(menuFile, "&File");
	menuBar->Append(menuHelp, "&Help");

	SetMenuBar(menuBar);

	CreateStatusBar();
	SetStatusText("Welcome to wxWidgets!");

	// 타이머 초기화 및 시작 방법 1: 타이머 객체에 직접 이벤트 핸들러 바인딩
	m_timer.Bind(wxEVT_TIMER, &MyFrame::OnTimer, this, m_timer.GetId()); // 타이머 이벤트 핸들러 바인딩	
	m_timer.Start(1000); // 1초마다 타이머 이벤트 발생

	// 타이머 초기화 및 시작 방법 2: 프레임에서 타이머 이벤트 핸들러 바인딩
	//m_timer.SetOwner(this); // 타이머의 소유자를 현재 프레임으로 설정
	//Bind(wxEVT_TIMER, &MyFrame::OnTimer, this, m_timer.GetId()); // 현재 프레임에서 타이머 이벤트 핸들러 바인딩
	//m_timer.Start(1000); // 1초마다 타이머 이벤트 발생

	wxPanel* panel = new wxPanel(this, wxID_ANY);
	wxButton* myButton = new wxButton(panel, wxID_ANY, "Press Me", wxPoint(30, 30), wxSize(100, 30));
	myButton->Bind(wxEVT_BUTTON, &MyFrame::OnHello, this);
	//Bind(wxEVT_BUTTON, &MyFrame::OnHello, this, myButton->GetId());

	Bind(wxEVT_MENU, &MyFrame::OnHello, this, ID_Hello);
	Bind(wxEVT_MENU, &MyFrame::OnAbout, this, wxID_ABOUT);
	Bind(wxEVT_MENU, &MyFrame::OnExit, this, wxID_EXIT);
}

void MyFrame::OnExit(wxCommandEvent& event)
{
	Close(true);
}

void MyFrame::OnAbout(wxCommandEvent& event)
{
	wxMessageBox("This is a wxWidgets Hello World example", "About Hello World", wxOK | wxICON_INFORMATION);
}

void MyFrame::OnHello(wxCommandEvent& event)
{
	wxLogMessage("Hello world from wxWidgets!");
}

void MyFrame::OnTimer(wxTimerEvent& event) // 타이머 이벤트 핸들러 구현
{
	static int count = 0;
	count++;
	SetStatusText(wxString::Format("Timer tick: %d", count));
}


상태표시줄에 타이머 동작이 표시된다.


복수의 타이머도 동일한 방법으로 생성한다.

#include <wx/wx.h>

class MyApp : public wxApp
{
public:
	bool OnInit() override;
};

wxIMPLEMENT_APP(MyApp);

class MyFrame : public wxFrame
{
public:
	MyFrame();

private:
	wxTimer m_timer; // 타이머 객체 추가
	wxTimer m_timer2; // 타이머 객체 추가

	void OnHello(wxCommandEvent& event);
	void OnExit(wxCommandEvent& event);
	void OnAbout(wxCommandEvent& event);
	void OnTimer(wxTimerEvent& event); // 타이머 이벤트 핸들러 추가
	void OnTimer2(wxTimerEvent& event); // 타이머 이벤트 핸들러 추가
};

enum
{
	ID_Hello = 1
};

bool MyApp::OnInit()
{
	MyFrame* frame = new MyFrame();
	frame->Show(true);
	return true;
}

MyFrame::MyFrame() : wxFrame(nullptr, wxID_ANY, "Hello World")
{
	wxMenu* menuFile = new wxMenu;
	menuFile->Append(ID_Hello, "&Hello...\tCtrl-H", "Help string shown in status bar for this menu item");
	menuFile->AppendSeparator();
	menuFile->Append(wxID_EXIT);

	wxMenu* menuHelp = new wxMenu;
	menuHelp->Append(wxID_ABOUT);

	wxMenuBar* menuBar = new wxMenuBar;
	menuBar->Append(menuFile, "&File");
	menuBar->Append(menuHelp, "&Help");

	SetMenuBar(menuBar);

	CreateStatusBar();
	SetStatusText("Welcome to wxWidgets!");

	// 타이머 초기화 및 시작 방법 1: 타이머 객체에 직접 이벤트 핸들러 바인딩
	m_timer.Bind(wxEVT_TIMER, &MyFrame::OnTimer, this, m_timer.GetId()); // 타이머 이벤트 핸들러 바인딩	
	m_timer.Start(1000); // 1초마다 타이머 이벤트 발생

	m_timer2.Bind(wxEVT_TIMER, &MyFrame::OnTimer2, this, m_timer2.GetId()); // 타이머2 이벤트 핸들러 바인딩
	m_timer2.Start(1000); // 1초마다 타이머2 이벤트 발생

	// 타이머 초기화 및 시작 방법 2: 프레임에서 타이머 이벤트 핸들러 바인딩
	//m_timer.SetOwner(this); // 타이머의 소유자를 현재 프레임으로 설정
	//Bind(wxEVT_TIMER, &MyFrame::OnTimer, this, m_timer.GetId()); // 현재 프레임에서 타이머 이벤트 핸들러 바인딩
	//m_timer.Start(1000); // 1초마다 타이머 이벤트 발생

	//m_timer2.SetOwner(this); // 타이머2의 소유자를 현재 프레임으로 설정
	//Bind(wxEVT_TIMER, &MyFrame::OnTimer2, this, m_timer2.GetId()); // 현재 프레임에서 타이머2 이벤트 핸들러 바인딩
	//m_timer2.Start(1000); // 1초마다 타이머2 이벤트 발생

	wxPanel* panel = new wxPanel(this, wxID_ANY);
	wxButton* myButton = new wxButton(panel, wxID_ANY, "Press Me", wxPoint(30, 30), wxSize(100, 30));
	myButton->Bind(wxEVT_BUTTON, &MyFrame::OnHello, this);
	//Bind(wxEVT_BUTTON, &MyFrame::OnHello, this, myButton->GetId());

	Bind(wxEVT_MENU, &MyFrame::OnHello, this, ID_Hello);
	Bind(wxEVT_MENU, &MyFrame::OnAbout, this, wxID_ABOUT);
	Bind(wxEVT_MENU, &MyFrame::OnExit, this, wxID_EXIT);
}

void MyFrame::OnExit(wxCommandEvent& event)
{
	Close(true);
}

void MyFrame::OnAbout(wxCommandEvent& event)
{
	wxMessageBox("This is a wxWidgets Hello World example", "About Hello World", wxOK | wxICON_INFORMATION);
}

void MyFrame::OnHello(wxCommandEvent& event)
{
	wxLogMessage("Hello world from wxWidgets!");
}

void MyFrame::OnTimer(wxTimerEvent& event) // 타이머 이벤트 핸들러 구현
{
	static int count = 0;
	count++;
	SetStatusText(wxString::Format("Timer tick: %d", count));
}

void MyFrame::OnTimer2(wxTimerEvent& event) // 타이머 이벤트 핸들러 구현
{
	static int count = 0;
	count++;
	SetTitle(wxString::Format("Timer2 tick: %d", count));
}


반응형
Posted by J-sean
:
반응형

wxChartDir은 ChartDir(ChartDirector)의 wxWidgets 프레임워크 래퍼(wrapper)다.

실제 차트를 그리고(렌더링) 데이터를 처리하는 핵심 엔진은 ChartDir이기 때문에, wxChartDir을 사용하려면 ChartDir이 필요하다.

wxChartDir로 wxWidgets 애플리케이션에 차트를 그려보자.


우선 wxChartDir을 빌드하자.

vcpkg install wxchartdir


ChartDirector에서 ChartDirector for C++을 다운로드받자.


다운로드받은 ChartDirector for C++을 확인해 보면 위와 같은 구조로 되어 있는데, 개발에 필요한 부분은 include와 lib64(또는 lib32) 디렉토리의 파일들이다.

위에서 vcpkg로 빌드한 wxChartDir의 폴더에 각각의 파일을 복사해 넣자. (chartdirXX.dll 파일도 lib64 디렉토리에 있다)


Include, Library 폴더 등을 적당히 세팅하고 아래 코드를 입력한다.

#include <wx/wx.h>
#include <wxchartdir/chartdir.h>
#include <wxchartdir/wxchartviewer.h>

#pragma comment(lib, "chartdir70.lib")
#pragma comment(lib, "wxchartdir.lib")

class MyApp : public wxApp
{
public:
	bool OnInit() override;
};

wxIMPLEMENT_APP(MyApp);

class MyFrame : public wxFrame
{
public:
	MyFrame();

private:
	void OnHello(wxCommandEvent& event);
	void OnExit(wxCommandEvent& event);
	void OnAbout(wxCommandEvent& event);

	wxPanel* panel;
};

enum
{
	ID_Hello = 1
};

bool MyApp::OnInit()
{
	MyFrame* frame = new MyFrame();
	frame->Show(true);
	return true;
}

// 메인 프레임의 위치(default position)와 크기(550x400)를 설정한다.
MyFrame::MyFrame() : wxFrame(nullptr, wxID_ANY, "Hello World", wxDefaultPosition, wxSize(550, 400))
{
	wxMenu* menuFile = new wxMenu;
	menuFile->Append(ID_Hello, "&Hello...\tCtrl-H", "Help string shown in status bar for this menu item");
	menuFile->AppendSeparator();
	menuFile->Append(wxID_EXIT);

	wxMenu* menuHelp = new wxMenu;
	menuHelp->Append(wxID_ABOUT);

	wxMenuBar* menuBar = new wxMenuBar;
	menuBar->Append(menuFile, "&File");
	menuBar->Append(menuHelp, "&Help");

	SetMenuBar(menuBar);

	CreateStatusBar();
	SetStatusText("Welcome to wxWidgets!");

	panel = new wxPanel(this, wxID_ANY);

	wxButton* myButton = new wxButton(panel, wxID_ANY, "Press Me", wxPoint(420, 30), wxSize(100, 30));
	myButton->Bind(wxEVT_BUTTON, &MyFrame::OnHello, this);

	Bind(wxEVT_MENU, &MyFrame::OnHello, this, ID_Hello);
	Bind(wxEVT_MENU, &MyFrame::OnAbout, this, wxID_ABOUT);
	Bind(wxEVT_MENU, &MyFrame::OnExit, this, wxID_EXIT);
}

void MyFrame::OnExit(wxCommandEvent& event)
{
	Close(true);
}

void MyFrame::OnAbout(wxCommandEvent& event)
{
	wxMessageBox("This is a wxWidgets Hello World example", "About Hello World", wxOK | wxICON_INFORMATION);
}

void MyFrame::OnHello(wxCommandEvent& event)
{
	// 데이터와 라벨 준비
	double data[] = { 85, 156, 179.5, 211, 123 };
	const char* labels[] = { "Mon", "Tue", "Wed", "Thu", "Fri" };

	// 400x300 크기의 XYChart 객체 생성
	XYChart* c = new XYChart(400, 300);

	// 플롯 영역 설정 (여백 조정)
	c->setPlotArea(40, 20, 300, 250);

	// 바 차트 레이어 추가
	c->addBarLayer(DoubleArray(data, (int)(sizeof(data) / sizeof(data[0]))));

	// X축에 라벨 설정
	c->xAxis()->setLabels(StringArray(labels, (int)(sizeof(labels) / sizeof(labels[0]))));

	// 차트 뷰어 생성 (wxPanel 위에 위치)
	wxChartViewer* chartViewer = new wxChartViewer(panel, wxID_ANY, wxPoint(10, 10), wxSize(400, 300));

	// 생성한 차트를 뷰어에 연결
	// wxChartViewer는 setChart에서 내부적으로 상태를 업데이트하거나 사용할 수 있지만, 
	// 라이브러리의 방식에 따라 BaseChart(XYChart)의 생명주기를 어떻게 관리해야 할지 주의해야 한다.
	chartViewer->setChart(c);

	// 문서에 따르면 setChart를 호출한 후 곧바로 BaseChart를 삭제하거나 로컬 스택에 할당하는 것도 완벽하게 안전하다.
	// "So it is perfectly safe to immediately delete the BaseChart after calling wxChartViewer::setChart"
	delete c;
}


버튼을 클릭하면 차트가 표시된다.


ChartDirector는 상용 라이브러리이기 때문에 라이선스를 구입하지 않으면 아래에 노란 광고가 표시된다.


더보기

ChartViewer의 크기를 XYChart 객체보다 10픽셀 정도(정확히는 9픽셀) 작게 하면 노란 광고를 보이지 않게 할 수 있다.  

(이 예제는 필요 없지만, X축 레이블이 광고와 겹친다면 setPlotArea()에서 플롯 영역의 높이도 조정해야 한다, 아래 히스토그램 예제 참고)

.
.
.
// 400x300 크기의 XYChart 객체 생성
XYChart* c = new XYChart(400, 300);
.
.
.
// 차트 뷰어 생성 (wxPanel 위에 위치)
wxChartViewer* chartViewer = new wxChartViewer(panel, wxID_ANY, wxPoint(10, 10), wxSize(400, 300-10));
// 차트 뷰어의 크기를 XYChart 객체보다 10픽셀 정도 작게 설정하면 노란 광고 배너가 보이지 않게 된다.
.
.
.


Line Chart를 만들어 보자.

#include <wx/wx.h>
#include <wxchartdir/chartdir.h>
#include <wxchartdir/wxchartviewer.h>

#pragma comment(lib, "chartdir70.lib")
#pragma comment(lib, "wxchartdir.lib")

class MyApp : public wxApp
{
public:
	bool OnInit() override;
};

wxIMPLEMENT_APP(MyApp);

class MyFrame : public wxFrame
{
public:
	MyFrame();

private:
	void OnHello(wxCommandEvent& event);
	void OnExit(wxCommandEvent& event);
	void OnAbout(wxCommandEvent& event);

	wxPanel* panel;
};

enum
{
	ID_Hello = 1
};

bool MyApp::OnInit()
{
	MyFrame* frame = new MyFrame();
	frame->Show(true);
	return true;
}

// 메인 프레임의 위치(default position)와 크기(550x400)를 설정한다.
MyFrame::MyFrame() : wxFrame(nullptr, wxID_ANY, "Hello World", wxDefaultPosition, wxSize(550, 400))
{
	wxMenu* menuFile = new wxMenu;
	menuFile->Append(ID_Hello, "&Hello...\tCtrl-H", "Help string shown in status bar for this menu item");
	menuFile->AppendSeparator();
	menuFile->Append(wxID_EXIT);

	wxMenu* menuHelp = new wxMenu;
	menuHelp->Append(wxID_ABOUT);

	wxMenuBar* menuBar = new wxMenuBar;
	menuBar->Append(menuFile, "&File");
	menuBar->Append(menuHelp, "&Help");

	SetMenuBar(menuBar);

	CreateStatusBar();
	SetStatusText("Welcome to wxWidgets!");

	panel = new wxPanel(this, wxID_ANY);

	wxButton* myButton = new wxButton(panel, wxID_ANY, "Press Me", wxPoint(420, 30), wxSize(100, 30));
	myButton->Bind(wxEVT_BUTTON, &MyFrame::OnHello, this);

	Bind(wxEVT_MENU, &MyFrame::OnHello, this, ID_Hello);
	Bind(wxEVT_MENU, &MyFrame::OnAbout, this, wxID_ABOUT);
	Bind(wxEVT_MENU, &MyFrame::OnExit, this, wxID_EXIT);
}

void MyFrame::OnExit(wxCommandEvent& event)
{
	Close(true);
}

void MyFrame::OnAbout(wxCommandEvent& event)
{
	wxMessageBox("This is a wxWidgets Hello World example", "About Hello World", wxOK | wxICON_INFORMATION);
}

void MyFrame::OnHello(wxCommandEvent& event)
{
	// The data for the line chart
	double data[] = { 30, 28, 40, 55, 75, 68, 54, 60, 50, 62, 75, 65, 75, 91, 60, 55, 53, 35, 50, 66,
		56, 48, 52, 65, 62 };
	const int data_size = (int)(sizeof(data) / sizeof(*data));

	// The labels for the line chart
	const char* labels[] = { "0", "1", "2", "3", "4", "5", "6", "7", "8", "9", "10", "11", "12",
		"13", "14", "15", "16", "17", "18", "19", "20", "21", "22", "23", "24" };
	const int labels_size = (int)(sizeof(labels) / sizeof(*labels));

	// Create a XYChart object of size 250 x 250 pixels
	XYChart* c = new XYChart(250, 250);

	// Set the plotarea at (30, 20) and of size 200 x 200 pixels
	c->setPlotArea(30, 20, 200, 200);

	// Add a line chart layer using the given data
	c->addLineLayer(DoubleArray(data, data_size));

	// Set the labels on the x axis.
	c->xAxis()->setLabels(StringArray(labels, labels_size));

	// Display 1 out of 3 labels on the x-axis.
	c->xAxis()->setLabelStep(3);

	// Create a ChartViewer to display the chart 
	wxChartViewer* chartViewer = new wxChartViewer(panel, wxID_ANY, wxPoint(10, 10), wxSize(250, 250));
	chartViewer->setChart(c);

	//free up resources
	delete c;
}


간단한 리얼타임 차트 만들기

2026.05.10 - [C, C++] - [wxWidgets] wxChartDir Simple Real-Time Chart 간단한 리얼타임 차트


히스토그램과 벨 커브를 그려보자.

#include <wx/wx.h>
#include <wxchartdir/chartdir.h>
#include <wxchartdir/wxchartviewer.h>

#include <math.h>

#pragma comment(lib, "chartdir70.lib")
#pragma comment(lib, "wxchartdir.lib")

class MyApp : public wxApp
{
public:
	bool OnInit() override;
};

wxIMPLEMENT_APP(MyApp);

class MyFrame : public wxFrame
{
public:
	MyFrame();

private:
	void OnHello(wxCommandEvent& event);
	void OnExit(wxCommandEvent& event);
	void OnAbout(wxCommandEvent& event);

	wxPanel* panel;
};

enum
{
	ID_Hello = 1
};

bool MyApp::OnInit()
{
	MyFrame* frame = new MyFrame();
	frame->Show(true);
	return true;
}

// 메인 프레임의 위치(default position)와 크기(750x500)를 설정한다.
MyFrame::MyFrame() : wxFrame(nullptr, wxID_ANY, "Hello World", wxDefaultPosition, wxSize(750, 500))
{
	wxMenu* menuFile = new wxMenu;
	menuFile->Append(ID_Hello, "&Hello...\tCtrl-H", "Help string shown in status bar for this menu item");
	menuFile->AppendSeparator();
	menuFile->Append(wxID_EXIT);

	wxMenu* menuHelp = new wxMenu;
	menuHelp->Append(wxID_ABOUT);

	wxMenuBar* menuBar = new wxMenuBar;
	menuBar->Append(menuFile, "&File");
	menuBar->Append(menuHelp, "&Help");

	SetMenuBar(menuBar);

	CreateStatusBar();
	SetStatusText("Welcome to wxWidgets!");

	panel = new wxPanel(this, wxID_ANY);

	wxButton* myButton = new wxButton(panel, wxID_ANY, "Press Me", wxPoint(620, 30), wxSize(100, 30));
	myButton->Bind(wxEVT_BUTTON, &MyFrame::OnHello, this);

	Bind(wxEVT_MENU, &MyFrame::OnHello, this, ID_Hello);
	Bind(wxEVT_MENU, &MyFrame::OnAbout, this, wxID_ABOUT);
	Bind(wxEVT_MENU, &MyFrame::OnExit, this, wxID_EXIT);
}

void MyFrame::OnExit(wxCommandEvent& event)
{
	Close(true);
}

void MyFrame::OnAbout(wxCommandEvent& event)
{
	wxMessageBox("This is a wxWidgets Hello World example", "About Hello World", wxOK | wxICON_INFORMATION);
}

void MyFrame::OnHello(wxCommandEvent& event)
{
	char buffer[1024];

	//
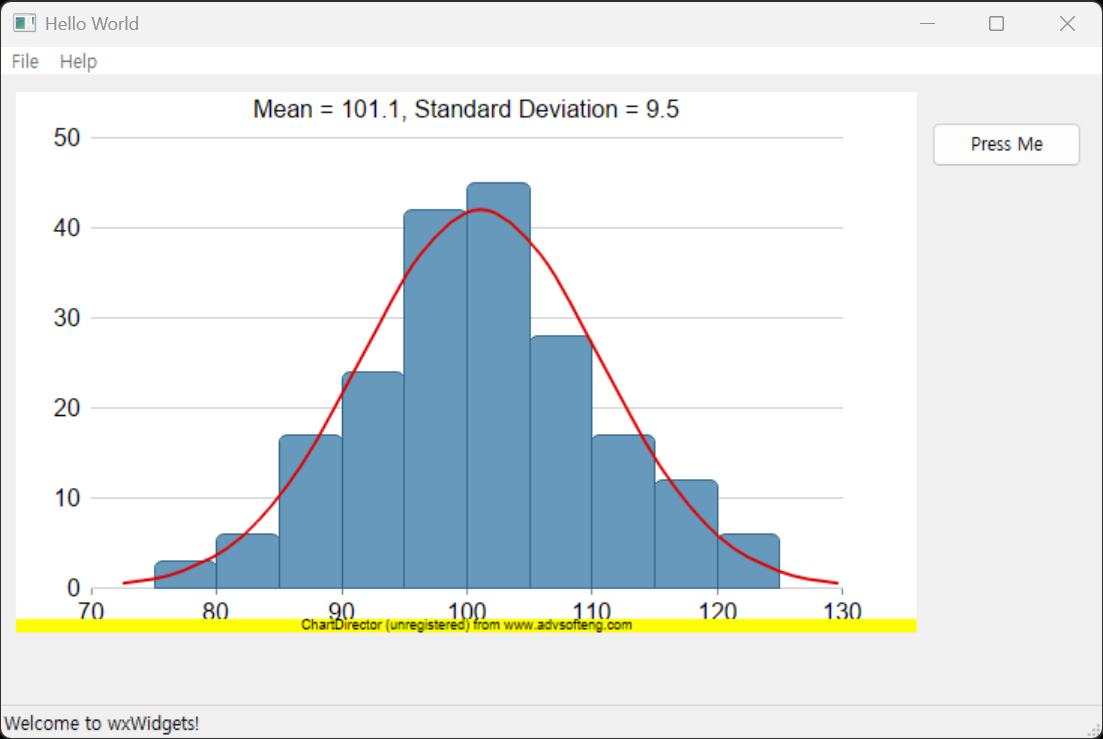
	// This example demonstrates creating a histogram with a bell curve from raw data. About half of
	// the code is to sort the raw data into slots and to generate the points on the bell curve. The
	// remaining half of the code is the actual charting code.
	//

	// 히스토그램 및 벨 커브 데이터 생성

	// Generate a random guassian distributed data series as the input data for this example.
	RanSeries* r = new RanSeries(66);
	DoubleArray samples = r->getGaussianSeries(200, 100, 10);

	//
	// Classify the numbers into slots. In this example, the slot width is 5 units.
	//
	double slotSize = 5;

	// Compute the min and max values, and extend them to the slot boundary.
	ArrayMath m = ArrayMath(samples);
	double minX = (int)(m.minValue() / slotSize) * slotSize;
	double maxX = (int)(m.maxValue() / slotSize) * slotSize + slotSize;

	// We can now determine the number of slots
	// slot의 개수를 계산한다. slotCount는 (maxX - minX) / slotSize로 계산되며, 소수점 첫째 자리에서 반올림하여 정수로 변환된다.
	int slotCount = (int)((maxX - minX) / slotSize + 0.5);
	double* frequency = new double[slotCount];
	memset(frequency, 0, sizeof(*frequency) * slotCount);

	// Count the data points contained in each slot
	// frequency에 각 slot에 해당하는 데이터 포인트의 개수를 저장한다. samples 배열의 각 요소에 대해, 해당 요소가 속하는 slot의
	// 인덱스를 계산하여 frequency 배열에서 해당 slot의 개수를 증가시킨다. slotIndex는 (samples[i] - minX) / slotSize로 계산되며
	// 이는 samples[i]가 minX에서 시작하여 slotSize 간격으로 나누어진 slot 중 어디에 위치하는지를 나타낸다.
	for (int i = 0; i < samples.len; ++i) {
		int slotIndex = (int)((samples[i] - minX) / slotSize);
		frequency[slotIndex] = frequency[slotIndex] + 1;
	}

	//
	// Compute Normal Distribution Curve
	//

	// The mean and standard deviation of the data
	double mean = m.avg();
	double stdDev = m.stdDev();

	// The normal distribution curve (bell curve) is a standard statistics curve. We need to
	// vertically scale it to make it proportion to the frequency count.
	double scaleFactor = slotSize * samples.len / stdDev / sqrt(2 * 3.1416);

	// In this example, we plot the bell curve up to 3 standard deviations.
	double stdDevWidth = 3.0;

	// We generate 4 points per standard deviation to be joined with a spline curve.
	int bellCurveResolution = (int)(stdDevWidth * 4 + 1);
	double* bellCurve = new double[bellCurveResolution];
	for (int i = 0; i < bellCurveResolution; ++i) {
		double z = 2 * i * stdDevWidth / (bellCurveResolution - 1) - stdDevWidth;
		bellCurve[i] = exp(-z * z / 2) * scaleFactor;
	}

	//
	// At this stage, we have obtained all data and can plot the chart.
	//

	// 히스토그램과 벨 커브 차트 생성

	// Create a XYChart object of size 600 x 360 pixels
	XYChart* c = new XYChart(600, 360);

	// Set the plotarea at (50, 30) and of size 500 x 300 pixels, with transparent background and
	// border and light grey (0xcccccc) horizontal grid lines
	c->setPlotArea(50, 30, 500, 300, Chart::Transparent, -1, Chart::Transparent, 0xcccccc);
	// 이 예제대로 플롯 영역의 높이를 300으로 설정하면 노란 광고 배너가 플롯 영역의 x축 레이블과 겹쳐서 보이게 된다.
	// 플롯 영역의 높이를 20정도 줄이면(300-20) 광고 배너와 겹치지 않게 된다. 그리고 아래 chartViewer의 크기도 20정도
	// 줄이면(360-20) 광고 배너도 보이지않게 할 수 있다.

	// Display the mean and standard deviation on the chart
	sprintf(buffer, "Mean = %.1f, Standard Deviation = %.1f", mean, stdDev);
	c->addTitle(buffer, "Arial");

	// Set the x and y axis label font to 12pt Arial
	c->xAxis()->setLabelStyle("Arial", 12);
	c->yAxis()->setLabelStyle("Arial", 12);

	// Set the x and y axis stems to transparent, and the x-axis tick color to grey (0x888888)
	c->xAxis()->setColors(Chart::Transparent, Chart::TextColor, Chart::TextColor, 0x888888);
	c->yAxis()->setColors(Chart::Transparent);

	// 벨 커브 그리기, 벨 커브가 필요 없다면 이 부분을 제거하면 된다.
	// Draw the bell curve as a spline layer in red (0xdd0000) with 2-pixel line width
	SplineLayer* bellLayer = c->addSplineLayer(DoubleArray(bellCurve, bellCurveResolution), 0xdd0000
	);
	bellLayer->setXData(mean - stdDevWidth * stdDev, mean + stdDevWidth * stdDev);
	bellLayer->setLineWidth(2);

	// 히스토그램 그리기
	// Draw the histogram as bars in blue (0x6699bb) with dark blue (0x336688) border
	BarLayer* histogramLayer = c->addBarLayer(DoubleArray(frequency, slotCount), 0x6699bb);
	histogramLayer->setBorderColor(0x336688);
	// The center of the bars span from minX + half_bar_width to maxX - half_bar_width
	histogramLayer->setXData(minX + slotSize / 2.0, maxX - slotSize / 2.0);
	// Configure the bars to touch each other with no gap in between
	histogramLayer->setBarGap(Chart::TouchBar);
	// Use rounded corners for decoration
	histogramLayer->setRoundedCorners();

	// ChartDirector by default will extend the x-axis scale by 0.5 unit to cater for the bar width.
	// It is because a bar plotted at x actually occupies (x +/- half_bar_width), and the bar width
	// is normally 1 for label based x-axis. However, this chart is using a linear x-axis instead of
	// label based. So we disable the automatic extension and add a dummy layer to extend the x-axis
	// scale to cover minX to maxX.
	c->xAxis()->setIndent(false);
	c->addLineLayer()->setXData(minX, maxX);

	// For the automatic y-axis labels, set the minimum spacing to 40 pixels.
	c->yAxis()->setTickDensity(40);

	// 차트 뷰어 생성 (wxPanel 위에 위치)
	wxChartViewer* chartViewer = new wxChartViewer(panel, wxID_ANY, wxPoint(10, 10), wxSize(600, 360));

	// 생성한 차트를 뷰어에 연결
	chartViewer->setChart(c);

	// 문서에 따르면 setChart를 호출한 후 곧바로 BaseChart를 삭제하거나 로컬 스택에 할당하는 것도 완벽하게 안전하다.
	// "So it is perfectly safe to immediately delete the BaseChart after calling wxChartViewer::setChart"
	delete c;
}


Angular Meter를 만들어 보자.

#include <wx/wx.h>
#include <wxchartdir/chartdir.h>
#include <wxchartdir/wxchartviewer.h>

#pragma comment(lib, "chartdir70.lib")
#pragma comment(lib, "wxchartdir.lib")

class MyApp : public wxApp
{
public:
	bool OnInit() override;
};

wxIMPLEMENT_APP(MyApp);

class MyFrame : public wxFrame
{
public:
	MyFrame();

private:
	void OnHello(wxCommandEvent& event);
	void OnExit(wxCommandEvent& event);
	void OnAbout(wxCommandEvent& event);

	wxPanel* panel;
};

enum
{
	ID_Hello = 1
};

bool MyApp::OnInit()
{
	MyFrame* frame = new MyFrame();
	frame->Show(true);
	return true;
}

// 메인 프레임의 위치(default position)와 크기(550x400)를 설정한다.
MyFrame::MyFrame() : wxFrame(nullptr, wxID_ANY, "Hello World", wxDefaultPosition, wxSize(550, 400))
{
	wxMenu* menuFile = new wxMenu;
	menuFile->Append(ID_Hello, "&Hello...\tCtrl-H", "Help string shown in status bar for this menu item");
	menuFile->AppendSeparator();
	menuFile->Append(wxID_EXIT);

	wxMenu* menuHelp = new wxMenu;
	menuHelp->Append(wxID_ABOUT);

	wxMenuBar* menuBar = new wxMenuBar;
	menuBar->Append(menuFile, "&File");
	menuBar->Append(menuHelp, "&Help");

	SetMenuBar(menuBar);

	CreateStatusBar();
	SetStatusText("Welcome to wxWidgets!");

	panel = new wxPanel(this, wxID_ANY);

	wxButton* myButton = new wxButton(panel, wxID_ANY, "Press Me", wxPoint(420, 30), wxSize(100, 30));
	myButton->Bind(wxEVT_BUTTON, &MyFrame::OnHello, this);

	Bind(wxEVT_MENU, &MyFrame::OnHello, this, ID_Hello);
	Bind(wxEVT_MENU, &MyFrame::OnAbout, this, wxID_ABOUT);
	Bind(wxEVT_MENU, &MyFrame::OnExit, this, wxID_EXIT);
}

void MyFrame::OnExit(wxCommandEvent& event)
{
	Close(true);
}

void MyFrame::OnAbout(wxCommandEvent& event)
{
	wxMessageBox("This is a wxWidgets Hello World example", "About Hello World", wxOK | wxICON_INFORMATION);
}

void MyFrame::OnHello(wxCommandEvent& event)
{
	// The value to display on the meter
	double value = 72.55;

	// Create an AngularMeter object of size 300 x 180 pixels with transparent background
	//AngularMeter* m = new AngularMeter(300, 180, Chart::Transparent);
	// 
	// Chart::Transparent는 wxChartViewer에서 검정색으로 렌더링될 수 있으므로, 패널의 배경색을 설정한다.
	wxColour bgColour = panel->GetBackgroundColour();
	int chartBgColor = (bgColour.Red() << 16) | (bgColour.Green() << 8) | bgColour.Blue();
	AngularMeter* m = new AngularMeter(300, 180, chartBgColor);

	// Center at (150, 150), scale radius = 128 pixels, scale angle -90 to +90 degrees
	m->setMeter(150, 150, 128, -90, 90);

	// Add a pale grey (0xeeeeee) scale background of 148 pixels radius, with a 10 pixel thick light
	// grey (0xcccccc) border
	m->addScaleBackground(148, 0xeeeeee, 10, 0xcccccc);

	// Meter scale is 0 - 100, with major tick every 20 units, minor tick every 10 units, and micro
	// tick every 5 units
	m->setScale(0, 100, 20, 10, 5);

	// Set the scale label style to 15pt Arial Italic. Set the major/minor/micro tick lengths to
	// 16/16/10 pixels pointing inwards, and their widths to 2/1/1 pixels.
	m->setLabelStyle("Arial Italic", 16);
	m->setTickLength(-16, -16, -10);
	m->setLineWidth(0, 2, 1, 1);

	// Add a smooth color scale to the meter
	double smoothColorScale[] = { 0, 0x3333ff, 25, 0x0088ff, 50, 0x00ff00, 75, 0xdddd00, 100, 0xff0000 };
	const int smoothColorScale_size = (int)(sizeof(smoothColorScale) / sizeof(*smoothColorScale));
	m->addColorScale(DoubleArray(smoothColorScale, smoothColorScale_size));

	// Add a text label centered at (150, 125) with 15pt Arial Italic font
	m->addText(150, 125, "CPU", "Arial Italic", 15, Chart::TextColor, Chart::BottomCenter);

	// Add a red (0xff0000) pointer at the specified value
	// addPointer() 메서드와 addPointer2() 메서드는 포인터의 모양이 약간 다르다.
	m->addPointer2(value, 0xff0000);

	// Create a wxChartViewer to display the meter, with a size of 300 x 180 pixels
	wxChartViewer* meterViewer = new wxChartViewer(panel, wxID_ANY, wxPoint(10, 10), wxSize(300, 180));
	meterViewer->setChart(m);

	//free up resources
	delete m;
}


※ 참고

ChartDirector Documentation

wxChartDir

wxChartDir Documentation


반응형
Posted by J-sean
:
반응형

wxCharts를 이용해 차트를 그려보자.


vcpkg install wxcharts

Include, Library 등을 적당히 세팅한다.


#include <wx/wx.h>
#include <wxcharts/wx/charts/wxchart.h> // wxCharts 라이브러리의 헤더 파일을 포함한다.
#include <wxcharts/wx/charts/wxbarchartctrl.h> // wxBarChartCtrl 클래스의 헤더 파일을 포함한다.

#pragma comment(lib, "wxchartsd.lib") // wxCharts 라이브러리를 링크한다.

class MyApp : public wxApp
{
public:
	bool OnInit() override;
};

wxIMPLEMENT_APP(MyApp);

class MyFrame : public wxFrame
{
public:
	MyFrame();

private:
	void OnHello(wxCommandEvent& event);
	void OnExit(wxCommandEvent& event);
	void OnAbout(wxCommandEvent& event);

	wxPanel* panel;
};

enum
{
	ID_Hello = 1
};

bool MyApp::OnInit()
{
	MyFrame* frame = new MyFrame();
	frame->Show(true);
	return true;
}

// 메인 프레임의 위치(default position)와 크기(550x400)를 설정한다.
MyFrame::MyFrame() : wxFrame(nullptr, wxID_ANY, "Hello World", wxDefaultPosition, wxSize(550, 400))
{
	wxMenu* menuFile = new wxMenu;
	menuFile->Append(ID_Hello, "&Hello...\tCtrl-H", "Help string shown in status bar for this menu item");
	menuFile->AppendSeparator();
	menuFile->Append(wxID_EXIT);

	wxMenu* menuHelp = new wxMenu;
	menuHelp->Append(wxID_ABOUT);

	wxMenuBar* menuBar = new wxMenuBar;
	menuBar->Append(menuFile, "&File");
	menuBar->Append(menuHelp, "&Help");

	SetMenuBar(menuBar);

	CreateStatusBar();
	SetStatusText("Welcome to wxWidgets!");

	panel = new wxPanel(this, wxID_ANY);

	wxButton* myButton = new wxButton(panel, wxID_ANY, "Press Me", wxPoint(420, 30), wxSize(100, 30));
	myButton->Bind(wxEVT_BUTTON, &MyFrame::OnHello, this);

	Bind(wxEVT_MENU, &MyFrame::OnHello, this, ID_Hello);
	Bind(wxEVT_MENU, &MyFrame::OnAbout, this, wxID_ABOUT);
	Bind(wxEVT_MENU, &MyFrame::OnExit, this, wxID_EXIT);
}

void MyFrame::OnExit(wxCommandEvent& event)
{
	Close(true);
}

void MyFrame::OnAbout(wxCommandEvent& event)
{
	wxMessageBox("This is a wxWidgets Hello World example", "About Hello World", wxOK | wxICON_INFORMATION);
}

void MyFrame::OnHello(wxCommandEvent& event)
{
	//wxLogMessage("Hello world from wxWidgets!");

	// wxCharts 라이브러리를 사용하여 막대 그래프를 생성
	// Create the data for the bar chart widget
	wxVector<wxString> labels;
	labels.push_back("January");
	labels.push_back("February");
	labels.push_back("March");
	labels.push_back("April");
	labels.push_back("May");
	labels.push_back("June");
	labels.push_back("July");
	wxChartsCategoricalData::ptr chartData = wxChartsCategoricalData::make_shared(labels);

	// Add the first dataset
	wxVector<wxDouble> points1;
	points1.push_back(3);
	points1.push_back(2.5);
	points1.push_back(1.2);
	points1.push_back(3);
	points1.push_back(6);
	points1.push_back(5);
	points1.push_back(1);
	wxChartsDoubleDataset::ptr dataset1(new wxChartsDoubleDataset("Dataset 1", points1));
	chartData->AddDataset(dataset1);

	// Add the second dataset
	wxVector<wxDouble> points2;
	points2.push_back(1);
	points2.push_back(1.33);
	points2.push_back(2.5);
	points2.push_back(2);
	points2.push_back(3);
	points2.push_back(1.8);
	points2.push_back(0.4);
	wxChartsDoubleDataset::ptr dataset2(new wxChartsDoubleDataset("Dataset 2", points2));
	chartData->AddDataset(dataset2);

	// Create the bar chart widget
	wxBarChartCtrl* barChartCtrl = new wxBarChartCtrl(panel, wxID_ANY, chartData);
	barChartCtrl->SetSize(400, 300);

	// Set up the sizer for the panel
	//wxBoxSizer* panelSizer = new wxBoxSizer(wxHORIZONTAL);
	//panelSizer->Add(barChartCtrl, 1, wxEXPAND);
	//panel->SetSizer(panelSizer);
}


버튼을 클릭한다.


Panel에 차트가 표시된다.


grid를 없애 보자.

void MyFrame::OnHello(wxCommandEvent& event)
{
	//wxLogMessage("Hello world from wxWidgets!");

	// wxCharts 라이브러리를 사용하여 막대 그래프를 생성
	// Create the data for the bar chart widget
	wxVector<wxString> labels;
	labels.push_back("January");
	labels.push_back("February");
	labels.push_back("March");
	labels.push_back("April");
	labels.push_back("May");
	labels.push_back("June");
	labels.push_back("July");
	wxChartsCategoricalData::ptr chartData = wxChartsCategoricalData::make_shared(labels);

	// Add the first dataset
	wxVector<wxDouble> points1;
	points1.push_back(3);
	points1.push_back(2.5);
	points1.push_back(1.2);
	points1.push_back(3);
	points1.push_back(6);
	points1.push_back(5);
	points1.push_back(1);
	wxChartsDoubleDataset::ptr dataset1(new wxChartsDoubleDataset("Dataset 1", points1));
	chartData->AddDataset(dataset1);

	// Add the second dataset
	wxVector<wxDouble> points2;
	points2.push_back(1);
	points2.push_back(1.33);
	points2.push_back(2.5);
	points2.push_back(2);
	points2.push_back(3);
	points2.push_back(1.8);
	points2.push_back(0.4);
	wxChartsDoubleDataset::ptr dataset2(new wxChartsDoubleDataset("Dataset 2", points2));
	chartData->AddDataset(dataset2);

	// barchart 옵션 설정
	wxBarChartOptions::ptr options(new wxBarChartOptions());

	// 라이브러리의 GetGridOptions()가 const 참조만 반환하므로
	// const_cast를 사용하여 상수성을 일시적으로 제거하여 옵션을 수정한다.
	wxChartsGridOptions& gridOptions = const_cast<wxChartsGridOptions&>(options->GetGridOptions());
	gridOptions.GetHorizontalGridLineOptions().SetShowGridLines(false);
	gridOptions.GetVerticalGridLineOptions().SetShowGridLines(false);

	// Create the bar chart widget with options
	wxBarChartCtrl* barChartCtrl = new wxBarChartCtrl(panel, wxID_ANY, chartData, options);
	barChartCtrl->SetSize(400, 300);

	// Set up the sizer for the panel
	//wxBoxSizer* panelSizer = new wxBoxSizer(wxHORIZONTAL);
	//panelSizer->Add(barChartCtrl, 1, wxEXPAND);
	//panel->SetSizer(panelSizer);
}


세로 막대 그래프를 그려 보자.

#include <wx/wx.h>
#include <wxcharts/wx/charts/wxchart.h> // wxCharts 라이브러리의 헤더 파일을 포함한다.
#include <wxcharts/wx/charts/wxcolumnchartctrl.h> // wxColumnChartCtrl 클래스의 헤더 파일을 포함한다.

#pragma comment(lib, "wxchartsd.lib") // wxCharts 라이브러리를 링크한다.

class MyApp : public wxApp
{
public:
	bool OnInit() override;
};

wxIMPLEMENT_APP(MyApp);

class MyFrame : public wxFrame
{
public:
	MyFrame();

private:
	void OnHello(wxCommandEvent& event);
	void OnExit(wxCommandEvent& event);
	void OnAbout(wxCommandEvent& event);

	wxPanel* panel;
};

enum
{
	ID_Hello = 1
};

bool MyApp::OnInit()
{
	MyFrame* frame = new MyFrame();
	frame->Show(true);
	return true;
}

// 메인 프레임의 위치(default position)와 크기(550x400)를 설정한다.
MyFrame::MyFrame() : wxFrame(nullptr, wxID_ANY, "Hello World", wxDefaultPosition, wxSize(550, 400))
{
	wxMenu* menuFile = new wxMenu;
	menuFile->Append(ID_Hello, "&Hello...\tCtrl-H", "Help string shown in status bar for this menu item");
	menuFile->AppendSeparator();
	menuFile->Append(wxID_EXIT);

	wxMenu* menuHelp = new wxMenu;
	menuHelp->Append(wxID_ABOUT);

	wxMenuBar* menuBar = new wxMenuBar;
	menuBar->Append(menuFile, "&File");
	menuBar->Append(menuHelp, "&Help");

	SetMenuBar(menuBar);

	CreateStatusBar();
	SetStatusText("Welcome to wxWidgets!");

	panel = new wxPanel(this, wxID_ANY);

	wxButton* myButton = new wxButton(panel, wxID_ANY, "Press Me", wxPoint(420, 30), wxSize(100, 30));
	myButton->Bind(wxEVT_BUTTON, &MyFrame::OnHello, this);

	Bind(wxEVT_MENU, &MyFrame::OnHello, this, ID_Hello);
	Bind(wxEVT_MENU, &MyFrame::OnAbout, this, wxID_ABOUT);
	Bind(wxEVT_MENU, &MyFrame::OnExit, this, wxID_EXIT);
}

void MyFrame::OnExit(wxCommandEvent& event)
{
	Close(true);
}

void MyFrame::OnAbout(wxCommandEvent& event)
{
	wxMessageBox("This is a wxWidgets Hello World example", "About Hello World", wxOK | wxICON_INFORMATION);
}

void MyFrame::OnHello(wxCommandEvent& event)
{
	//wxLogMessage("Hello world from wxWidgets!");

	// wxCharts 라이브러리를 사용하여 막대 그래프를 생성
	// Create the data for the bar chart widget
	wxVector<wxString> labels;
	labels.push_back("January");
	labels.push_back("February");
	labels.push_back("March");
	labels.push_back("April");
	labels.push_back("May");
	labels.push_back("June");
	labels.push_back("July");
	wxChartsCategoricalData::ptr chartData = wxChartsCategoricalData::make_shared(labels);

	// Add the first dataset
	wxVector<wxDouble> points1;
	points1.push_back(3);
	points1.push_back(2.5);
	points1.push_back(1.2);
	points1.push_back(3);
	points1.push_back(6);
	points1.push_back(5);
	points1.push_back(1);
	wxChartsDoubleDataset::ptr dataset1(new wxChartsDoubleDataset("Dataset 1", points1));
	chartData->AddDataset(dataset1);

	// Add the second dataset
	wxVector<wxDouble> points2;
	points2.push_back(1);
	points2.push_back(1.33);
	points2.push_back(2.5);
	points2.push_back(2);
	points2.push_back(3);
	points2.push_back(1.8);
	points2.push_back(0.4);
	wxChartsDoubleDataset::ptr dataset2(new wxChartsDoubleDataset("Dataset 2", points2));
	chartData->AddDataset(dataset2);

	// Create the column chart widget (Month가 X축에 표시됨)
	wxColumnChartCtrl* columnChartCtrl = new wxColumnChartCtrl(panel, wxID_ANY, chartData);
	columnChartCtrl->SetSize(400, 300);

	// Set up the sizer for the panel
	//wxBoxSizer* panelSizer = new wxBoxSizer(wxHORIZONTAL);
	//panelSizer->Add(columnChartCtrl, 1, wxEXPAND);
	//panel->SetSizer(panelSizer);
}


세로 막대 그래프가 표시된다.


세로 막대 그래프는 wxColumnChartOptions::prt가 없어서 grid를 없애지 못한다. 아직 완전한 라이브러리는 아닌 것 같다.


라인 차트를 그려보자.

#include <wx/wx.h>
#include <wxcharts/wx/charts/wxchart.h> // wxchart.h 헤더 파일을 포함한다.
#include <wxcharts/wx/charts/wxlinechartctrl.h> // wxlinechartctrl.h 헤더 파일을 포함한다.

#pragma comment(lib, "wxchartsd.lib") 

class MyApp : public wxApp
{
public:
	bool OnInit() override;
};

wxIMPLEMENT_APP(MyApp);

class MyFrame : public wxFrame
{
public:
	MyFrame();

private:
	void OnHello(wxCommandEvent& event);
	void OnExit(wxCommandEvent& event);
	void OnAbout(wxCommandEvent& event);

	wxPanel* panel;
};

enum
{
	ID_Hello = 1
};

bool MyApp::OnInit()
{
	MyFrame* frame = new MyFrame();
	frame->Show(true);
	return true;
}

// 메인 프레임의 위치(default position)와 크기(550x400)를 설정한다.
MyFrame::MyFrame() : wxFrame(nullptr, wxID_ANY, "Hello World", wxDefaultPosition, wxSize(550, 400))
{
	wxMenu* menuFile = new wxMenu;
	menuFile->Append(ID_Hello, "&Hello...\tCtrl-H", "Help string shown in status bar for this menu item");
	menuFile->AppendSeparator();
	menuFile->Append(wxID_EXIT);

	wxMenu* menuHelp = new wxMenu;
	menuHelp->Append(wxID_ABOUT);

	wxMenuBar* menuBar = new wxMenuBar;
	menuBar->Append(menuFile, "&File");
	menuBar->Append(menuHelp, "&Help");

	SetMenuBar(menuBar);

	CreateStatusBar();
	SetStatusText("Welcome to wxWidgets!");

	panel = new wxPanel(this, wxID_ANY);

	wxButton* myButton = new wxButton(panel, wxID_ANY, "Press Me", wxPoint(420, 30), wxSize(100, 30));
	myButton->Bind(wxEVT_BUTTON, &MyFrame::OnHello, this);

	Bind(wxEVT_MENU, &MyFrame::OnHello, this, ID_Hello);
	Bind(wxEVT_MENU, &MyFrame::OnAbout, this, wxID_ABOUT);
	Bind(wxEVT_MENU, &MyFrame::OnExit, this, wxID_EXIT);
}

void MyFrame::OnExit(wxCommandEvent& event)
{
	Close(true);
}

void MyFrame::OnAbout(wxCommandEvent& event)
{
	wxMessageBox("This is a wxWidgets Hello World example", "About Hello World", wxOK | wxICON_INFORMATION);
}

void MyFrame::OnHello(wxCommandEvent& event)
{
	wxVector<wxString> labels;
	labels.push_back("2023-01-01");
	labels.push_back("2023-01-02");
	labels.push_back("2023-01-03");
	labels.push_back("2023-01-04");
	labels.push_back("2023-01-05");
	wxChartsCategoricalData::ptr chartData = wxChartsCategoricalData::make_shared(labels);

	wxVector<wxDouble> points;
	points.push_back(3);
	points.push_back(2.5);
	points.push_back(1.2);
	points.push_back(3);
	points.push_back(6);
	wxChartsDoubleDataset::ptr dataset1(new wxChartsDoubleDataset("Data", points));
	chartData->AddDataset(dataset1);

	// Create the line chart widget
	wxLineChartCtrl* lineChartCtrl = new wxLineChartCtrl(panel, wxID_ANY, chartData, wxCHARTSLINETYPE_STRAIGHT, wxDefaultPosition, wxDefaultSize, wxBORDER_DEFAULT);
	lineChartCtrl->SetSize(400, 300);

	// Set up the sizer for the panel
	//wxBoxSizer* panelSizer = new wxBoxSizer(wxHORIZONTAL);
	//panelSizer->Add(lineChartCtrl, 1, wxEXPAND);
	//panel->SetSizer(panelSizer);
}


timeseries 차트는 아직 구현이 제대로 된 것 같지 않다. 사용할 수가 없어 라인 차트를 만들어 본 것이다.

아직 제대로 된 튜토리얼이나 문서도 없다. 아래 샘플을 참고하자.


※ 참고

wxCharts

Samples


반응형
Posted by J-sean
:
반응형

wxFormBuilder로 만든 XRC 파일을 사용해 보자.


wxFormBuilder에서 Form에 버튼을 하나 배치하고 적당히 디자인한다.


XRC 파일을 저장한다. (gui.xrc)


#include <wx/wx.h>
#include <wx/xrc/xmlres.h>

#ifdef _DEBUG
#pragma comment(lib, "wxbase33ud_xml.lib")
#pragma comment(lib, "wxmsw33ud_xrc.lib")
#else
#pragma comment(lib, "wxbase33u_xml.lib")
#pragma comment(lib, "wxmsw33u_xrc.lib")
#endif

class MyApp : public wxApp {
public:
	bool OnInit() override;
};

wxIMPLEMENT_APP(MyApp);

class MyFrame : public wxFrame
{
public:
	MyFrame();
private:
	void OnButtonClicked(wxCommandEvent& event);
};

MyFrame::MyFrame() {
	// XRC 리소스 로드
	wxXmlResource::Get()->Load(wxT("gui.xrc")); // 생성한 xrc 파일명
	// Frame 로드
	wxXmlResource::Get()->LoadFrame(this, nullptr, wxT("MyFrame1")); // wxFormBuilder에서 설정한 Frame 이름
	// 컨트롤 바인딩 (이벤트 처리용)
	wxButton* button = static_cast<wxButton*>(FindWindowByName(wxT("btnSubmit"))); // wxFormBuilder에서 설정한 버튼 이름
	if (button) {
		button->Bind(wxEVT_BUTTON, &MyFrame::OnButtonClicked, this);
	}
}

void MyFrame::OnButtonClicked(wxCommandEvent& event) {
	wxMessageBox(wxT("Hello from XRC!"));
}

bool MyApp::OnInit() {
	wxInitAllImageHandlers();
	wxXmlResource::Get()->InitAllHandlers(); // XRC 핸들러 초기화

	MyFrame* frame = new MyFrame();
	frame->Show(true);
	return true;
}


버튼만 하나 배치하면 화면을 가득 채운다.


※ 참고

wxFormBuilder


반응형
Posted by J-sean
:
반응형

wxWidgets을 빌드하고 간단한 예제를 만들어 보자.


vcpkg install wxwidgets


약 4분 정도가 걸린다.


콘솔 프로젝트라면 SubSystem을 Windows로 바꿔준다.


간단한 예제.

#include <wx/wx.h>

class MyApp : public wxApp
{
public:
	bool OnInit() override;
};

wxIMPLEMENT_APP(MyApp);

class MyFrame : public wxFrame
{
public:
	MyFrame();

private:
	void OnHello(wxCommandEvent& event);
	void OnExit(wxCommandEvent& event);
	void OnAbout(wxCommandEvent& event);
};

enum
{
	ID_Hello = 1
};

bool MyApp::OnInit()
{
	MyFrame* frame = new MyFrame();
	frame->Show(true);
	return true;
}

MyFrame::MyFrame() : wxFrame(nullptr, wxID_ANY, "Hello World")
{
	wxMenu* menuFile = new wxMenu;
	menuFile->Append(ID_Hello, "&Hello...\tCtrl-H", "Help string shown in status bar for this menu item");
	menuFile->AppendSeparator();
	menuFile->Append(wxID_EXIT);

	wxMenu* menuHelp = new wxMenu;
	menuHelp->Append(wxID_ABOUT);

	wxMenuBar* menuBar = new wxMenuBar;
	menuBar->Append(menuFile, "&File");
	menuBar->Append(menuHelp, "&Help");

	SetMenuBar(menuBar);

	CreateStatusBar();
	SetStatusText("Welcome to wxWidgets!");

	Bind(wxEVT_MENU, &MyFrame::OnHello, this, ID_Hello);
	Bind(wxEVT_MENU, &MyFrame::OnAbout, this, wxID_ABOUT);
	Bind(wxEVT_MENU, &MyFrame::OnExit, this, wxID_EXIT);
}

void MyFrame::OnExit(wxCommandEvent& event)
{
	Close(true);
}

void MyFrame::OnAbout(wxCommandEvent& event)
{
	wxMessageBox("This is a wxWidgets Hello World example", "About Hello World", wxOK | wxICON_INFORMATION);
}

void MyFrame::OnHello(wxCommandEvent& event)
{
	wxLogMessage("Hello world from wxWidgets!");
}


버튼을 추가해 보자.

.
.
.
	CreateStatusBar();
	SetStatusText("Welcome to wxWidgets!");

	wxPanel* panel = new wxPanel(this, wxID_ANY);
	wxButton* myButton = new wxButton(panel, wxID_ANY, "Press Me", wxPoint(30, 30), wxSize(100, 30));
	myButton->Bind(wxEVT_BUTTON, &MyFrame::OnHello, this);
	//Bind(wxEVT_BUTTON, &MyFrame::OnHello, this, myButton->GetId());

	Bind(wxEVT_MENU, &MyFrame::OnHello, this, ID_Hello);
	Bind(wxEVT_MENU, &MyFrame::OnAbout, this, wxID_ABOUT);
	Bind(wxEVT_MENU, &MyFrame::OnExit, this, wxID_EXIT);
.
.
.


코드만으로 UI를 디자인하기는 쉽지 않다. 필요하다면 wysiwyg 방식으로 디자인할 수 있는 wxFormBuilder를 사용하자.

wxFormBuilder


이번에는 OpenCV를 이용해 이미지를 표시해 보자.

#include <wx/wx.h>
#include <opencv2/opencv.hpp>

class MyApp : public wxApp
{
public:
	bool OnInit() override;
};

wxIMPLEMENT_APP(MyApp);

class MyFrame : public wxFrame
{
public:
	MyFrame();

private:
	void OnHello(wxCommandEvent& event);
	void OnExit(wxCommandEvent& event);
	void OnAbout(wxCommandEvent& event);

	wxPanel* m_panel; // 버튼과 이미지를 담을 패널
	wxStaticBitmap* m_imageCtrl; // 이미지 표시를 위한 컨트롤
};

enum
{
	ID_Hello = 1
};

bool MyApp::OnInit()
{
	MyFrame* frame = new MyFrame();
	frame->Show(true);
	return true;
}

MyFrame::MyFrame() : wxFrame(nullptr, wxID_ANY, "Hello World")
{
	wxMenu* menuFile = new wxMenu;
	menuFile->Append(ID_Hello, "&Hello...\tCtrl-H", "Help string shown in status bar for this menu item");
	menuFile->AppendSeparator();
	menuFile->Append(wxID_EXIT);

	wxMenu* menuHelp = new wxMenu;
	menuHelp->Append(wxID_ABOUT);

	wxMenuBar* menuBar = new wxMenuBar;
	menuBar->Append(menuFile, "&File");
	menuBar->Append(menuHelp, "&Help");

	SetMenuBar(menuBar);

	CreateStatusBar();
	SetStatusText("Welcome to wxWidgets!");

	m_panel = new wxPanel(this, wxID_ANY);
	wxButton* myButton = new wxButton(m_panel, wxID_ANY, "Press Me", wxPoint(30, 30), wxSize(100, 30));
	myButton->Bind(wxEVT_BUTTON, &MyFrame::OnHello, this);
	//Bind(wxEVT_BUTTON, &MyFrame::OnHello, this, myButton->GetId());

	m_imageCtrl = new wxStaticBitmap(m_panel, wxID_ANY, wxNullBitmap, wxPoint(30, 80));
	// 이미지 표시 컨트롤 초기화. wxNullBitmap으로 초기화하여 나중에 이미지가 로드될 때 업데이트할 수 있도록 함.

	Bind(wxEVT_MENU, &MyFrame::OnHello, this, ID_Hello);
	Bind(wxEVT_MENU, &MyFrame::OnAbout, this, wxID_ABOUT);
	Bind(wxEVT_MENU, &MyFrame::OnExit, this, wxID_EXIT);
}

void MyFrame::OnExit(wxCommandEvent& event)
{
	Close(true);
}

void MyFrame::OnAbout(wxCommandEvent& event)
{
	wxMessageBox("This is a wxWidgets Hello World example", "About Hello World", wxOK | wxICON_INFORMATION);
}

void MyFrame::OnHello(wxCommandEvent& event)
{
	//wxLogMessage("Hello world from wxWidgets!");
	cv::Mat image = cv::imread("palvin1.png");
	if (image.empty())
	{
		wxLogError("Could not load image!");
	}
	else
	{
		// OpenCV는 BGR을 사용하므로 wxImage에서 필요로 하는 RGB 형식으로 변환.
		cv::cvtColor(image, image, cv::COLOR_BGR2RGB);

		// wxWidgets 구조상 플랫폼 비의존적(Device Independent)인 픽셀 데이터를 플랫폼 의존적(Device Dependent)인
		// 이미지로 그리기 위해서는 wxImage를 거쳐 wxBitmap으로 변환해야 한다. wxImage는 픽셀 데이터를 소유하므로
		// 이미지가 wxImage에 의해 관리되도록 true를 전달한다.
		wxImage wxImg(image.cols, image.rows, image.data, true);
		wxBitmap bitmap(wxImg);

		if (m_imageCtrl)
		{
			m_imageCtrl->SetBitmap(bitmap);
			m_imageCtrl->SetSize(bitmap.GetWidth(), bitmap.GetHeight());
			m_panel->Refresh();
		}
	}
}


wxStaticBitmap과 같은 컨트롤을 거치지 않고 wxPaintDC(Device Context)를 이용하여 디스플레이에 직접 그리는 방식도 가능하다. 이 방법은 비디오 캡처 등으로 계속 프레임이 바뀔 때 컨트롤을 계속 업데이트하는 오버헤드를 줄이는데 유리할 수 있다.


#include <wx/wx.h>
//#include <wx/dcbuffer.h> // wxBufferedPaintDC를 사용하기 위한 헤더
#include <opencv2/opencv.hpp>

class MyApp : public wxApp
{
public:
	bool OnInit() override;
};

wxIMPLEMENT_APP(MyApp);

class MyFrame : public wxFrame
{
public:
	MyFrame();

private:
	void OnHello(wxCommandEvent& event);
	void OnExit(wxCommandEvent& event);
	void OnAbout(wxCommandEvent& event);
	void OnPaint(wxPaintEvent& event);

	wxPanel* m_panel; // 버튼과 이미지를 담을 패널
	wxBitmap m_bitmap; // 직접 그릴 비트맵 데이터
};

enum
{
	ID_Hello = 1
};

bool MyApp::OnInit()
{
	MyFrame* frame = new MyFrame();
	frame->Show(true);
	return true;
}

MyFrame::MyFrame() : wxFrame(nullptr, wxID_ANY, "Hello World")
{
	wxMenu* menuFile = new wxMenu;
	menuFile->Append(ID_Hello, "&Hello...\tCtrl-H", "Help string shown in status bar for this menu item");
	menuFile->AppendSeparator();
	menuFile->Append(wxID_EXIT);

	wxMenu* menuHelp = new wxMenu;
	menuHelp->Append(wxID_ABOUT);

	wxMenuBar* menuBar = new wxMenuBar;
	menuBar->Append(menuFile, "&File");
	menuBar->Append(menuHelp, "&Help");

	SetMenuBar(menuBar);

	CreateStatusBar();
	SetStatusText("Welcome to wxWidgets!");

	m_panel = new wxPanel(this, wxID_ANY);
	//m_panel->SetBackgroundStyle(wxBG_STYLE_PAINT);
	// wxBufferedPaintDC 사용시 검은 화면 방지, wxBG_STYLE_PAINT는 직접 패널 배경을 그리겠다는 의미로
	// OnPaint에서 DC의 배경색으로 패널의 배경색을 설정하고 Clear()를 호출하여 화면을 지워야 한다.

	wxButton* myButton = new wxButton(m_panel, wxID_ANY, "Press Me", wxPoint(30, 30), wxSize(100, 30));
	myButton->Bind(wxEVT_BUTTON, &MyFrame::OnHello, this);
	//Bind(wxEVT_BUTTON, &MyFrame::OnHello, this, myButton->GetId());

	// 패널에 페인트 이벤트를 바인드하여 DC를 통해 직접 그린다.
	m_panel->Bind(wxEVT_PAINT, &MyFrame::OnPaint, this);
	m_panel->Bind(wxEVT_ERASE_BACKGROUND, [](wxEraseEvent& event) { event.Skip(); }); // 배경 지우기 이벤트를 무시하여 깜빡임 방지
	m_panel->SetDoubleBuffered(true); // 깜빡임 방지 위해 더블 버퍼링 활성화

	Bind(wxEVT_MENU, &MyFrame::OnHello, this, ID_Hello);
	Bind(wxEVT_MENU, &MyFrame::OnAbout, this, wxID_ABOUT);
	Bind(wxEVT_MENU, &MyFrame::OnExit, this, wxID_EXIT);
}

void MyFrame::OnExit(wxCommandEvent& event)
{
	Close(true);
}

void MyFrame::OnAbout(wxCommandEvent& event)
{
	wxMessageBox("This is a wxWidgets Hello World example", "About Hello World", wxOK | wxICON_INFORMATION);
}

void MyFrame::OnHello(wxCommandEvent& event)
{
	//wxLogMessage("Hello world from wxWidgets!");
	cv::Mat image = cv::imread("palvin1.png");
	if (image.empty())
	{
		wxLogError("Could not load image!");
	}
	else
	{
		// OpenCV는 BGR을 사용하므로 wxImage에서 필요로 하는 RGB 형식으로 변환.
		cv::cvtColor(image, image, cv::COLOR_BGR2RGB);

		// wxWidgets 구조상 플랫폼 비의존적(Device Independent)인 픽셀 데이터를 플랫폼 의존적(Device Dependent)인
		// 이미지로 그리기 위해서는 wxImage를 거쳐 wxBitmap으로 변환해야 한다. wxImage는 픽셀 데이터를 소유하므로
		// 이미지가 wxImage에 의해 관리되도록 true를 전달한다.
		wxImage wxImg(image.cols, image.rows, image.data, true);
		m_bitmap = wxBitmap(wxImg);

		m_panel->Refresh(); // 패널을 다시 그리도록 요청하여 OnPaint가 호출되게 한다.
	}
}

void MyFrame::OnPaint(wxPaintEvent& event)
{
	// m_panel에 대한 Paint DC 생성 (페인트 이벤트 안에서만 사용 가능)
	wxPaintDC dc(m_panel);

	// wxPaintDC 대신 메모리에 먼저 그리고 화면에 출력하는 wxBufferedPaintDC 클래스를 사용해도 부드러운 출력이
	// 가능하며 깜빡임도 줄일 수 있다고 한다. wxBufferedPaintDC는 wxPaintDC를 상속하므로 wxPaintDC 대신
	// wxBufferedPaintDC를 사용하면 된다. 이 경우 m_panel에 더블 버퍼링은 활성화할 필요가 없다.
	// 둘 중 하나만 사용하면 된다. wxPaintDC + SetDoubleBuffered 사용을 추천.
	// wxBufferedPaintDC는 운영체제의 네이티브 더블 버퍼링을 지원하지 않는 옛날 OS나 특수한 상황을 위해 존재한다.

	// 상단의 #include <wx/dcbuffer.h> 주석 취소.
	//wxBufferedPaintDC dc(m_panel);

	//dc.SetBackground(wxBrush(m_panel->GetBackgroundColour()));
	//dc.Clear();
	// 패널 기본 배경색으로 화면을 지워준다.
	// wxBG_STYLE_PAINT 스타일을 사용했다면 OnPaint에서 DC의 배경색을 패널의 배경색으로 설정하고 Clear()를 호출하여 화면을
	// 지워야 검은색으로 나타나지 않는다.

	if (m_bitmap.IsOk()) // 비트맵이 유효한 경우에만 그린다.
	{
		// 지정된 좌표 (30, 80)에 비트맵을 직접 그린다. 마스크 사용은 false로 설정.
		dc.DrawBitmap(m_bitmap, 30, 80, false);
	}
}


결과는 이전 코드와 같다.


※ 참고

Hello World Example

Documentation

Tutorials


반응형
Posted by J-sean
:
반응형

SDL3에 Dear ImGui를 사용해 보자. 아래 링크를 참고해 SDL3를 준비한다.

2025.03.30 - [C, C++] - [SDL3] Simple DirectMedia Layer 3 Setup and Getting Started - SDL3 설정 및 초기화


프로젝트 폴더에 위와 같이 ImGui 관련 파일을 복사한다. (lib, dll 파일은 없다)


프로젝트에 ImGui 필터를 추가하고 파일을 추가한다.


1
2
3
4
5
6
7
8
9
10
11
12
13
14
15
16
17
18
19
20
21
22
23
24
25
26
27
28
29
30
31
32
33
34
35
36
37
38
39
40
41
42
43
44
45
46
47
48
49
50
51
52
53
54
55
56
57
58
59
60
61
62
63
64
65
66
67
68
69
70
71
72
73
74
75
76
77
78
79
80
81
82
83
84
85
86
87
88
89
90
91
92
93
94
95
96
97
98
99
100
101
102
103
104
105
106
107
108
109
110
111
112
113
114
115
116
117
118
119
120
121
122
123
124
125
126
127
128
129
130
131
132
133
134
#define SDL_MAIN_USE_CALLBACKS 1
#include <SDL3/SDL.h>
#include <SDL3/SDL_main.h>
#include <stdio.h>
#include <Windows.h>
 
#include "imgui.h"
#include "imgui_impl_sdl3.h"
#include "imgui_impl_sdlrenderer3.h"
 
static SDL_Window* window = NULL;
static SDL_Renderer* renderer = NULL;
ImGuiIO* pio = NULL;
 
SDL_AppResult SDL_AppInit(void** appstate, int argc, char* argv[])
{
    SDL_SetAppMetadata("Example Renderer Clear""1.0""com.example.renderer-clear");
 
    if (!SDL_Init(SDL_INIT_VIDEO)) {
        SDL_Log("Couldn't initialize SDL: %s", SDL_GetError());
        return SDL_APP_FAILURE;
    }
 
    if (!SDL_CreateWindowAndRenderer("examples/renderer/clear"6404800&window, &renderer)) {
        SDL_Log("Couldn't create window/renderer: %s", SDL_GetError());
        return SDL_APP_FAILURE;
    }
 
    // Setup Dear ImGui context
    IMGUI_CHECKVERSION();
    ImGui::CreateContext();
    ImGuiIO& io = ImGui::GetIO(); (void)io;
    // (void)io는 의미 없는 명령.  just to avoid compiler warning on unused variable
    pio = &io;
    // io가 SDL_AppIterate()에서 사용되기 때문에 전역 포인터 변수 pio에 대입.
    io.ConfigFlags |= ImGuiConfigFlags_NavEnableKeyboard;     // Enable Keyboard Controls
    //io.ConfigFlags |= ImGuiConfigFlags_NavEnableGamepad;      // Enable Gamepad Controls
 
    // Setup Dear ImGui style
    //ImGui::StyleColorsDark();
    ImGui::StyleColorsLight();
 
    // Setup Platform/Renderer backends
    ImGui_ImplSDL3_InitForSDLRenderer(window, renderer);
    ImGui_ImplSDLRenderer3_Init(renderer);
 
    return SDL_APP_CONTINUE;
}
 
SDL_AppResult SDL_AppEvent(void* appstate, SDL_Event* event)
{
    // Poll and handle events (inputs, window resize, etc.)
    // You can read the io.WantCaptureMouse, io.WantCaptureKeyboard flags to tell if dear imgui wants to use your inputs.
    // - When io.WantCaptureMouse is true, do not dispatch mouse input data to your main application, or clear/overwrite your copy of the mouse data.
    // - When io.WantCaptureKeyboard is true, do not dispatch keyboard input data to your main application, or clear/overwrite your copy of the keyboard data.
    // Generally you may always pass all inputs to dear imgui, and hide them from your application based on those two flags.
    ImGui_ImplSDL3_ProcessEvent(event);
 
    switch (event->type) {
    case SDL_EVENT_QUIT:
        return SDL_APP_SUCCESS;
    case SDL_EVENT_KEY_DOWN:
        printf("Key pressed: %s\n", SDL_GetKeyName(event->key.key));
        if (event->key.key == SDLK_ESCAPE)
            return SDL_APP_SUCCESS;
        break;
    default:
        break;
    }
 
    return SDL_APP_CONTINUE;
}
 
SDL_AppResult SDL_AppIterate(void* appstate)
{
    // Start the Dear ImGui frame
    ImGui_ImplSDLRenderer3_NewFrame();
    ImGui_ImplSDL3_NewFrame();
    ImGui::NewFrame();
 
    // Show a simple window that we create ourselves. We use a Begin/End pair to create a named window.
    {
        static float f = 0.0f;
        static int counter = 0;
 
        ImGui::Begin("Hello, world!"); // Create a window called "Hello, world!" and append into it.
        //ImGui::SetWindowSize(ImVec2(100, 20)); // 매 프레임마다 윈도우 사이즈를 (100, 20)으로 지정한다.
        //ImGui::SetWindowSize(ImVec2(100, 20), ImGuiCond_Once); // 프로그램을 시작할때 한 번만 윈도우 사이즈를 지정한다.
        //ImGui::SetWindowSize(ImVec2(100, 20), ImGuiCond_FirstUseEver); // 프로그램을 처음 시작할때(imgui.ini파일이 존재하지 않을때)
                                                                         // 한 번만 윈도우 사이즈를 지정한다.
        ImGui::Text("This is some useful text."); // Display some text (you can use a format strings too)
        if (ImGui::Button("Button")) // Buttons return true when clicked (most widgets return true when edited/activated)
            counter++;
        ImGui::SameLine();
        ImGui::Text("counter = %d", counter);
        ImGui::Text("Application average %.3f ms/frame (%.1f FPS)"1000.0f / pio->Framerate, pio->Framerate);
        ImGui::End();
    }
    // 윈도우 없이 위치가 고정된 버튼 생성하기.
    {
        ImGui::Begin("No Window"0, ImGuiWindowFlags_NoBackground | ImGuiWindowFlags_NoDecoration);
        ImGui::SetWindowPos(ImVec2(1020));
        ImGui::SetWindowSize(ImVec2(10020));
        // WindowSize()는 이 예제 블럭에서 생성하려는 버튼의 사이즈를 지정하는 함수가 아니다. 버튼을 포함하는 윈도우의 사이즈다.
        // 이 예제는 윈도우가 보이지 않으므로 사이즈를 지정하지 않으면 버튼 사이즈보다 훨씬 크게 지정되서 근처의 다른 UI가
        // 이 윈도우에 가려져 제대로 동작하지 않을 수 있다. (보이기는 하지만 클릭이 되지 않는다)
        // 아니면, Begin()에서 ImGuiWindowFlags_NoBringToFrontOnFocus 옵션을 추가하면 다른 윈도우의 UI 동작을 방해하지 않는다.
        // 이 예제에서 ImGuiWindowFlags_NoInputs 옵션은 버튼을 비활성화 시키므로 사용하면 안된다.        
        ImGui::Button("Fixed Button");
        ImGui::End();
    }
 
    // Rendering
    ImGui::Render();
 
    SDL_SetRenderDrawColor(renderer, 255255255, SDL_ALPHA_OPAQUE);
    SDL_RenderClear(renderer);
    ImGui_ImplSDLRenderer3_RenderDrawData(ImGui::GetDrawData(), renderer);
    SDL_RenderPresent(renderer);
 
    return SDL_APP_CONTINUE;
}
 
void SDL_AppQuit(void* appstate, SDL_AppResult result)
{
    // Cleanup    
    ImGui_ImplSDLRenderer3_Shutdown();
    ImGui_ImplSDL3_Shutdown();
    ImGui::DestroyContext();
 
    SDL_DestroyRenderer(renderer);
    SDL_DestroyWindow(window);
    SDL_Quit();
}


소스를 입력하고 빌드한다.


실행하면 GUI가 표시된다.


이번엔 ImGui를 이용해 이미지를 출력해 보자.


stb_image.h를 추가한다.
stb_image.h
0.27MB


Image Loading and Displaying Examples

위 링크를 참고해 소스를 작성한다.


1
2
3
4
5
6
7
8
9
10
11
12
13
14
15
16
17
18
19
20
21
22
23
24
25
26
27
28
29
30
31
32
33
34
35
36
37
38
39
40
41
42
43
44
45
46
47
48
49
50
51
52
53
54
55
56
57
58
59
60
61
62
63
64
65
66
67
68
69
70
71
72
73
74
75
76
77
78
79
80
81
82
83
84
85
86
87
88
89
90
91
92
93
94
95
96
97
98
99
100
101
102
103
104
105
106
107
108
109
110
111
112
113
114
115
116
117
118
119
120
121
122
123
124
125
126
127
128
129
130
131
132
133
134
135
136
137
138
139
140
141
142
143
144
145
146
147
148
149
150
151
152
153
154
155
156
157
158
159
160
161
162
163
164
165
166
167
168
169
170
171
172
173
174
175
176
177
178
179
180
181
182
183
184
185
186
187
188
189
#define _CRT_SECURE_NO_WARNINGS
#define STB_IMAGE_IMPLEMENTATION
#define SDL_MAIN_USE_CALLBACKS 1
#include <SDL3/SDL.h>
#include <SDL3/SDL_main.h>
#include <stdio.h>
#include <Windows.h>
 
#include "imgui.h"
#include "imgui_impl_sdl3.h"
#include "imgui_impl_sdlrenderer3.h"
 
#include "stb_image.h"
 
static SDL_Window* window = NULL;
static SDL_Renderer* renderer = NULL;
ImGuiIO* pio = NULL;
 
SDL_Texture* my_texture;
int my_image_width, my_image_height;
 
bool LoadTextureFromMemory(const void* data, size_t data_size, SDL_Renderer* renderer, SDL_Texture** out_texture, int* out_width, int* out_height)
{
    int image_width = 0;
    int image_height = 0;
    int channels = 4;
    unsigned char* image_data = stbi_load_from_memory((const unsigned char*)data, (int)data_size, &image_width, &image_height, NULL4);
    if (image_data == nullptr)
    {
        fprintf(stderr, "Failed to load image: %s\n", stbi_failure_reason());
        return false;
    }
 
    SDL_Surface* surface = SDL_CreateSurfaceFrom(image_width, image_height, SDL_PIXELFORMAT_RGBA32, (void*)image_data, channels * image_width);
    if (surface == nullptr)
    {
        fprintf(stderr, "Failed to create SDL surface: %s\n", SDL_GetError());
        return false;
    }
 
    SDL_Texture* texture = SDL_CreateTextureFromSurface(renderer, surface);
    if (texture == nullptr)
        fprintf(stderr, "Failed to create SDL texture: %s\n", SDL_GetError());
 
    *out_texture = texture;
    *out_width = image_width;
    *out_height = image_height;
 
    SDL_DestroySurface(surface);
    stbi_image_free(image_data);
 
    return true;
}
 
// Open and read a file, then forward to LoadTextureFromMemory()
bool LoadTextureFromFile(const char* file_name, SDL_Renderer* renderer, SDL_Texture** out_texture, int* out_width, int* out_height)
{
    FILE* f = fopen(file_name, "rb");
    if (f == NULL)
        return false;
    fseek(f, 0, SEEK_END);
    size_t file_size = (size_t)ftell(f);
    if (file_size == -1)
        return false;
    fseek(f, 0, SEEK_SET);
    void* file_data = IM_ALLOC(file_size);
    fread(file_data, 1, file_size, f);
    fclose(f);
    bool ret = LoadTextureFromMemory(file_data, file_size, renderer, out_texture, out_width, out_height);
    IM_FREE(file_data);
    return ret;
}
 
SDL_AppResult SDL_AppInit(void** appstate, int argc, char* argv[])
{
    SDL_SetAppMetadata("Example Renderer Clear""1.0""com.example.renderer-clear");
 
    if (!SDL_Init(SDL_INIT_VIDEO)) {
        SDL_Log("Couldn't initialize SDL: %s", SDL_GetError());
        return SDL_APP_FAILURE;
    }
 
    if (!SDL_CreateWindowAndRenderer("examples/renderer/clear"6404800&window, &renderer)) {
        SDL_Log("Couldn't create window/renderer: %s", SDL_GetError());
        return SDL_APP_FAILURE;
    }
 
    // Setup Dear ImGui context
    IMGUI_CHECKVERSION();
    ImGui::CreateContext();
    ImGuiIO& io = ImGui::GetIO(); (void)io;
    // (void)io는 의미 없는 명령.  just to avoid compiler warning on unused variable
    pio = &io;
    // io가 SDL_AppIterate()에서 사용되기 때문에 전역 포인터 변수 pio에 대입.
    io.ConfigFlags |= ImGuiConfigFlags_NavEnableKeyboard;     // Enable Keyboard Controls
    //io.ConfigFlags |= ImGuiConfigFlags_NavEnableGamepad;      // Enable Gamepad Controls
 
    // Setup Dear ImGui style
    //ImGui::StyleColorsDark();
    ImGui::StyleColorsLight();
 
    // Setup Platform/Renderer backends
    ImGui_ImplSDL3_InitForSDLRenderer(window, renderer);
    ImGui_ImplSDLRenderer3_Init(renderer);
 
    // Load our texture after initialising SDL
    bool ret = LoadTextureFromFile("palvin.jpg", renderer, &my_texture, &my_image_width, &my_image_height);
    IM_ASSERT(ret);
 
    return SDL_APP_CONTINUE;
}
 
SDL_AppResult SDL_AppEvent(void* appstate, SDL_Event* event)
{
    // Poll and handle events (inputs, window resize, etc.)
    // You can read the io.WantCaptureMouse, io.WantCaptureKeyboard flags to tell if dear imgui wants to use your inputs.
    // - When io.WantCaptureMouse is true, do not dispatch mouse input data to your main application, or clear/overwrite your copy of the mouse data.
    // - When io.WantCaptureKeyboard is true, do not dispatch keyboard input data to your main application, or clear/overwrite your copy of the keyboard data.
    // Generally you may always pass all inputs to dear imgui, and hide them from your application based on those two flags.
    ImGui_ImplSDL3_ProcessEvent(event);
 
    switch (event->type) {
    case SDL_EVENT_QUIT:
        return SDL_APP_SUCCESS;
    case SDL_EVENT_KEY_DOWN:
        printf("Key pressed: %s\n", SDL_GetKeyName(event->key.key));
        if (event->key.key == SDLK_ESCAPE)
            return SDL_APP_SUCCESS;
        break;
    default:
        break;
    }
 
    return SDL_APP_CONTINUE;
}
 
SDL_AppResult SDL_AppIterate(void* appstate)
{
    // Start the Dear ImGui frame
    ImGui_ImplSDLRenderer3_NewFrame();
    ImGui_ImplSDL3_NewFrame();
    ImGui::NewFrame();
 
    // Show a simple window that we create ourselves. We use a Begin/End pair to create a named window.
    {
        static float f = 0.0f;
        static int counter = 0;
 
        ImGui::Begin("Hello, world!"); // Create a window called "Hello, world!" and append into it.
        ImGui::Text("This is some useful text."); // Display some text (you can use a format strings too)
        if (ImGui::Button("Button")) // Buttons return true when clicked (most widgets return true when edited/activated)
            counter++;
        ImGui::SameLine();
        ImGui::Text("counter = %d", counter);
        ImGui::Text("Application average %.3f ms/frame (%.1f FPS)"1000.0f / pio->Framerate, pio->Framerate);
        ImGui::End();
    }
    // 윈도우 없이 위치가 고정된 이미지 생성하기.
    {
        ImGui::Begin("No Window"0, ImGuiWindowFlags_NoBackground | ImGuiWindowFlags_NoDecoration | ImGuiWindowFlags_NoBringToFrontOnFocus | ImGuiWindowFlags_NoInputs);
        ImGui::SetWindowPos(ImVec2(00));
        ImGui::Text("pointer = %p", my_texture);
        ImGui::Text("size = %d x %d", my_image_width, my_image_height);
        ImGui::Image((ImTextureID)(intptr_t)my_texture, ImVec2((float)my_image_width, (float)my_image_height));
        ImGui::End();
    }
 
    // Rendering
    ImGui::Render();
 
    SDL_SetRenderDrawColor(renderer, 255255255, SDL_ALPHA_OPAQUE);
    SDL_RenderClear(renderer);
    ImGui_ImplSDLRenderer3_RenderDrawData(ImGui::GetDrawData(), renderer);
    SDL_RenderPresent(renderer);
 
    return SDL_APP_CONTINUE;
}
 
void SDL_AppQuit(void* appstate, SDL_AppResult result)
{
    // Cleanup    
    ImGui_ImplSDLRenderer3_Shutdown();
    ImGui_ImplSDL3_Shutdown();
    ImGui::DestroyContext();
 
    SDL_DestroyRenderer(renderer);
    SDL_DestroyWindow(window);
    SDL_Quit();
}


실행하면 이미지가 표시된다.


반응형
Posted by J-sean
:
반응형

파이게임과 GUI 라이브러리를 사용해 보자.

ImGui를 사용해 보려 했는데, OpenGL을 이용해야 하고 pygame.Surface.fill()을 사용할 수 없는 등 마음에 들지 않아 Pygame GUI를 사용하기로 했다.


pygame-gui를 설치한다.


1
2
3
4
5
6
7
8
9
10
11
12
13
14
15
16
17
18
19
20
21
22
23
24
25
26
27
28
29
30
31
32
33
34
35
36
37
38
39
40
41
42
43
44
import pygame
import pygame_gui
 
pygame.init()
pygame.display.set_caption("Super fun game development")
screenSize = (640480)
screen = pygame.display.set_mode(screenSize, pygame.DOUBLEBUF | pygame.RESIZABLE)
clock = pygame.time.Clock()
 
manager = pygame_gui.UIManager(screenSize)
hello_button = pygame_gui.elements.UIButton(relative_rect=pygame.Rect((1010), (10050)),
                                            text='Say Hello', manager=manager)
 
running = True
 
while running:
    time_delta = clock.tick(60)/1000
    # As you may have noticed we also had to create a pygame Clock to track the amount of time
    # in seconds that passes between each loop of the program. We need this 'time_delta' value
    # because several of the UI elements make use of timers and this is a convenient place to
    # get it.
        
    for event in pygame.event.get():
        if event.type == pygame.QUIT:
            running = False
        elif event.type == pygame.KEYDOWN and event.key == pygame.K_ESCAPE:
            running = False
        
        if event.type == pygame_gui.UI_BUTTON_PRESSED:
              if event.ui_element == hello_button:
                  print('Hello World!')
        
        manager.process_events(event)
    
    manager.update(time_delta)
 
    screen.fill("black")
    pygame.draw.circle(screen, "gray", screen.get_rect().center, 100)
 
    manager.draw_ui(screen)
 
    pygame.display.flip()
 
pygame.quit()


코드를 입력하고 실행한다.


버튼이 표시된다.


2024.01.28 - [Python] - [Pygame] Box2D 파이게임 물리 라이브러리

위 링크의 코드를 이용해 조금 더 실용적인 예제를 만들어 보자.


1
2
3
4
5
6
7
8
9
10
11
12
13
14
15
16
17
18
19
20
21
22
23
24
25
26
27
28
29
30
31
32
33
34
35
36
37
38
39
40
41
42
43
44
45
46
47
48
49
50
51
52
53
54
55
56
57
58
59
60
61
62
63
64
65
66
import math
import pygame
import pygame_gui
from Box2D import *
 
pygame.init()
pygame.display.set_caption("Physics Test")
screen = pygame.display.set_mode((640480))
running = True
player = pygame.image.load("player.png").convert()
 
manager = pygame_gui.UIManager((640480))
again_button = pygame_gui.elements.UIButton(relative_rect=pygame.Rect((35010), (200100)),
                                            text='Play again', manager=manager)
 
world = b2World(gravity=(09.8), doSleep=True)
 
groundBody = world.CreateStaticBody(position=(0400), shapes=b2PolygonShape(box=(5000)))
 
wallBody = world.CreateStaticBody(position=(3000), shapes=b2PolygonShape(box=(0400)))
 
playerBody = world.CreateDynamicBody(position=(00), linearVelocity=(500), angularVelocity=0.2)
playerFixtureDef = playerBody.CreatePolygonFixture(box=(player.get_width()/2,
                              player.get_height()/2), density=1, friction=0.5, restitution=0.7)
 
timeStep = 1.0 / 300
vel_iters, pos_iters = 62
  
while running:
    for event in pygame.event.get():
        if event.type == pygame.QUIT:
            running = False
        elif event.type == pygame.KEYDOWN and event.key == pygame.K_SPACE:
            playerBody.transform = ((00), 0)
            playerBody.linearVelocity = (500)
            playerBody.angularVelocity = 0.2
        elif event.type == pygame.KEYDOWN and event.key == pygame.K_ESCAPE:
            running = False
            
        if event.type == pygame_gui.UI_BUTTON_PRESSED:
            if event.ui_element == again_button:
                playerBody.transform = ((00), 0)
                playerBody.linearVelocity = (500)
                playerBody.angularVelocity = 0.2
        
        manager.process_events(event)
            
    manager.update(timeStep)
    
    world.Step(timeStep, vel_iters, pos_iters)
    world.ClearForces()
     
    screen.fill("black")
    pygame.draw.rect(screen, "brown", (040060020))
    pygame.draw.rect(screen, "yellow", (300020400))
 
    rotated_player = pygame.transform.rotate(player, playerBody.angle * 180/math.pi)
    
    screen.blit(rotated_player, (playerBody.position[0- rotated_player.get_width()/2,
                                 playerBody.position[1- rotated_player.get_height()/2))
 
    manager.draw_ui(screen)
    
    pygame.display.flip()
    
pygame.quit()


코드를 입력하고 실행한다.


버튼을 클릭하면 캐릭터가 다시 던져진다.


※ 참고

GUIs with pygame

Pygame GUI


반응형
Posted by J-sean
: