반응형

키보드와 마우스 입력을 간단히 확인해 보자.


노드에 스크립트를 추가한다.


1
2
3
4
5
6
7
8
9
10
11
12
13
14
15
16
17
18
19
20
21
22
23
24
25
26
27
using Godot;
 
public partial class Main : Node
{
    // Called when the node enters the scene tree for the first time.
    public override void _Ready()
    {
    }
 
    // Called every frame. 'delta' is the elapsed time since the previous frame.
    public override void _Process(double delta)
    {
        if(Input.IsMouseButtonPressed(MouseButton.Left))
        {
            GD.Print($"Mouse Left Button: {GetViewport().GetMousePosition()}");
        }
        if(Input.IsMouseButtonPressed(MouseButton.Right))
        {
            GD.Print($"Mouse Right Button: {GetViewport().GetMousePosition()}");
        }
        if(Input.IsKeyPressed(Key.Escape))
        {
            GD.Print("Escape Key");
            //GetTree().Quit();
        }
    }
}


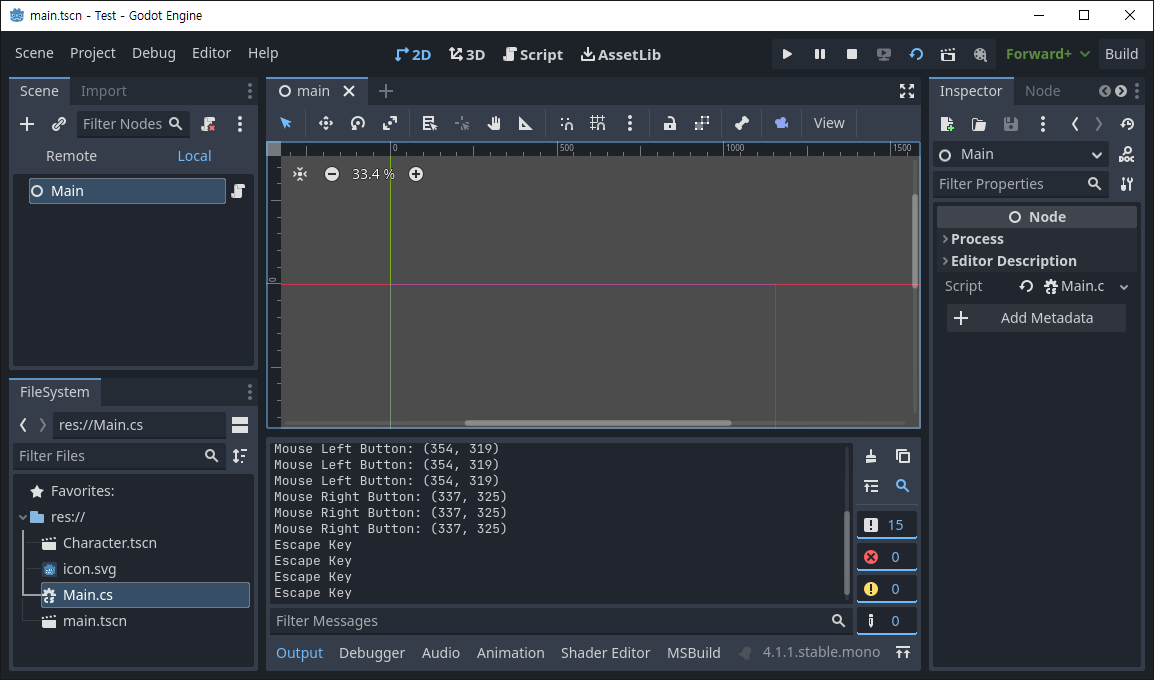
마우스와 키보드 입력을 감지하는 코드를 작성한다. IsMouseButtonPressed()와 IsKeyPressed()는 버튼이나 키가 눌려있는 동안 계속해서 true를 반환한다. 눌리거나 떼는 순간만 반응하고 싶다면 아래 함수를 사용한다.

Input.IsActionJustPressed()
Input.IsActionJustReleased()


버튼이나 키가 눌리면 Output창에 표시된다.


1
2
3
4
5
6
7
8
9
10
using Godot;
 
public partial class Script : Node2D
{
    public override void _Input(InputEvent @event)
    {
        if (@event.IsActionPressed("ui_accept"))
            GD.Print(@event.AsText());
    }
}


_Input()와 InputEvent를 사용하는 코드를 작성한다. InputEvent.IsActionPressed()는 눌리는 순간 한 번만 반응한다.


Input Map에 등록된 목록을 사용할 수 있다.


ui_accept로 등록된 Enter키나 Space키가 눌리면 AsText()에 의해 키 이름(Enter/Space)이 출력된다.


1
2
3
4
5
6
7
8
9
10
11
12
13
14
15
16
17
18
19
20
21
22
23
24
25
using Godot;
 
public partial class Script : Node2D
{
    public override void _Input(InputEvent @event)
    {
        if (@event is InputEventMouseButton mouseEvent && mouseEvent.Pressed)
        {
            switch (mouseEvent.ButtonIndex)
            {
                case MouseButton.Left:
                    GD.Print(@event.AsText() + " at: " + mouseEvent.Position);
                    break;
                case MouseButton.Right:
                    GD.Print(@event.AsText() + " at: " + GetViewport().GetMousePosition());
                    // mouseEvent.position과 GetViewport().GetMousePosition()는 같은
                    // 결과를 출력한다.
                    break;
                case MouseButton.WheelUp:
                    GD.Print(@event.AsText());
                    break;
            }
        }
    }
}


이번엔 버튼 동작을 구분하는 코드를 입력한다.


버튼 동작과 위치가 표시된다.


※ 참고

Input Handling


반응형
Posted by J-sean
:
반응형

수동으로 언제든 간단하게 크래시를 발생시켜 블루 스크린이 뜨게 해 보자.


CrashOnCtrlScroll 키를 생성한다. (USB 키보드 사용)

PS/2 키보드의 경우 아래 경로에 키를 생성한다. HKEY_LOCAL_MACHINE\System\CurrentControlSet\Services\i8042prt\Parameters


그리고 재부팅 후 원하는 순간에 (키보드 오른쪽에 있는)Ctrl키를 누르고 Scroll Lock키를 두 번 누른다.


블루 스크린이 뜬다. (중지 코드: MANUALLY_INITIATED_CRASH)


지정된 폴더에 메모리 덤프가 생성된다.


Windbg로 확인해 보면 매뉴얼 크래시가 표시된다.


※ 참고

Forcing a system crash from the keyboard


반응형
Posted by J-sean
:
반응형

아두이노 프로 마이크로를 이용해 간단한 USB키보드를 만들 수 있다.


2019/10/27 - [C, C++] - Sending a keyboard input 키 입력 보내기


Arduino Pro Micro Pin Map


Tactile Switch를 연결한다.

D4 - Tactile Switch - GND


1
2
3
4
5
6
7
8
9
10
11
12
13
14
15
16
17
18
19
20
21
22
23
24
#include <Keyboard.h>
 
const char PIN_RETURN = 4;
 
void setup() {
  // put your setup code here, to run once:
  pinMode(PIN_RETURN, INPUT_PULLUP);
  Keyboard.begin();
}
 
void loop() {
  // put your main code here, to run repeatedly:
  if (digitalRead(PIN_RETURN)== LOW)
  {
    Keyboard.press(KEY_RETURN);
    delay(100);
    Keyboard.release(KEY_RETURN); // Keyboard.releaseAll();
    delay(100);
  }
 
  delay(100);
}
 
// https://www.arduino.cc/reference/en/language/functions/usb/keyboard/


스위치를 누르면 Enter키가 입력되는 소스.

※ 참고: https://www.arduino.cc/reference/en/language/functions/usb/keyboard/


Arduino Leonardo 보드를 선택하고 컴파일후 업로드 한다.


장치 관리자를 확인하면 'HID 키보드 장치'로 인식된다. 스위치를 누르면 Enter키가 입력된다.


반응형
Posted by J-sean
:
반응형

The SendInput function inserts the events in the INPUT structures serially into the keyboard or mouse input stream.

키보드 입력을 보낸다.


2020/10/17 - [Raspberry Pi & Arduino] - Turn your Arduino Pro Micro into a USB Keyboard - 아두이노 프로 마이크로 USB 키보드 만들기


1
2
3
4
5
6
7
8
9
10
11
12
13
14
15
16
17
18
19
20
21
22
23
24
25
26
27
28
29
30
31
32
33
34
35
36
37
38
39
40
41
42
43
44
45
46
47
48
49
50
51
52
53
54
55
56
57
58
59
60
61
62
63
64
65
66
67
68
69
70
71
72
73
74
75
76
77
78
79
80
81
82
83
84
85
86
87
88
89
90
91
92
93
94
95
96
97
98
99
100
101
102
103
104
105
106
107
108
109
110
111
112
113
114
#include <Windows.h>
#include <iostream>
 
using namespace std;
 
void PrintMenu()
{
    cout << "--- Key sender ---" << endl << endl;
    cout << "0: End" << endl;
    cout << "1: Send left key" << endl;
    cout << "2: Send right key" << endl;
    cout << "3: Send up key" << endl;
    cout << "4: Send down key" << endl;
    cout << "5: Send enter key" << endl;
    cout << "6: Send 'aA'" << endl;
    cout << "Choose: ";
}
 
// Virtual-Key Codes: https://docs.microsoft.com/ko-kr/windows/win32/inputdev/virtual-key-codes
void SendVKcodes(BYTE vk)
{
    Sleep(5000); // Wait for 5 seconds before sending a keycode.
 
    INPUT input;
    ZeroMemory(&input, sizeof(INPUT));
    input.type = INPUT_KEYBOARD;
    input.ki.wVk = vk;
    // A virtual-key code. The code must be a value in the range 1 to 254. If the dwFlags member
    // specifies KEYEVENTF_UNICODE, wVk must be 0.
 
    // input.ki.wScan = vk;
    // A hardware scan code for the key. If dwFlags specifies KEYEVENTF_UNICODE, wScan specifies
    // a Unicode character which is to be sent to the foreground application.
 
    SendInput(1&input, sizeof(INPUT));
 
    input.ki.dwFlags = KEYEVENTF_KEYUP;
    // If specified, the key is being released. If not specified, the key is being pressed.
    SendInput(1&input, sizeof(INPUT));
}
 
void SendaA()
{
    Sleep(5000);
 
    // Send 'a'
    INPUT input;
    ZeroMemory(&input, sizeof(INPUT));
    input.type = INPUT_KEYBOARD;
    input.ki.wVk = 0x41;    // a key
    SendInput(1&input, sizeof(INPUT));
 
    input.ki.dwFlags = KEYEVENTF_KEYUP;
    SendInput(1&input, sizeof(INPUT));
 
    // Sned 'A'
    input.ki.dwFlags = 0;
    input.ki.wVk = VK_SHIFT;
    SendInput(1&input, sizeof(INPUT));
 
    input.ki.wVk = 0x41;    // a key
    SendInput(1&input, sizeof(INPUT));
 
    input.ki.dwFlags = KEYEVENTF_KEYUP;
    SendInput(1&input, sizeof(INPUT));
 
    input.ki.wVk = VK_SHIFT;
    SendInput(1&input, sizeof(INPUT));
}
 
int main()
{
    int choice = 1;
 
    while (choice)
    {
        PrintMenu();
        cin >> choice;
 
        switch (choice)
        {
        case 1:
            SendVKcodes(VK_LEFT);
 
            break;
        case 2:
            SendVKcodes(VK_RIGHT);
 
            break;
        case 3:
            SendVKcodes(VK_UP);
 
            break;
        case 4:
            SendVKcodes(VK_DOWN);
 
            break;
        case 5:
            SendVKcodes(VK_RETURN);
 
            break;
 
        case 6:
            SendaA();
 
            break;
        default:
 
            return 0;
        }
    }
 
    return 0;
}


Run the program and choose the key you want to send.


※ Adjust key down duration by adding Sleep() between KEYEVENTF_KEYDOWN and KEYEVENTF_KEYUP.

For short key down duration, give 60~100 to Sleep() for the better result although some keys don't need Sleep() at all for very short key down duration.


반응형
Posted by J-sean
: