반응형

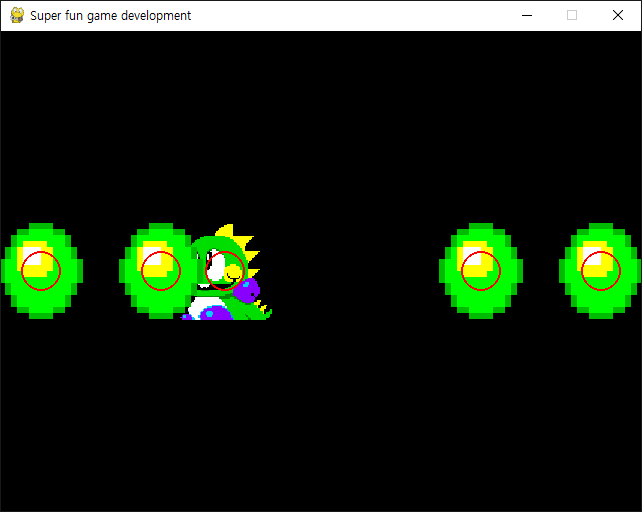
충돌 감지 영역을 원으로 지정하고 스프라이트 충돌을 확인해 보자.


1
2
3
4
5
6
7
8
9
10
11
12
13
14
15
16
17
18
19
20
21
22
23
24
25
26
27
28
29
30
31
32
33
34
35
36
37
38
39
40
41
42
43
44
45
46
47
48
49
50
51
52
53
54
55
56
57
58
59
60
61
62
63
64
65
66
67
68
69
70
71
72
73
74
75
76
77
78
79
80
81
82
83
84
85
86
87
88
89
90
91
92
93
94
95
96
97
98
99
100
101
102
103
104
105
106
import pygame
 
pygame.init()
pygame.display.set_caption("Super fun game development")
screen = pygame.display.set_mode((640480))
clock = pygame.time.Clock()
 
class Player(pygame.sprite.Sprite):
    def __init__(self, position):
        pygame.sprite.Sprite.__init__(self)
 
        self.direction = -1
        self.speed = 4
        self.image = pygame.image.load("player.png").convert()
        self.image.set_colorkey(self.image.get_at((00)))
        self.size = (self.image.get_width()*1.5self.image.get_height()*1.5)
        self.image = pygame.transform.scale(self.image, self.size)
        self.rect = self.image.get_rect(center=position)
        # rectangle이 아닌 circle을 이용해 충돌 감지하기 위한 반지름 속성 설정.
        self.radius = 40
        # 충돌 감지 circle 표시
        pygame.draw.circle(self.image, "red"self.image.get_rect().center, self.radius, 2)
 
    def flip_image(self):
        self.image = pygame.transform.flip(self.image, TrueFalse)
        
    def update(self):
        pass
# 플레이어 클래스
 
class Bubble(pygame.sprite.Sprite):
    def __init__(self, position):
        pygame.sprite.Sprite.__init__(self)
 
        self.image = pygame.image.load("bubble.png").convert()
        self.image.set_colorkey(self.image.get_at((00)))
        self.size = (self.image.get_width()*6self.image.get_height()*6)
        self.image = pygame.transform.scale(self.image, self.size)
        self.rect = self.image.get_rect(center=position)
        self.collided = False
        # rectangle이 아닌 circle을 이용해 충돌 감지하기 위한 반지름 속성 설정.
        self.radius = 40
        # 충돌 감지 circle 표시
        pygame.draw.circle(self.image, "red"self.image.get_rect().center, self.radius, 2)
 
    def update(self):
        if self.collided == True:
            self.rect.top -= 1
# 버블 클래스
# 충돌(self.collided)을 감지하면 위치(self.rect.top)가 변한다.
 
def main():
    player = Player((screen.get_width()/2, screen.get_height()/2))
    player_sprite = pygame.sprite.Group(player)
    # 플레이어 스프라이트 그룹
 
    bubbles = [
        Bubble((40, screen.get_height()/2)),
        Bubble((160, screen.get_height()/2)),
        Bubble((480, screen.get_height()/2)),
        Bubble((600, screen.get_height()/2))]
    bubble_sprites = pygame.sprite.Group(bubbles)
    # 버블 스프라이트 그룹
 
    running = True
 
    while running:
        for event in pygame.event.get():
            if event.type == pygame.QUIT:
                running = False
            elif event.type == pygame.KEYDOWN and event.key == pygame.K_ESCAPE:
                running = False
 
        keys = pygame.key.get_pressed()
        if keys[pygame.K_LEFT]:
            if player.direction > 0:
                player.flip_image()
                player.direction = -1
            player.rect.move_ip(-player.speed, 0)
        if keys[pygame.K_RIGHT]:
            if player.direction < 0:
                player.flip_image()
                player.direction = 1
            player.rect.move_ip(player.speed, 0)
 
        # spritecollide()의 마지막 인수 collided에 collide_circle()를 대입한다.
        collision = pygame.sprite.spritecollide(player, bubble_sprites, False, pygame.sprite.collide_circle)
        for bubble in collision:
            bubble.collided = True
        # 플레이어와 버블의 충돌을 감지하고 충돌한 버블의 collided 값을 True로 바꾼다.
        
        player_sprite.update()
        bubble_sprites.update()
                 
        screen.fill("black")
         
        player_sprite.draw(screen)
        bubble_sprites.draw(screen)
    
        pygame.display.flip()
        clock.tick(60)
 
    pygame.quit()
 
if __name__ == '__main__':
  main()


공룡과 버블의 충돌 감지 영역이 빨간 원으로 표시된다.


좀 더 확실한 확인을 위해 공룡과 버블의 충돌 감지 circle의 radius를 20으로 바꾸고 다시 실행해 보자.


스프라이트는 충돌 했지만 원은 충돌하지 않았기 때문에 충돌로 판정되지 않는다.


반응형
Posted by J-sean
:
반응형

사방이 벽으로 둘러쌓인 공간에서 이리저리 움직이는 공을 만들어 보자.


1
2
3
4
5
6
7
8
9
10
11
12
13
14
15
16
17
18
19
20
21
22
23
24
25
26
27
28
29
30
31
32
33
34
35
36
37
38
39
import pygame
 
pygame.init()
pygame.display.set_caption("Super fun game development")
screen = pygame.display.set_mode((640480))
clock = pygame.time.Clock()
 
position = pygame.math.Vector2(screen.get_width()/2, screen.get_height()/2)
velocity = pygame.math.Vector2(11).normalize() * 5
 
running = True
 
while running:
    for event in pygame.event.get():
        if event.type == pygame.QUIT:
            running = False
        elif event.type == pygame.KEYDOWN and event.key == pygame.K_ESCAPE:
            running = False
 
    screen.fill("black")
 
    if position.y > screen.get_height():
        velocity.reflect_ip(pygame.math.Vector2(01))
        # 천장이나 바닥에 부딪히면 (0, 1)의 법선 백터를 갖는 평면에 반사.
    elif position.y < 0:
        velocity.reflect_ip(pygame.math.Vector2(01))
    elif position.x > screen.get_width():
        velocity.reflect_ip(pygame.math.Vector2(10))
        # 오른쪽이나 왼쪽에 부딪히면 (1, 0)의 법선 백터를 갖는 평면에 반사.
    elif position.x < 0:
        velocity.reflect_ip(pygame.math.Vector2(10))  
 
    position = position + velocity
    pygame.draw.circle(screen, "red", position, 20)
    pygame.display.flip()
 
    clock.tick(60)
 
pygame.quit()


반응형
Posted by J-sean
:
반응형

OpenGL 화면에 Pygame 이미지(스프라이트)를 렌더링 해 보자.


1
2
3
4
5
6
7
8
9
10
11
12
13
14
15
16
17
18
19
20
21
22
23
24
25
26
27
28
29
30
31
32
33
34
35
36
37
38
39
40
41
42
43
44
45
46
47
48
49
50
51
52
53
54
55
import pygame
from pygame.locals import *
 
from OpenGL.GL import *
from OpenGL.GLU import *
 
verticies = ((1-1-1), (11-1), (-11-1), (-1-1-1),
             (1-11), (111), (-1-11), (-111))
edges = ((0,1), (0,3), (0,4), (2,1), (2,3), (2,7), (6,3), (6,4),
         (6,7), (5,1), (5,4), (5,7))
 
def drawCube():
    glBegin(GL_LINES)
    for edge in edges:
        for vertex in edge:
            glVertex3fv(verticies[vertex])
    glEnd()
 
def drawImage(x, y):
    image = pygame.image.load("player.png").convert()
    image.set_colorkey(image.get_at((00)))
    image = pygame.transform.scale(image, (image.get_width()*1.5,
                                           image.get_height()*1.5))
    imageData = pygame.image.tostring(image, "RGBA"True)
    glWindowPos2d(x-image.get_width()/2, y-image.get_height()/2)
    glDrawPixels(image.get_width(), image.get_height(), GL_RGBA,
                 GL_UNSIGNED_BYTE, imageData)
 
pygame.init()
clock = pygame.time.Clock()
display = (640480)
pygame.display.set_mode(display, DOUBLEBUF | OPENGL)
 
glEnable(GL_BLEND)
glBlendFunc(GL_SRC_ALPHA, GL_ONE_MINUS_SRC_ALPHA)
 
gluPerspective(45, (display[0]/display[1]), 0.150.0)
glTranslatef(0.00.0-5)
 
run = True
while run:    
    for event in pygame.event.get():
        if event.type == pygame.QUIT:
            run = False
 
    glRotatef(1311)
    glClear(GL_COLOR_BUFFER_BIT|GL_DEPTH_BUFFER_BIT)
    drawCube()
    drawImage(display[0]/2, display[1]/2)
    
    pygame.display.flip()
    clock.tick(60)
 
pygame.quit()
exit()


반응형
Posted by J-sean
:
반응형

OpenGL 화면에 Pygame 폰트를 렌더링 해 보자.


1
2
3
4
5
6
7
8
9
10
11
12
13
14
15
16
17
18
19
20
21
22
23
24
25
26
27
28
29
30
31
32
33
34
35
36
37
38
39
40
41
42
43
44
45
46
47
48
49
50
import pygame
from pygame.locals import *
 
from OpenGL.GL import *
from OpenGL.GLU import *
 
verticies = ((1-1-1), (11-1), (-11-1), (-1-1-1),
             (1-11), (111), (-1-11), (-111))
edges = ((0,1), (0,3), (0,4), (2,1), (2,3), (2,7), (6,3), (6,4),
         (6,7), (5,1), (5,4), (5,7))
 
def drawCube():
    glBegin(GL_LINES)
    for edge in edges:
        for vertex in edge:
            glVertex3fv(verticies[vertex])
    glEnd()
 
def drawText(x, y, text):
    font = pygame.font.SysFont('arial'64)
    textSurface = font.render(text, True, (125125125255), (2552550255))
    textData = pygame.image.tostring(textSurface, "RGBA"True)
    glWindowPos2d(x-textSurface.get_width()/2, y-textSurface.get_height()/2)
    glDrawPixels(textSurface.get_width(), textSurface.get_height(), GL_RGBA,
                 GL_UNSIGNED_BYTE, textData)
 
pygame.init()
clock = pygame.time.Clock()
display = (640480)
pygame.display.set_mode(display, DOUBLEBUF | OPENGL)
 
gluPerspective(45, (display[0]/display[1]), 0.150.0)
glTranslatef(0.00.0-5)
 
run = True
while run:    
    for event in pygame.event.get():
        if event.type == pygame.QUIT:
            run = False
 
    glRotatef(1311)
    glClear(GL_COLOR_BUFFER_BIT|GL_DEPTH_BUFFER_BIT)
    drawCube()
    drawText(display[0]/2, display[1]/2"Cube")
    
    pygame.display.flip()
    clock.tick(60)
 
pygame.quit()
exit()


이번엔 폰트의 배경이 표시되지 않도록 해 보자.


1
2
3
4
5
6
7
8
9
10
11
12
13
14
15
16
17
18
19
20
21
22
23
24
25
26
27
28
29
30
31
32
33
34
35
36
37
38
39
40
41
42
43
44
45
46
47
48
49
50
51
52
53
import pygame
from pygame.locals import *
 
from OpenGL.GL import *
from OpenGL.GLU import *
 
verticies = ((1-1-1), (11-1), (-11-1), (-1-1-1),
             (1-11), (111), (-1-11), (-111))
edges = ((0,1), (0,3), (0,4), (2,1), (2,3), (2,7), (6,3), (6,4),
         (6,7), (5,1), (5,4), (5,7))
 
def drawCube():
    glBegin(GL_LINES)
    for edge in edges:
        for vertex in edge:
            glVertex3fv(verticies[vertex])
    glEnd()
 
def drawText(x, y, text):
    font = pygame.font.SysFont('arial'64)
    textSurface = font.render(text, True, (125125125255)).convert_alpha()
    textData = pygame.image.tostring(textSurface, "RGBA"True)
    glWindowPos2d(x-textSurface.get_width()/2, y-textSurface.get_height()/2)
    glDrawPixels(textSurface.get_width(), textSurface.get_height(), GL_RGBA,
                 GL_UNSIGNED_BYTE, textData)
 
pygame.init()
clock = pygame.time.Clock()
display = (640480)
pygame.display.set_mode(display, DOUBLEBUF | OPENGL)
 
glEnable(GL_BLEND)
glBlendFunc(GL_SRC_ALPHA, GL_ONE_MINUS_SRC_ALPHA)
 
gluPerspective(45, (display[0]/display[1]), 0.150.0)
glTranslatef(0.00.0-5)
 
run = True
while run:    
    for event in pygame.event.get():
        if event.type == pygame.QUIT:
            run = False
 
    glRotatef(1311)
    glClear(GL_COLOR_BUFFER_BIT|GL_DEPTH_BUFFER_BIT)
    drawCube()
    drawText(display[0]/2, display[1]/2"Cube")
    
    pygame.display.flip()
    clock.tick(60)
 
pygame.quit()
exit()


반응형
Posted by J-sean
:

[Pygame] PyOpenGL 파이게임

Python 2023. 9. 11. 23:09 |
반응형

파이게임과 PyOpenGL을 연동해 보자.


1
2
3
4
5
6
7
8
9
10
11
12
13
14
15
16
17
18
19
20
21
22
23
24
25
26
27
28
29
30
31
32
33
34
35
36
37
38
39
40
41
42
43
44
45
46
47
48
49
50
import pygame
from pygame.locals import *
 
from OpenGL.GL import *
from OpenGL.GLU import *
 
verticies = (
    (1-1-1), (11-1),
    (-11-1), (-1-1-1),
    (1-11), (111),
    (-1-11), (-111) )
 
edges = (
    (0,1), (0,3), (0,4),
    (2,1), (2,3), (2,7),
    (6,3), (6,4), (6,7),
    (5,1), (5,4), (5,7) )
 
def Cube():
    glBegin(GL_LINES)
    for edge in edges:
        for vertex in edge:
            glVertex3fv(verticies[vertex])
    glEnd()
 
def main():
    pygame.init()
    display = (640,480)
    pygame.display.set_mode(display, DOUBLEBUF|OPENGL)
    clock = pygame.time.Clock()
 
    gluPerspective(45, (display[0]/display[1]), 0.150.0)
 
    glTranslatef(0.00.0-5)
 
    while True:
        for event in pygame.event.get():
            if event.type == pygame.QUIT:
                pygame.quit()
                quit()
 
        glRotatef(1312)
        glClear(GL_COLOR_BUFFER_BIT|GL_DEPTH_BUFFER_BIT)
        Cube()
 
        pygame.display.flip()
        clock.tick(30)
 
if __name__ == '__main__':
   main()


※ 참고

PyOpenGL Tutorial1

PyOpenGL Tutorial2

OpenGL 강좌1

OpenGL 강좌2


반응형
Posted by J-sean
:

Python PyOpenGL

Python 2023. 9. 11. 22:59 |
반응형

파이썬에서 OpenGL을 사용해 보자.


1
2
3
4
5
6
7
8
9
10
11
12
13
14
15
16
17
18
19
20
21
22
23
24
25
from OpenGL.GL import *
from OpenGL.GLU import *
from OpenGL.GLUT import *
 
def Display():
    glClear(GL_COLOR_BUFFER_BIT)
 
    glBegin(GL_QUADS)
    glVertex2f(0.50.5)
    glVertex2f(-0.50.5)
    glVertex2f(-0.5-0.5)
    glVertex2f(0.5-0.5)
    glEnd()
    
    glFlush()
    
if __name__ == "__main__":
    glutInit()
 
    #glutInitDisplayMode(GLUT_RGB)
    #glutInitWindowSize(640, 480)
    #glutInitWindowPosition(400, 300)
    glutCreateWindow("OpenGL")
    glutDisplayFunc(Display)
    glutMainLoop()


윈도우에 사각형이 표시된다.


pip install PyOpenGL
pip install PyOpenGL_accelerate

위 명령으로 공식 PyOpenGL, PyOpenGL_accelerate를 설치하면 OpenGL.GLUT에 문제가 있는 경우가 있다. 예를 들어 glutinit()를 실행하면 아래와 같은 에러가 발생한다.

NullFunctionError: Attempt to call an undefined function glutInit, check for bool(glutInit) before calling.

만약 에러가 발생한다면 설치한 패키지를 삭제하고 아래 링크에서 받아 다시 설치한다.

Unofficial Windows Binaries for Python Extension Packages


PyOpenGL_accelerate-3.1.6-cp311-cp311-win_amd64.whl
0.34MB
PyOpenGL-3.1.6-cp311-cp311-win_amd64.whl
2.64MB


하지만 OpenGL.GLUT을 사용하지 않는다면 공식 패키지를 사용해도 상관 없다. Pygame을 사용해 보자.


1
2
3
4
5
6
7
8
9
10
11
12
13
14
15
16
17
18
19
20
21
22
23
24
25
26
27
28
29
30
31
32
33
34
35
36
37
38
39
import pygame
from pygame.locals import *
 
from OpenGL.GL import *
from OpenGL.GLU import *
 
def Display():
    glBegin(GL_QUADS)
    glVertex2f(0.50.5)
    glVertex2f(-0.50.5)
    glVertex2f(-0.5-0.5)
    glVertex2f(0.5-0.5)
    glEnd()
 
def main():
    pygame.init()
    display = (640,480)
    pygame.display.set_mode(display, DOUBLEBUF|OPENGL)
    clock = pygame.time.Clock()
 
    gluPerspective(45, (display[0]/display[1]), 0.150.0)
 
    glTranslatef(0.00.0-5)
 
    while True:
        for event in pygame.event.get():
            if event.type == pygame.QUIT:
                pygame.quit()
                quit()
 
        glClear(GL_COLOR_BUFFER_BIT|GL_DEPTH_BUFFER_BIT)
        glRotatef(1312)
        Display()
 
        pygame.display.flip()
        clock.tick(30)
 
if __name__ == '__main__':
   main()


※ 참고

OpenGL 강좌


반응형
Posted by J-sean
:
반응형

코루틴과 데이터를 교환해서 처리해 보자.


1
2
3
4
5
6
7
8
9
10
11
12
13
14
15
16
17
18
19
20
21
22
23
24
25
26
27
28
29
30
31
32
33
34
import time
 
def MyCoroutine():
    num = 0
    while True:
        x = yield num
        num += 1
        print(x)
        time.sleep(0.5)
 
co = MyCoroutine()
next(co)
time.sleep(1)
# 코루틴을 시작하고 yield 명령에서 대기한다.
 
print(co.send(100))
time.sleep(1)
# 코루틴에 100을 전달(x에 100 대입)하고 num을 받아서 출력한다.
# num 값은 yield 명령이 실행되는 시점에 결정된 값(0)이 아니고
# 코루틴이 끝나는 시점에 결정된 값(1)이 전달된다.
 
print(co.send(200))
time.sleep(1)
# 코루틴에 200을 전달(x에 200 대입)하고 num을 받아서 출력한다.
 
next(co)
# 코루틴에 아무 값도 전달하지 않고(그래서 None이 출력된다) 다음
# yield 까지 진행하고 받아온 num 값은 무시.
 
print(next(co))
# 마찬가지로 코루틴에 아무 값도 전달하지 않고 다름 yield 까지 진행.
# 이번엔 num 값을 받아서 출력한다.
 
co.close()


반응형
Posted by J-sean
:
반응형

파이썬에서 여러 작업을 코루틴으로 동시에 진행해 보자.


1
2
3
4
5
6
7
8
9
10
11
12
13
14
15
16
17
18
19
20
21
22
23
24
25
26
27
28
29
30
31
32
33
34
35
36
37
38
39
40
41
42
43
44
import asyncio
import time
 
async def show_text(text, delay):
    for i in range(5):
        print(text + " " + str(i))
        await asyncio.sleep(delay)
        # coroutine asyncio.sleep(delay, result=None)
        # Block for delay seconds. If result is provided,
        # it is returned to the caller when the coroutine
        # completes. sleep() always suspends the current
        # task, allowing other tasks to run.
    return text
 
async def main():
    #result = await asyncio.gather(
    #    show_text("first", 0.5),
    #    show_text("second", 0.5),
    #    show_text("third", 1)
    #    )
    #print(result)
 
    task1 = asyncio.create_task(show_text("first"0.5))
    task2 = asyncio.create_task(show_text("second"0.5))
    task3 = asyncio.create_task(show_text("third"1))
    # The asyncio.create_task() function to run coroutines
    # concurrently as asyncio Tasks.
 
    await task1
    await task2
    await task3
    # Awaiting on a coroutine.
 
    print("result: " + task1.result())
    print("result: " + task2.result())
    print("result: " + task3.result())
    
if __name__ == "__main__":
    start = time.time()
    asyncio.run(main())
    # The asyncio.run() function to run the top-level
    # entry point “main()” function.
    end = time.time()
    print(end - start)


총 소요시간은 5초이다.

첫 번째, 두 번째, 세 번째 작업의 소요시간 총 합이 아닌, 가장 긴 작업 시간을 가진 세 번째 작업의 소요시간인 5초가 걸린다.


Coroutines and Tasks


반응형
Posted by J-sean
: