반응형

SDL 기본 라이브러리는 WAV 형식의 오디오만 처리할 수 있다. mp3, ogg 등의 형식을 처리하기 위해서는 SDL_mixer 라이브러리가 필요하다.


우선 SDL 기본 라이브러리로 WAV 사운드를 출력해 보자.


1
2
3
4
5
6
7
8
9
10
11
12
13
14
15
16
17
18
19
20
21
22
23
24
25
26
27
28
29
30
31
32
33
34
35
36
37
38
39
40
41
42
43
44
45
46
47
48
49
50
51
52
53
#include <iostream>
#include "SDL.h"
 
#pragma comment(lib, "sdl2.lib")
#pragma comment(lib, "sdl2main.lib")
 
int main(int argc, char* argv[]) {
    SDL_Init(SDL_INIT_AUDIO);
 
    SDL_AudioSpec wav_spec;
    Uint8* wav_buffer;
    Uint32 wav_length;
 
    if (SDL_LoadWAV("sound.wav"&wav_spec, &wav_buffer, &wav_length) == NULL) {
        // Use this function to load a WAVE from a file.
        printf("SDL_LoadWAV Error: %s\n", SDL_GetError());
        return -1;
    }
 
    int bitDepth = SDL_AUDIO_BITSIZE(wav_spec.format);
    int bytesPerSecond = (bitDepth * wav_spec.channels * wav_spec.freq) / 8;
    float durationSec = (float)wav_length / bytesPerSecond;
    printf("Duration: %f\n", durationSec);
    // wav 파일 재생 시간 구하기.
 
    SDL_AudioDeviceID dev = SDL_OpenAudioDevice(NULL0&wav_spec, NULL0);
    // Open a specific audio device.
    if (dev == NULL) {
        printf("SDL_AudioDeviceID Error: %s\n", SDL_GetError());
        return -1;
    }
 
    if (SDL_QueueAudio(dev, wav_buffer, wav_length) != 0) {
        // Queue more audio on non-callback devices.
        printf("SDL_QueueAudio Error: %s\n", SDL_GetError());
        return -1;
    }
 
    SDL_PauseAudioDevice(dev, 0);
    // Use this function to pause and unpause audio playback on a specified device.
    // dev: a device opened by SDL_OpenAudioDevice()
    // pause_on: non-zero to pause, 0 to unpause
    SDL_Delay(durationSec * 1000);
    // Wait a specified number of milliseconds before returning.
 
    SDL_FreeWAV(wav_buffer);
    // Free data previously allocated with SDL_LoadWAV() or SDL_LoadWAV_RW().
    SDL_CloseAudioDevice(dev);
    //Use this function to shut down audio processing and close the audio device.
    SDL_Quit();
 
    return 0;
}


코드를 작성하고 빌드한다.


실행하면 재생 시간이 표시되고 사운드가 출력된다.


※ 참고

SDL_AudioFormat


이번엔 SDL_mixer를 이용해 mp3, ogg 등의 사운드를 출력해 보자. 아래 링크에서 SDL_mixer를 다운받고 적당히 설치한다.

SDL Libraries


1
2
3
4
5
6
7
8
9
10
11
12
13
14
15
16
17
18
19
20
21
22
23
24
25
26
27
28
29
30
31
32
33
34
35
36
37
38
39
40
#include <iostream>
#include "SDL.h"
#include "SDL_mixer.h"
 
#pragma comment(lib, "sdl2.lib")
#pragma comment(lib, "sdl2main.lib")
#pragma comment(lib, "sdl2_mixer.lib")
 
int main(int argc, char* argv[]) {
    SDL_Init(SDL_INIT_AUDIO);
 
    if (Mix_OpenAudio(48000, MIX_DEFAULT_FORMAT, 22048!= 0) {
        // Open the default audio device for playback.
        printf("Mix_OpenAudio Error: %s\n", Mix_GetError());
        return -1;
    }
 
    Mix_Music* music = Mix_LoadMUS("sound.mp3");
    // Load a supported audio format into a music object.
    if (music == NULL) {
        printf("Mix_LoadMUS Error: %s\n", Mix_GetError());
        return -1;
    }
    printf("Duration: %f\n", Mix_MusicDuration(music));
    // Get a music object's duration, in seconds.
 
    Mix_PlayMusic(music, 0);
    // Play a new music object. (0 means "play once and stop")
    SDL_Delay(int(Mix_MusicDuration(music) * 1000));
 
    Mix_FreeMusic(music);
    // Free a music object. If this music is currently playing,
    // it will be stopped.
    Mix_CloseAudio();
    // Close the mixer, halting all playing audio.
 
    SDL_Quit();
 
    return 0;
}


코드를 작성하고 빌드한다.


실행하면 재생시간이 표시되고 사운드가 출력된다.


※ 참고

SDL_mixer API


반응형
Posted by J-sean
:
반응형

pycaw를 이용해 시스템 오디오 볼륨을 설정해 보자.


pycaw를 설치한다.


1
2
3
4
5
6
7
8
9
10
11
12
13
14
15
16
17
18
19
20
21
22
23
24
25
from ctypes import cast, POINTER
from comtypes import CLSCTX_ALL
from pycaw.pycaw import AudioUtilities, IAudioEndpointVolume
from time import sleep
 
devices = AudioUtilities.GetSpeakers()
interface = devices.Activate(IAudioEndpointVolume._iid_, CLSCTX_ALL, None)
volume = cast(interface, POINTER(IAudioEndpointVolume))
 
# Control volume
#volume.SetMasterVolumeLevel(-0.0, None) # Max(100%)
#volume.SetMasterVolumeLevel(-3.3, None) # 80%
#volume.SetMasterVolumeLevel(-10.3, None) # 50%
#volume.SetMasterVolumeLevel(-23.6, None) # 20%
#volume.SetMasterVolumeLevel(-64.0, None) # Min(0%)
 
while(True):
    current = volume.GetMasterVolumeLevel()    
    print("Current Volume:", current)
 
    if (current > -23.6):
        current -= 1
        volume.SetMasterVolumeLevel(current, None)
 
    sleep(1)


위와 같이 코드를 작성하고 실행한다.


100% 었던 볼륨이 20% 이하로 내려간다.


실행시 콘솔 화면이 뜨지 않게 하려면 파일 확장명을 .pyw로 바꾼다.


※ 참고

pycaw

2022.01.06 - [C#] - C# AudioSwitcher System Audio/Sound Volume Control - 시스템 오디오/사운드 볼륨 컨트롤 1

2022.01.07 - [C#] - C# AudioSwitcher System Audio/Sound Volume Control - 시스템 오디오/사운드 볼륨 컨트롤 2

2023.10.28 - [C#] - C# Sound Meter 사운드 미터


반응형
Posted by J-sean
:
반응형


2022.01.06 - [C#] - C# AudioSwitcher System Audio/Sound Volume Control - 시스템 오디오/사운드 볼륨 컨트롤 1

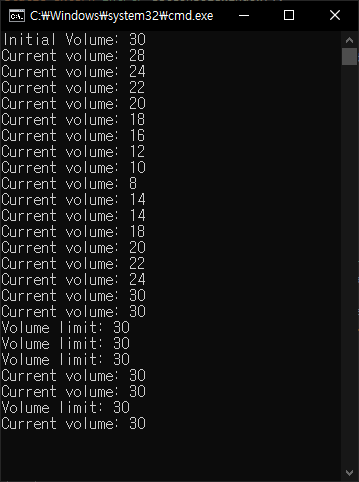
의 소스를 수정해 Observer를 등록하고 VolumeChanged Notification을 받아 지정된 볼륨 이상 변경 하지 못 하도록 해 보자.


1
2
3
4
5
6
7
8
9
10
11
12
13
14
15
16
17
18
19
20
21
22
23
24
25
26
27
28
29
30
31
32
33
34
35
36
37
38
39
40
41
42
43
44
45
46
47
48
49
50
51
52
53
54
55
56
57
58
59
60
61
62
63
64
65
66
67
68
69
70
71
72
73
74
75
76
77
78
79
80
81
82
using System;
using System.Collections.Generic;
using System.Linq;
using System.Text;
using System.Threading.Tasks;
 
using System.Runtime.InteropServices;
using AudioSwitcher.AudioApi.CoreAudio;
using AudioSwitcher.AudioApi;
 
namespace ConsoleApp1
{
    class Program
    {
        [DllImport("kernel32.dll")]
        static extern IntPtr GetConsoleWindow();
 
        [DllImport("user32.dll")]
        static extern bool ShowWindow(IntPtr hWnd, int nCmdShow);
 
        static int maxVol;
 
        static void Main(string[] args)
        {
            const int SW_HIDE = 0// 창 숨기기
            const int SW_SHOW = 1// 창 보이기
 
            IntPtr handle = GetConsoleWindow();
            //ShowWindow(handle, SW_HIDE);            
 
            CoreAudioDevice defaultPlaybackDevice = new CoreAudioController().DefaultPlaybackDevice;
            Console.WriteLine($"Initial Volume: {defaultPlaybackDevice.Volume}");
 
            IObserver<DeviceVolumeChangedArgs> volumeChangeObserver = new VolumeChangeObserver();
            IDisposable subscriber = defaultPlaybackDevice.VolumeChanged.Subscribe(volumeChangeObserver);
 
            //subscriber.Dispose(); // 볼륨 제한 종료
 
            if (args.Length > 0)
            {
                maxVol = int.Parse(args[0]);
            }
            else
            {
                maxVol = 30;
            }
 
            defaultPlaybackDevice.Volume = maxVol; // 허용 최고 볼륨으로 초기화
 
            while (true)
            {
                System.Threading.Thread.Sleep(10000); // 10초 지연
            }
        }
 
        public class VolumeChangeObserver : IObserver<DeviceVolumeChangedArgs>
        {
            public virtual void OnCompleted()
            {
                Console.WriteLine("Completed.");
            }
 
            public virtual void OnError(Exception e)
            {
                Console.WriteLine(e.Message);
            }
 
            public virtual void OnNext(DeviceVolumeChangedArgs args)
            {
                if (args.Volume > maxVol)
                {
                    Console.WriteLine($"Volume limit: {maxVol}");
                    args.Device.Volume = maxVol; // args.Volume = read only
                }
                else
                {
                    Console.WriteLine($"Current volume: {args.Volume}");
                }
            }
        }
    }
}


소스를 입력하고 빌드한다.


옵션 없이 실행하면 볼륨을 30 이상 올릴 수 없다.

※ 참고

2022.01.08 - [C#] - C# Observer Design Pattern with The IObserver and IObservable interfaces

2023.10.26 - [Python] - Python Core Audio Windows Library 파이썬 코어 오디오 라이브러리

2023.10.28 - [C#] - C# Sound Meter 사운드 미터


반응형
Posted by J-sean
:
반응형

AudioSwitcher를 이용해 시스템 볼륨을 조정해 보자.


AudioSwitcher Nuget Package를 설치한다.


1
2
3
4
5
6
7
8
9
10
11
12
13
14
15
16
17
18
19
20
21
22
23
24
25
26
27
28
29
30
31
32
33
34
35
36
37
38
39
40
41
42
43
44
45
46
47
using System;
using System.Collections.Generic;
using System.Linq;
using System.Text;
using System.Threading.Tasks;
 
using System.Runtime.InteropServices;
using AudioSwitcher.AudioApi.CoreAudio;
 
namespace ConsoleApp1
{
    class Program
    {
        [DllImport("kernel32.dll")]
        static extern IntPtr GetConsoleWindow();
 
        [DllImport("user32.dll")]
        static extern bool ShowWindow(IntPtr hWnd, int nCmdShow);
 
        static void Main(string[] args)
        {
            const int SW_HIDE = 0// 창 숨기기
            const int SW_SHOW = 1// 창 보이기
 
            IntPtr handle = GetConsoleWindow();
            //ShowWindow(handle, SW_HIDE);
 
            CoreAudioDevice defaultPlaybackDevice = new CoreAudioController().DefaultPlaybackDevice;
            Console.WriteLine("Current Volume: " + defaultPlaybackDevice.Volume);
 
            while (true)
            {
                if (defaultPlaybackDevice.Volume > 20// 볼륨이 20 보다 크다면
                {
                    while (defaultPlaybackDevice.Volume > 20// 볼륨이 20 보다 크지 않을때 까지 무한 루프
                    {
                        defaultPlaybackDevice.Volume--// 볼륨 1 감소
                        Console.WriteLine("Current Volume: " + defaultPlaybackDevice.Volume);
                        System.Threading.Thread.Sleep(1000); // 매 1초 확인
                    }
                }
 
                System.Threading.Thread.Sleep(10000); // 매 10초 확인
            }
        }
    }
}


소스를 입력하고 빌드한다.


프로그램을 실행하면 시스템 볼륨이 20 이하일 때까지 1초마다 1씩 감소한다.


처음 35였던 볼륨이 20이 되었다.


2022.01.07 - [C#] - C# AudioSwitcher System Audio/Sound Volume Control - 시스템 오디오/사운드 볼륨 컨트롤 2


반응형
Posted by J-sean
:
반응형

C#에서 Windows Media Player를 이용해 오디오 파일을 플레이 해 보자.


아래 링크를 참고해 Windows Media Player COM Component를 가져오고 빌드시 메세지가 발생하지 않도록 하자.

(Windows Media Player 컴포넌트를 폼에 배치할 필요는 없다)

2021.11.21 - [C#] - C# Windows Media Player Audio/Video Play #1


폼과 버튼을 적당히 배치한다.


1
2
3
4
5
6
7
8
9
10
11
12
13
14
15
16
17
18
19
20
21
22
23
24
25
26
27
28
29
30
31
32
33
34
35
36
37
38
39
40
41
42
43
44
45
46
47
48
49
50
51
52
53
54
55
56
57
58
59
60
61
62
63
64
65
66
67
68
69
70
71
72
73
using System;
using System.Collections.Generic;
using System.ComponentModel;
using System.Data;
using System.Drawing;
using System.Linq;
using System.Text;
using System.Threading.Tasks;
using System.Windows.Forms;
 
using WMPLib;
 
namespace WindowsFormsApp1
{
    public partial class Form1 : Form
    {
        private string time;
 
        WindowsMediaPlayer wmp;
 
        public Form1()
        {
            InitializeComponent();
            
            wmp = new WindowsMediaPlayer();
 
            Timer T = new Timer();
            T.Interval = 1000;
            T.Tick += new EventHandler(Form1_Timer);
            T.Start();
        }
 
        private void Form1_Timer(object sender, System.EventArgs e)
        {
            if (wmp.playState == WMPPlayState.wmppsPlaying)
            {
                //time = wmp.controls.currentPositionString + " / " + wmp.controls.currentItem.durationString;
                //time = wmp.controls.currentPosition.ToString() + " / " + wmp.controls.currentItem.duration.ToString();
                time = TimeSpan.FromSeconds((int)wmp.controls.currentPosition).ToString() + " / "
                    + TimeSpan.FromSeconds((int)wmp.controls.currentItem.duration);
 
                Graphics G = CreateGraphics();
                //G.DrawString(time, Font, System.Drawing.Brushes.Black, 20, 70); // 글자가 겹친다.
                TextRenderer.DrawText(G, time, Font, new Point(2070), ForeColor, BackColor);
                G.Dispose();
            }
        }
 
        private void button1_Click(object sender, EventArgs e)
        {
            try
            {
                OpenFileDialog dlg = new OpenFileDialog();
                if (dlg.ShowDialog() == DialogResult.OK)
                {
                    wmp.URL = dlg.FileName;
                }
            }
            catch (Exception exc)
            {
                MessageBox.Show(exc.Message);
            }
        }
 
        private void button2_Click(object sender, EventArgs e)
        {
            if (wmp.playState == WMPPlayState.wmppsPlaying)
            {
                wmp.controls.stop();
            }
        }
    }
}


소스를 입력한다.


오디오/비디오 파일을 플레이 할 수 있다. (비디오 파일은 오디오만 출력된다)

실행 파일과 함께 Interop.WMPLib.dll 파일이 존재해야 한다.


Using the Windows Media Player Control in a .NET Framework Solution


반응형
Posted by J-sean
:
반응형


2021.11.21 - [C#] - C# Windows Media Player Audio/Video Play #2


C#에서 Windows Media Player를 이용해 오디오/비디오 파일을 플레이 해 보자.


Toolbox의 원하는 곳에서 우클릭 - Choose Items...


COM Components - Windows Media Player 선택.


폼, 버튼, Windows Media Player를 적당히 배치한다.


1
2
3
4
5
6
7
8
9
10
11
12
13
14
15
16
17
18
19
20
21
22
23
24
25
26
27
28
29
30
31
32
33
34
35
36
37
38
39
40
41
42
using System;
using System.Collections.Generic;
using System.ComponentModel;
using System.Data;
using System.Drawing;
using System.Linq;
using System.Text;
using System.Threading.Tasks;
using System.Windows.Forms;
 
using WMPLib;
 
namespace WindowsFormsApp1
{
    public partial class Form1 : Form
    {
        public Form1()
        {
            InitializeComponent();
        }
 
        private void button1_Click(object sender, EventArgs e)
        {
            try
            {
                OpenFileDialog dlg = new OpenFileDialog();
                if (dlg.ShowDialog() == DialogResult.OK)
                {
                    axWindowsMediaPlayer1.URL = dlg.FileName;
                    axWindowsMediaPlayer1.Ctlcontrols.stop();   // 자동 재생 방지.
                    // The managed-code wrapper for the Windows Media Player control exposes
                    // the Controls object as Ctlcontrols to avoid collision with the Controls
                    // property inherited from System.Windows.Forms.Control.
                }
            }
            catch (Exception exc)
            {
                MessageBox.Show(exc.Message);
            }
        }
    }
}


소스를 입력한다.


이대로 빌드해도 문제는 없지만 위와 같은 메세지가 나온다.


References - WMPLib - Properties - Embed Interop Types - False 선택

다시 빌드하면 아무 메세지도 나오지 않는다.


MP3등 오디오 파일 재생.


AVI, MP4등 비디오 파일 재생.


이번엔 실행하면 아무것도 보이지 않다가 오디오/비디오 파일을 선택하면 UI없이 플레이 하는 프로그램을 만들어 보자.


폼, 버튼, Windows Media Player를 배치한다.


1
2
3
4
5
6
7
8
9
10
11
12
13
14
15
16
17
18
19
20
21
22
23
24
25
26
27
28
29
30
31
32
33
34
35
36
37
38
39
40
41
42
43
44
45
46
47
48
49
50
51
52
53
54
using System;
using System.Collections.Generic;
using System.ComponentModel;
using System.Data;
using System.Drawing;
using System.Linq;
using System.Text;
using System.Threading.Tasks;
using System.Windows.Forms;
 
using WMPLib;
 
namespace WindowsFormsApp1
{
    public partial class Form1 : Form
    {
        public Form1()
        {
            InitializeComponent();
 
            axWindowsMediaPlayer1.Visible = false;
            axWindowsMediaPlayer1.uiMode = "none";
        }
 
        private void button1_Click(object sender, EventArgs e)
        {
            try
            {
                OpenFileDialog dlg = new OpenFileDialog();
                if (dlg.ShowDialog() == DialogResult.OK)
                {
                    axWindowsMediaPlayer1.URL = dlg.FileName;
                    axWindowsMediaPlayer1.Visible = true;
                }
            } catch (Exception exc)
            {
                MessageBox.Show(exc.Message);
            }
        }
 
        private void button2_Click(object sender, EventArgs e)
        {
            if (axWindowsMediaPlayer1.playState == WMPPlayState.wmppsPlaying)
            {
                axWindowsMediaPlayer1.Ctlcontrols.stop();
                // The managed-code wrapper for the Windows Media Player control exposes
                // the Controls object as Ctlcontrols to avoid collision with the Controls
                // property inherited from System.Windows.Forms.Control.
                
                axWindowsMediaPlayer1.Visible = false;
            }            
        }
    }
}


소스를 입력하고 빌드한다.


WMP가 보이지 않는다. Play 버튼을 클릭하고 비디오 파일을 선택한다.


비디오가 UI없이 플레이된다.


실행 파일과 함께 Interop.WMPLib.dll 파일이 존재해야 한다.


Using the Windows Media Player Control in a .NET Framework Solution


반응형
Posted by J-sean
:
반응형

Bartop 게임기 제작에 필요한 부품을 알아 보니 작은 스피커와 앰프도 필요하다는걸 알게 되었다. 가장 비싼 취미 중 하나라는 오디오. 그 취미의 중심에 있는 부품 중 하나인 앰프는 몇 천원부터 수 천만원에 이르기 까지 정말 다양한 가격대가 형성되어 있다. 물론 내가 구입한 제품은 low-end... 그래도 나름배송비 포함 $5.84다. ㅠㅠ


PAM8406 2 Channel Audio Amplifier


PAM8406은 이 제품의 이름이 아니라 사용된 앰프칩의 이름이다.

이 제품은 LQ-AMP10W지만 아무도 그렇게 부르지 않는다.


PAM8406 2 Channel Audio Amplifier

Voltage: 5VDC

Output Power: 5W 2Ω / 3W 4Ω / 1.8W 8Ω

https://www.aliexpress.com/item/32957841305.html?spm=2114.13010708.0.0.3a994c4ddUnkBN


스피커, 전원, 오디오 소스를 연결 한다.


3W 4Ω 스피커로 테스트 했다.


테스트는 영상으로 확인 하자.


반응형
Posted by J-sean
:
반응형

You can stream an audio file with MediaPlayer.


<AndroidManifest.xml>

1
    <uses-permission android:name="android.permission.INTERNET"/>


<MainActivity.java>

1
2
3
4
5
6
7
8
9
10
11
12
13
14
15
16
17
18
19
20
21
22
23
24
25
26
27
28
29
30
31
32
33
34
35
36
37
38
39
40
41
42
43
44
45
46
47
48
49
50
51
52
53
54
55
56
57
58
59
60
61
62
63
64
65
66
67
68
69
70
71
72
73
74
75
76
77
78
79
80
81
82
83
public class MainActivity extends AppCompatActivity {
 
    MediaPlayer mediaPlayer;
    int position = 0;
    boolean isPaused = false;   // To prevent false resume.
 
    @Override
    protected void onCreate(Bundle savedInstanceState) {
        super.onCreate(savedInstanceState);
        setContentView(R.layout.activity_main);
 
        // Play
        Button button = findViewById(R.id.button);
        button.setOnClickListener(new View.OnClickListener() {
            public void onClick(View view) {
                if (mediaPlayer != null) {
                    mediaPlayer.release();
                }
                try {
                    mediaPlayer = new MediaPlayer();
                    mediaPlayer.setDataSource("http://nexoft.tk/download/Davich.mp3");  // or your audio file url.
                    mediaPlayer.prepare();
                    mediaPlayer.start();
                    isPaused = false;
                } catch (Exception e)
                {
                    e.printStackTrace();
                }
                Toast.makeText(getApplicationContext(), "Media player started", Toast.LENGTH_SHORT).show();
            }
        });
 
        // Stop
        Button button2 = findViewById(R.id.button2);
        button2.setOnClickListener(new View.OnClickListener() {
            @Override
            public void onClick(View v) {
                if (mediaPlayer != null) {
                    mediaPlayer.stop();
                    isPaused = false;
                    Toast.makeText(getApplicationContext(), "Media player stopped", Toast.LENGTH_SHORT).show();
                }
            }
        });
 
        // Pause
        Button button3 = findViewById(R.id.button3);
        button3.setOnClickListener(new View.OnClickListener() {
            @Override
            public void onClick(View v) {
                if (mediaPlayer != null && mediaPlayer.isPlaying()) {
                    position = mediaPlayer.getCurrentPosition();
                    mediaPlayer.pause();
                    isPaused = true;
                    Toast.makeText(getApplicationContext(), "Media player paused at " + position / 1000 + " sec", Toast.LENGTH_SHORT).show();
                }
            }
        });
 
        // Resume
        Button button4 = findViewById(R.id.button4);
        button4.setOnClickListener(new View.OnClickListener() {
            @Override
            public void onClick(View v) {
                if (mediaPlayer != null && !mediaPlayer.isPlaying() && isPaused == true) {
                    mediaPlayer.start();
                    mediaPlayer.seekTo(position);
                    isPaused = false;
                    Toast.makeText(getApplicationContext(), "Media player resumed at " + position / 1000 + " sec", Toast.LENGTH_SHORT).show();
                }
            }
        });
    }
 
    @Override
    protected void onDestroy() {
        super.onDestroy();
 
        if (mediaPlayer != null) {
            mediaPlayer.release();
        }
    }
}


Run the app and start the audio file.


반응형
Posted by J-sean
: