반응형

SDL 에는 GUI 기능이 없어 다른 라이브러리를 사용해야 한다. 많은 GUI 라이브러리가 있는데 ImGui 를 확인해 보자.

아래 링크에서 ImGui를 다운로드 한다.

Dear ImGui


압축을 풀고 examples - imgui_examples.sln 파일을 실행한다.


비주얼 스튜디오 버전이 다르면 프로젝트를 업그레이드 한다.


sdlrenderer2를 startup 프로젝트로 설정한다.


main.cpp 파일을 확인하자.


SDL 관련 명령에서 에러가 발생한다.


Project Property Pages - Additional Include Directories 에 정확한 SDL Include 디렉토리를 지정한다.


Project Property Pages - Additional Library Directories 에 정확한 SDL Library 디렉토리를 지정한다.


프로젝트를 빌드한다.


실행하면 윈도우에 GUI가 출력된다. (SDL2.dll 파일이 없다는 에러가 발생하면 복사해 넣어준다)


이번엔 내가 직접 만든 프로젝트에서 ImGui 예제를 실행해 보자.


ImGui 라이브러리 디렉토리는 위 그림과 같이 구성 되어 있다.


비주얼 스튜디오 프로젝트를 만들고 소스 파일 하나만 추가한다.


SDL2.dll 파일을 찾을 수 있도록 환경을 설정한다.


SDL과 ImGui에서 사용하는 Include 디렉토리를 설정한다.


SDL에서 사용하는 Library 디렉토리를 설정한다.


SDL에서 사용하는 라이브러리 파일을 설정한다.


ImGui, ImGui-Backend 필터를 만들고 ImGui SDL 예제에서 사용하는 파일을 추가한다.


처음에 만들어둔 소스 파일에 예제 소스파일(..\imgui-1.90.1\examples\example_sdl2_sdlrenderer2\main.cpp) 내용을 복사하고 빌드한다.


실행하면 운도우에 GUI가 출력된다.


※ 참고

Getting Started


반응형
Posted by J-sean
:

OpenCvSharp Simple Camera Example

C# 2022. 1. 14. 18:07 |
반응형

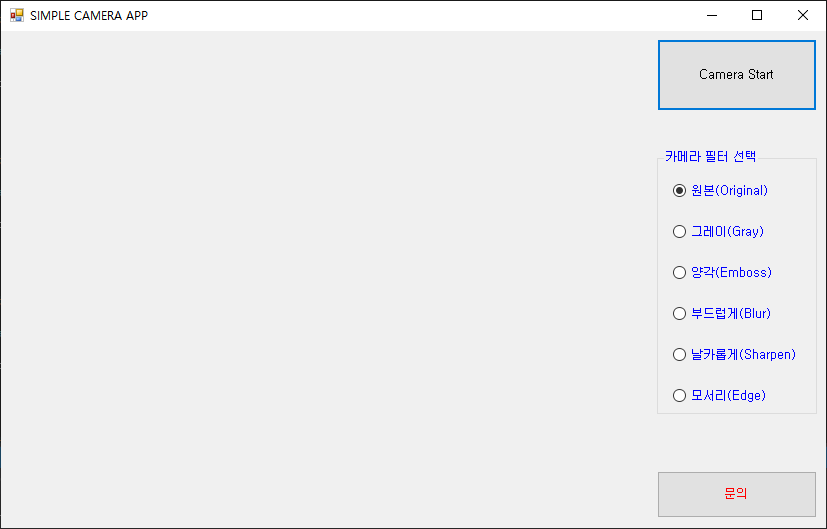
C#과 OpenCvSharp를 이용한 간단한 카메라 응용 프로그램 예.


폼에 Button, RadioButton, PictureBox등을 적당히 배치한다.


1
2
3
4
5
6
7
8
9
10
11
12
13
14
15
16
17
18
19
20
21
22
23
24
25
26
27
28
29
30
31
32
33
34
35
36
37
38
39
40
41
42
43
44
45
46
47
48
49
50
51
52
53
54
55
56
57
58
59
60
61
62
63
64
65
66
67
68
69
70
71
72
73
74
75
76
77
78
79
80
81
82
83
84
85
86
87
88
89
90
91
92
93
94
95
96
97
98
99
100
101
102
103
104
105
106
107
108
109
110
111
112
113
114
115
116
117
118
119
120
121
122
123
124
125
126
127
128
129
130
131
132
133
134
135
136
137
138
139
140
141
142
143
144
145
146
147
148
149
150
151
152
153
154
155
156
157
158
159
160
161
162
163
164
165
166
167
168
169
170
171
172
173
174
175
176
177
178
179
180
181
182
183
184
185
186
187
188
189
190
191
192
193
194
195
196
197
198
199
200
201
202
203
204
205
206
207
208
209
210
211
212
213
214
215
216
217
using System;
using System.Collections.Generic;
using System.ComponentModel;
using System.Data;
using System.Drawing;
using System.Linq;
using System.Text;
using System.Threading.Tasks;
using System.Windows.Forms;
 
using System.Threading;
using OpenCvSharp;
using OpenCvSharp.Extensions;
 
namespace OpenCV
{
    delegate void dele(Mat m);
 
    public partial class Form1 : Form
    {
        bool isCameraOn;
 
        dele filter;    // 카메라에 적용할 필터(효과) 델리게이트
        Thread thread;
        Mat mat;
        VideoCapture videoCapture;
 
        public Form1()
        {
            InitializeComponent();
 
            this.FormBorderStyle = FormBorderStyle.FixedSingle;
            pictureBox1.SizeMode = PictureBoxSizeMode.StretchImage;
            button1.Text = "Camera Start";
            isCameraOn = false;
            filter = null;
            radioButton1.Checked = true;
        }
 
        private void CameraCallback()
        {
            mat = new Mat();
            videoCapture = new VideoCapture(0);
 
            if (!videoCapture.IsOpened())
            {
                Text = "Camera open failed!";
                MessageBox.Show("카메라를 열 수 없습니다. 연결 상태를 확인 해 주세요.");
 
                return;
            }
 
            while (true)
            {
                videoCapture.Read(mat);
 
                if (!mat.Empty() && filter != null)
                {
                    filter(mat);    // 선택된 라디오 버튼에 따른 필터 적용.                    
                }
 
                if (!mat.Empty())
                {
                    // 로고를 디스플레이하기 위해 그레이 이미지(1채널)는 컬러 포맷(3채널)으로 변환
                    if (mat.Channels() == 1)
                    {
                        Cv2.CvtColor(mat, mat, ColorConversionCodes.GRAY2BGR);
                    }
                    Cv2.PutText(mat, "SEAN"new OpenCvSharp.Point(550470), HersheyFonts.HersheyDuplex, 1new Scalar(00255), 2);
 
                    // 이 전 프레임에서 PictureBox에 로드된 비트맵 이미지를 Dispose하지 않으면 메모리 사용량이 크게 증가한다.
                    if (pictureBox1.Image != null)
                    {
                        pictureBox1.Image.Dispose();
                    }
                    pictureBox1.Image = BitmapConverter.ToBitmap(mat);
                }
            }
        }
 
        private void button1_Click(object sender, EventArgs e)
        {
            if (isCameraOn == false)
            {
                thread = new Thread(new ThreadStart(CameraCallback));
 
                thread.Start();
                isCameraOn = true;
                button1.Text = "Camera Stop";
            }
            else
            {
                if (videoCapture.IsOpened())
                {
                    thread.Abort();
                    if (pictureBox1.Image != null)
                    {
                        pictureBox1.Image.Dispose();
                    }
                    videoCapture.Release();
                    mat.Release();
                }
                isCameraOn = false;
                button1.Text = "Camera Start";
            }
        }
 
        private void button2_Click(object sender, EventArgs e)
        {
            System.Diagnostics.Process.Start("https://s-engineer.tistory.com/");
        }
 
        private void Form1_FormClosing(object sender, FormClosingEventArgs e)
        {
            if (thread != null && thread.IsAlive && videoCapture.IsOpened())
            {
                thread.Abort();
                if (pictureBox1.Image != null)
                {
                    pictureBox1.Image.Dispose();
                }
                videoCapture.Release();
                mat.Release();
            }
        }
 
        // 필터 함수들
        private void ToGray(Mat mat)
        {
            Cv2.CvtColor(mat, mat, ColorConversionCodes.BGR2GRAY);
        }
 
        private void ToEmboss(Mat mat)
        {
            float[] data = { -1.0f, -1.0f, 0.0f, -1.0f, 0f, 1.0f, 0.0f, 1.0f, 1.0f };
            Mat emboss = new Mat(33, MatType.CV_32FC1, data);
 
            Cv2.CvtColor(mat, mat, ColorConversionCodes.BGR2GRAY);
            Cv2.Filter2D(mat, mat, -1, emboss, new OpenCvSharp.Point(-1-1), 128);
 
            emboss.Release();
        }
 
        private void ToBlur(Mat mat)
        {
            Cv2.GaussianBlur(mat, mat, new OpenCvSharp.Size(), (double)3);
        }
 
        private void ToSharpen(Mat mat)
        {
            Mat blurred = new Mat();
            Cv2.GaussianBlur(mat, blurred, new OpenCvSharp.Size(), (double)3);
 
            // 아래 연산이 반복되면 메모리 사용량이 크게 증가한다.
            float alpha = 2.0f;
            ((1 + alpha) * mat - alpha * blurred).ToMat().CopyTo(mat);
            //mat = (1 + alpha) * mat - alpha * blurred;
 
            blurred.Release();
        }
 
        private void ToEdge(Mat mat)
        {
            Cv2.CvtColor(mat, mat, ColorConversionCodes.BGR2GRAY);
            Cv2.Canny(mat, mat, 5070);
        }
 
        // 라디오 버튼 이벤트 핸들러들
        private void radioButton1_CheckedChanged(object sender, EventArgs e)
        {
            if (((RadioButton)sender).Checked)
            {
                filter = null;
            }
        }
 
        private void radioButton2_CheckedChanged(object sender, EventArgs e)
        {
            if (((RadioButton)sender).Checked)
            {
                filter = ToGray;
            }
        }
 
        private void radioButton3_CheckedChanged(object sender, EventArgs e)
        {
            if (((RadioButton)sender).Checked)
            {
                filter = ToEmboss;
            }
        }
 
        private void radioButton4_CheckedChanged(object sender, EventArgs e)
        {
            if (((RadioButton)sender).Checked)
            {
                filter = ToBlur;
            }
        }
 
        private void radioButton5_CheckedChanged(object sender, EventArgs e)
        {
            if (((RadioButton)sender).Checked)
            {
                filter = ToSharpen;
            }
        }
 
        private void radioButton6_CheckedChanged(object sender, EventArgs e)
        {
            if (((RadioButton)sender).Checked)
            {
                filter = ToEdge;
            }
        }
    }
}


소스를 입력하고 빌드한다.


프로그램을 실행하고 Camera Start 버튼을 클릭한다.


다른 필터를 선택하면 그에 맞는 화면이 출력된다.


※ 소스에서 ToSharpen() 의 주석 부분은 제대로 실행되지 않는다. 관련 내용은 아래 링크를 참고하자.

2022.01.14 - [C#] - OpenCvSharp Simple Example and MatExpr


※ ToSharpen() 의 반복 실행으로 인한 메모리 사용량 증가는 OpenCV의 메모리 할당을 파악하지 못하는 .NET Garbage Collector의 문제다. 아래와 같이 Garbage Collector 호출 코드 추가로 해결은 가능하다.

1
2
3
4
5
6
7
8
9
10
11
12
private void ToSharpen(Mat mat)
{
    Mat blurred = new Mat();
    Cv2.GaussianBlur(mat, blurred, new OpenCvSharp.Size(), (double)3);
 
    float alpha = 2.0f;
    ((1 + alpha) * mat - alpha * blurred).ToMat().CopyTo(mat);
 
    GC.Collect();
 
    blurred.Release();
}


https://github.com/shimat/opencvsharp/issues/391


반응형
Posted by J-sean
:
반응형

DOTween의 DOPath() 예제


아래와 같은 스크립트를 만든다.

1
2
3
4
5
6
7
8
9
10
11
12
13
14
15
16
17
18
19
20
21
22
23
24
25
26
27
28
29
30
31
32
33
34
35
36
37
38
39
40
using System.Collections;
using System.Collections.Generic;
using UnityEngine;
using DG.Tweening;
 
public class Tween : MonoBehaviour
{
    public Ease ease;
 
    public Transform wayPoint1;
    public Transform wayPoint2;
    public Transform wayPoint3;
 
    private Vector3[] wayPoints;
 
    // Start is called before the first frame update
    void Start()
    {
        // static DOTween.Init(bool recycleAllByDefault = false, bool useSafeMode = true, LogBehaviour logBehaviour = LogBehaviour.ErrorsOnly)
        // Initializes DOTween.
        DOTween.Init(falsetrue, LogBehaviour.ErrorsOnly);
 
        wayPoints = new Vector3[3];
        wayPoints.SetValue(wayPoint1.position, 0);
        wayPoints.SetValue(wayPoint2.position, 1);
        wayPoints.SetValue(wayPoint3.position, 2);
        // wayPoints = new[] { wayPoint1.position, wayPoint2.position, wayPoint3.position };
 
        // DOPath(Vector3[] waypoints, float duration, PathType pathType = Linear, PathMode pathMode = Full3D, int resolution = 10, Color gizmoColor = null)
        // Tweens a Transform's position through the given path waypoints, using the chosen path algorithm.
        transform.DOPath(wayPoints, 6.0f, PathType.CatmullRom).SetLookAt(new Vector3(0.0f, 0.0f, 0.0f)).SetEase(ease).SetLoops(-1, LoopType.Yoyo);
    }
 
    // Update is called once per frame
    void Update()
    {
 
    }
}


스크립트 이름은 Tween으로 지정 한다.


Empty Object(WayPoint)와 Cube를 생성하고 Cube에 Tween 스크립트를 추가한다.


Empty Object를 3개 생성하고 WayPointX로 이름을 바꿔서 Cube가 이동할 위치에 배치한다. Cube Inspector 창의 Tween 스크립트에서 Way Point1~3 변수에 WayPoint1~3 오브젝트를 지정한다. Ease 변수도 In Bounce 등 원하는 ease로 변경한다.


플레이 버튼을 클릭 하면 Cube가 지정한 위치들을 거쳐 이동 한다. DOPath()의 경우 Scene창에 이동 경로가 표시 된다.


반응형
Posted by J-sean
:
반응형

DOTween의 Sequence 예제


아래와 같은 스크립트를 만든다.

1
2
3
4
5
6
7
8
9
10
11
12
13
14
15
16
17
18
19
20
21
22
23
24
25
26
27
28
29
30
31
32
33
34
35
36
37
38
39
40
41
42
43
44
using System.Collections;
using System.Collections.Generic;
using UnityEngine;
using DG.Tweening;
 
public class Tween : MonoBehaviour
{
    public Ease ease;
 
    // Start is called before the first frame update
    void Start()
    {
        // static DOTween.Init(bool recycleAllByDefault = false, bool useSafeMode = true, LogBehaviour logBehaviour = LogBehaviour.ErrorsOnly)
        // Initializes DOTween.
        DOTween.Init(falsetrue, LogBehaviour.ErrorsOnly);
 
        // static DOTween.Sequence()
        // Returns a usable Sequence which you can store and add tweens to.
        Sequence mySeq = DOTween.Sequence();
 
        // Delays and loops (when not infinite) will work even inside nested tweens.
 
        // Append(Tween tween)
        // Adds the given tween to the end of the Sequence.
        mySeq.Append(transform.DOMove(new Vector3(5.0f, 0.0f, 5.0f), 2false).SetEase(ease).SetLoops(3, LoopType.Yoyo));
        mySeq.Append(transform.DOMove(new Vector3(-5.0f, 0.0f, 5.0f), 2false).SetEase(ease).SetLoops(3, LoopType.Yoyo));
        // 첫 번째 DOMove를 3회 반복, 그리고 두 번째 DOMove를 3회 반복 한다. 전체(첫 번째 + 두 번째) DOMove를 3회 반복하는게 아니다.
 
        // Insert a lookat tween for the whole duration of the Sequence
 
        // Insert(float atPosition, Tween tween)
        // Inserts the given tween at the given time position, thus allowing you to overlap tweens instead of just placing them one after each other.
        mySeq.Insert(0, transform.DOLookAt(new Vector3(0.0f, 0.0f, 0.0f), mySeq.Duration()));
        // float Duration(bool includeLoops = true)
        // Returns the duration of the tween(delays excluded, loops included if includeLoops is TRUE).
    }
 
    // Update is called once per frame
    void Update()
    {
 
    }
}


스크립트 이름은 Tween으로 지정 한다.


Cube를 생성하고 Tween 스크립트를 추가한다.


Inspector 창의 Tween 스크립트에서 Ease 변수를 In Bounce 등 원하는 ease로 변경한다.


플레이 버튼을 클릭 하면 Cube가 첫 번째 DOMove 3회, 두 번째 DOMove 3회를 반복하며 전체 시간에 걸쳐 원점을 향해 회전 한다.


반응형
Posted by J-sean
:
반응형

Below code shows how to use cv::String class.


1
2
3
4
5
6
7
8
9
10
11
12
13
14
15
16
17
18
19
20
21
22
23
24
25
26
27
28
29
30
31
32
33
34
35
36
37
#include <opencv2/opencv.hpp>
 
using namespace std;
using namespace cv;
 
int main(int argc, char** argv)
{
    const char* str = "Open Source Computer Vision";
    String str1("Hello World");
    String str2(str, str+11);
    String str3 = "Software Engineer";
 
    cout << "str1: " << str1 << endl << "str2: " << str2 << endl
        << "str3: " << str3 << endl << endl;
 
    cout << "*str1.begin(): " << *str1.begin() << endl;
    cout << "str1[1]: " << str1[1<< endl;
    cout << "*(str1.end()-1): " << *(str1.end()-1<< endl << endl;
 
    cout << "str2.size(): " << str2.size() << endl;
    cout << "str2.length(): " << str2.length() << endl;
    cout << "str2.empty(): " << str2.empty() << endl;
    cout << "str3.find(\"ng\"): " << str3.find("ng"<< endl << endl;
 
    cout << "format(\"%s %d\", str3.c_str(), 100): " << format("%s %d", str3.c_str(), 100<< endl;
    cout << "str3.toLowerCase(): " << str3.toLowerCase() << endl;
    cout << "str3.substr(2, 4): " << str3.substr(24<< endl << endl;
 
    str1.swap(str3);
    cout << "str1.swap(str3)" << endl;
    cout << "- str1: " << str1 << endl << "- str3: " << str3 << endl;
    str1.clear();
    cout << "str1.clear()" << endl;
    cout << "- str1: " << endl;
 
    return 0;
}
cs


반응형
Posted by J-sean
: