반응형

파이게임과 2D Rigid Body Simulation Library Box2D를 사용해 보자.


다음 명령어로 Box2D를 설치한다.

pip install box2d


설치중 에러가 발생한다면 SWIG를 설치하고 설치 디렉토리를 시스템 변수 Path에 등록한다.

SWIG


SWIG를 설치하면 에러가 발생하지 않는다.


추가로 box2d-kengz를 설치한다.


player.png
0.00MB


1
2
3
4
5
6
7
8
9
10
11
12
13
14
15
16
17
18
19
20
21
22
23
24
25
26
27
28
29
30
31
32
33
34
35
36
37
38
39
40
41
42
43
44
45
46
47
48
49
50
51
52
53
54
55
56
57
58
59
60
61
62
63
64
65
66
67
68
69
70
71
72
73
74
75
76
77
78
79
80
81
82
83
84
85
86
87
88
89
import math
import pygame
from Box2D import *
 
pygame.init()
pygame.display.set_caption("Physics Test")
screen = pygame.display.set_mode((640480))
running = True
player = pygame.image.load("player.png").convert()
 
# World 정의
world = b2World(gravity=(09.8), doSleep=True)
 
# Ground 정의
groundBodyDef = b2BodyDef()
groundBodyDef.position = (0400)
groundBody = world.CreateBody(groundBodyDef)
groundShape = b2PolygonShape()
groundShape.SetAsBox(5000)
groundBody.CreateFixture(shape=groundShape)
#groundBody = world.CreateStaticBody(position=(0, 400), shapes=b2PolygonShape(box=(500, 0)))
# 위 정의와 동일
 
# Wall 정의
wallBodyDef = b2BodyDef()
wallBodyDef.position = (3000)
wallBody = world.CreateBody(wallBodyDef)
wallShape = b2PolygonShape()
wallShape.SetAsBox(0400)
wallBody.CreateFixture(shape=wallShape)
#wallBody = world.CreateStaticBody(position=(300, 0), shapes=b2PolygonShape(box=(0, 400)))
# 위 정의와 동일
 
# Player 정의
playerBodyDef = b2BodyDef()
playerBodyDef.type = b2_dynamicBody;
playerBodyDef.position = (00)
playerBodyDef.linearVelocity = (500)
playerBodyDef.angularVelocity = 0.2
playerBody = world.CreateBody(playerBodyDef)
playerShape = b2PolygonShape()
playerShape.SetAsBox(player.get_width()/2, player.get_height()/2)
playerFixtureDef = b2FixtureDef(shape=playerShape)
playerFixtureDef.density = 1
playerFixtureDef.friction = 0.5
playerFixtureDef.restitution = 0.7
playerBody.CreateFixture(playerFixtureDef)
#playerBody = world.CreateDynamicBody(position=(0, 0), linearVelocity=(50, 0),
#                                     angularVelocity=0.2)
#playerFixtureDef = playerBody.CreatePolygonFixture(box=(player.get_width()/2,
#                          player.get_height()/2), density=1, friction=0.5, restitution=0.7)
# 위 정의와 동일
 
timeStep = 1.0 / 300
vel_iters, pos_iters = 62
  
while running:
    for event in pygame.event.get():
        if event.type == pygame.QUIT:
            running = False
        elif event.type == pygame.KEYDOWN and event.key == pygame.K_SPACE:
            playerBody.transform = ((00), 0)
            playerBody.linearVelocity = (500)
            playerBody.angularVelocity = 0.2
        elif event.type == pygame.KEYDOWN and event.key == pygame.K_ESCAPE:
            running = False
    
    # Instruct the world to perform a single step of simulation. It is
    # generally best to keep the time step and iterations fixed.
    world.Step(timeStep, vel_iters, pos_iters)
    # Clear applied body forces. We didn't apply any forces, but you
    # should know about this function.
    world.ClearForces()
     
    screen.fill("white")
    pygame.draw.rect(screen, "brown", (040060020)) # Ground 그리기
    pygame.draw.rect(screen, "black", (300020400)) # Wall 그리기
 
    rotated_player = pygame.transform.rotate(player, playerBody.angle * 180/math.pi)
    # Unless rotating by 90 degree increments, the image will be padded larger to hold
    # the new size. If the image has pixel alphas, the padded area will be transparent.
    # Otherwise pygame will pick a color that matches the Surface colorkey or the topleft
    # pixel value.
    screen.blit(rotated_player, (playerBody.position[0- rotated_player.get_width()/2,
                                 playerBody.position[1- rotated_player.get_height()/2))
 
    pygame.display.flip()
    
pygame.quit()


코드를 입력하고 실행한다.


GIF 캡쳐 과정에서 화질이 많이 떨어졌지만 강체들의 물리 반응을 확인할 수 있다.


pygame.transform.rotate()

rotate an image
rotate(surface, angle) -> Surface

Unfiltered counterclockwise rotation. The angle argument represents degrees and can be any floating point value. Negative angle amounts will rotate clockwise.
Unless rotating by 90 degree increments, the image will be padded larger to hold the new size. If the image has pixel alphas, the padded area will be transparent. Otherwise pygame will pick a color that matches the Surface colorkey or the topleft pixel value.


배경을 바꾸거나 Colorkey를 설정하면 캐릭터 주변 패딩을 없앨 수 있다.


아래 링크에서 GUI를 구현해 본다.

2024.01.29 - [Python] - [Pygame] Pygame GUI 파이게임 그래픽 유저 인터페이스


※ 참고

PyBox2D

PyBox2D Manual


반응형
Posted by J-sean
:
반응형

SDL 에는 GUI 기능이 없어 다른 라이브러리를 사용해야 한다. 많은 GUI 라이브러리가 있는데 ImGui 를 확인해 보자.

아래 링크에서 ImGui를 다운로드 한다.

Dear ImGui


압축을 풀고 examples - imgui_examples.sln 파일을 실행한다.


비주얼 스튜디오 버전이 다르면 프로젝트를 업그레이드 한다.


sdlrenderer2를 startup 프로젝트로 설정한다.


main.cpp 파일을 확인하자.


SDL 관련 명령에서 에러가 발생한다.


Project Property Pages - Additional Include Directories 에 정확한 SDL Include 디렉토리를 지정한다.


Project Property Pages - Additional Library Directories 에 정확한 SDL Library 디렉토리를 지정한다.


프로젝트를 빌드한다.


실행하면 윈도우에 GUI가 출력된다. (SDL2.dll 파일이 없다는 에러가 발생하면 복사해 넣어준다)


이번엔 내가 직접 만든 프로젝트에서 ImGui 예제를 실행해 보자.


ImGui 라이브러리 디렉토리는 위 그림과 같이 구성 되어 있다.


비주얼 스튜디오 프로젝트를 만들고 소스 파일 하나만 추가한다.


SDL2.dll 파일을 찾을 수 있도록 환경을 설정한다.


SDL과 ImGui에서 사용하는 Include 디렉토리를 설정한다.


SDL에서 사용하는 Library 디렉토리를 설정한다.


SDL에서 사용하는 라이브러리 파일을 설정한다.


ImGui, ImGui-Backend 필터를 만들고 ImGui SDL 예제에서 사용하는 파일을 추가한다.


처음에 만들어둔 소스 파일에 예제 소스파일(..\imgui-1.90.1\examples\example_sdl2_sdlrenderer2\main.cpp) 내용을 복사하고 빌드한다.


실행하면 운도우에 GUI가 출력된다.


※ 참고

Getting Started


반응형
Posted by J-sean
:
반응형

C/C++로 만든 라이브러리(dll)를 파이썬에서 사용해 보자.


DLL 프로젝트를 생성한다.


Precompiled Header는 사용하지 않는다.


1
2
3
4
extern "C" __declspec(dllexportint Add(int a, int b)
{
    return a + b;
}


간단한 더하기 함수(Add)를 작성하고 컴파일 한다. 라이브러리(MyDll.dll)가 생성된다.


1
2
3
4
5
6
7
8
9
import ctypes
 
clib = ctypes.windll.LoadLibrary(".\MyDll.dll"# 라이브러리 로드
 
add = clib.Add    # 함수 대입
add.argtypes = (ctypes.c_int, ctypes.c_int) # 인수 타입 지정
add.restype = ctypes.c_int # 반환 타입 지정
 
print("Add: %d" %add(12))


라이브러리를 사용하는 파이썬 코드를 작성한다.


파이썬 코드가 있는 폴더에 라이브러리를 복사한다.


파이썬 코드를 실행한다.


※ 참고

ctypes - A foreign function library for Python


반응형
Posted by J-sean
:
반응형

C#으로 만든 클래스 라이브러리(DLL)는 C++ 라이브러리처럼 간단히 사용할 수 없다. C++에서 C# 라이브러리를 사용해 보자.


Class Library (.NET Framework) 프로젝트를 선택한다.


적당한 이름과 위치를 지정한다.


프로젝트가 생성되면 Tools - NuGet Package Manager - Manage NuGet Packages for Solution... 을 선택한다.


Browse에서 dllexport를 검색하고 설치한다.


DllExport설치 중간에 위와 같은 프로그램이 실행된다.


Installed 체크박스와 x64 라디오 버튼을 선택하고 Apply 버튼을 클릭한다.


DllExport 설치가 완료되면 프로젝트를 다시 로드한다. 'Reload All' 버튼을 클릭한다.


Solution Platforms를 x64로 바꾸고 간단한 소스 입력 후 빌드한다.


라이브러리 파일이 생성된다.


위에서 생성한 C# 라이브러리 파일을 사용하는 x64 C++ 프로젝트를 만들고 빌드한다.


실행파일이 있는 폴더에 C# 라이브러리 파일을 복사한다.


C++로 만든 프로그램을 실행하면 C# 라이브러리를 이용한 결과가 표시된다.


DllExport 를 설치하고 나면 C# 라이브러리 솔루션 폴더에 DllExport.bat 파일이 생성되어 있다.


여러번 설치를 반복하다 보면 솔루션 폴더에 DllExport.bat 파일이 생성되지 않는 경우도 있는데 packages 폴더에서 복사한다. DllExport.bat 파일이 솔루션 폴더에 없으면 빌드시 에러가 발생한다.


환경 설정을 다시 하기 위해선 위와 같이 명령어를 실행한다. (dllexport -action Configure)

※ 참고

https://github.com/3F/DllExport
https://youtu.be/9Hyg3_WE9Ks
https://youtu.be/sBWt-KdQtoc


반응형
Posted by J-sean
:
반응형

C#으로 클래스 라이브러리(DLL)를 만들어 보자.


Class Library (.NET Framework) 프로젝트를 선택한다.


적당한 이름과 위치를 지정한다.


1
2
3
4
5
6
7
8
9
10
11
12
13
14
15
16
17
18
19
20
21
using System;
using System.Collections.Generic;
using System.Linq;
using System.Text;
using System.Threading.Tasks;
 
namespace CSDll
{
    public class Class1
    {
        public static int Add(int a, int b)
        {
            return a + b;
        }
 
        public static int Sub(int a, int b)
        {
            return a - b;
        }
    }
}


소스를 입력하고 빌드한다.


클래스 라이브러리(DLL)가 생성된다.


마찬가지로 적당한 이름과 위치에 Console App (.NET Framework)을 생성한다.


위에서 생성한 라이브러리를 사용하기 위해 using 선언을 하면 에러가 발생한다. 사용하려는 라이브러리를 찾을 수 없기 때문이다.


Project - Add Reference... 를 선택한다.


Browse에서 Browse... 버튼을 클릭한다.


사용하려는 라이브러리 파일을 선택하고 Add 버튼을 클릭한다.


라이브러리가 추가되면 OK 버튼을 클릭한다.


에러 표시가 사라졌다.


1
2
3
4
5
6
7
8
9
10
11
12
13
14
15
16
17
18
19
using System;
using System.Collections.Generic;
using System.Linq;
using System.Text;
using System.Threading.Tasks;
 
using CSDll;
 
namespace ConsoleApp1
{
    class Program
    {
        static void Main(string[] args)
        {
            Console.WriteLine("3 + 2 = {0}", Class1.Add(32));
            Console.WriteLine("3 - 2 = {0}", Class1.Sub(32));
        }
    }
}


라이브러리를 사용하는 코드를 입력하고 빌드한다.


문제없이 실행된다.


Output 폴더를 확인해 보면 라이브러리(CSDll.dll)가 복사되어 있다. 라이브러리 파일은 실행파일과 함께 배포해야 한다.


반응형
Posted by J-sean
:
반응형

유니티에서 OpenCV를 사용할 수 있도록 라이브러리(DLL)를 만들어 보자.


Visual Studio에서 C++ - Windows - Empty Project를 선택한다.


적당한 이름과 폴더를 지정한다.


프로젝트가 생성되었으면 C++ File을 추가한다. (Add New Item)


Solution Platforms는 x64로 변경한다.


프로젝트 Property Pages - General - Configuration Type - Dynamic Library (.dll)로 변경한다.


Advanced - Target File Extension - .dll로 변경한다.


C/C++ - General - Additional Include Directories에 OpenCV Include 폴더를 추가한다.


Linker - General - Additional Library Directories에 OpenCV Library 폴더를 추가한다.


Linker - Input - Additional Dependencies에 OpenCV 라이브러리(opencv_worldXXXd.lib)를 추가한다.


1
2
3
4
5
6
7
8
9
10
11
12
13
14
15
16
#include <opencv2/opencv.hpp>
 
struct Color32
{
    uchar red;
    uchar green;
    uchar blue;
    uchar alpha;
};
 
extern "C" __declspec(dllexportvoid FlipImage(Color32 **rawImage, int width, int height)
{
    using namespace cv;
    Mat image(height, width, CV_8UC4, *rawImage);
    flip(image, image, -1);
}


프로젝트 세팅이 끝나면 이미지의 상하좌우를 반전하는 소스를 입력하고 빌드한다.


라이브러리 파일(OpenCVDll.dll)이 생성된다.


유니티3D 프로젝트를 생성한다.


Assets에 Plugin 폴더를 만들고 OpenCV 라이브러리 파일(opencv_worldXXX.dll)과 위에서 만든 라이브러리 파일(OpenCVDll.dll)을 복사한다.


원하는 이미지 파일을 Assets 폴더에 복사한다.


아래와 같이 텍스쳐 세팅을 변경한다.

Texture Type - Sprite (2D and UI)

Advanced - Read/Write Enabled - Check

Default - Format - RGBA 32 bit

Apply 클릭


Image UI를 생성한다.


Source Image에 위에서 추가한 이미지를 선택한다.


스크립트 컴포넌트를 추가한다.


1
2
3
4
5
6
7
8
9
10
11
12
13
14
15
16
17
18
19
20
21
22
23
24
25
26
27
using System.Collections;
using System.Collections.Generic;
using UnityEngine;
 
using System.Runtime.InteropServices;
using UnityEngine.UI;
 
public class OpenCVTest : MonoBehaviour
{
    [DllImport("OpenCVDll")]
    private static extern void FlipImage(ref Color32[] rawImage, int width, int height);
 
    // Start is called before the first frame update
    void Start()
    {
        Color32[] image = GetComponent<Image>().sprite.texture.GetPixels32();
        FlipImage(ref image, 608912);
        GetComponent<Image>().sprite.texture.SetPixels32(image);
        GetComponent<Image>().sprite.texture.Apply();
    }
 
    // Update is called once per frame
    void Update()
    {
 
    }
}


OpenCVDll.dll을 사용하는 스크립트를 작성하고 저장한다.


유니티로 돌아오면 스크립트가 컴파일 된다. 실행 버튼을 클릭한다.


이미지의 상하좌우가 반전된다.


3D 오브젝트에 적용해 보자. Image UI를 삭제하고 Cube를 생성한다.


위에서 사용했던 이미지는 삭제하고 다시 복사한다. 그리고 아래와 같이 세팅한다.

Advanced - Read/Write Enabled - Check

Default - Format - RGBA 32 bit

Apply 클릭


Material을 생성하고 위에서 세팅한 이미지를 적용한다. (Albedo 옆 동그라미 클릭)


Cube에 새로 생성한 Material을 적용하고 OpenCVTest 스크립트를 추가한다.


1
2
3
4
5
6
7
8
9
10
11
12
13
14
15
16
17
18
19
20
21
22
23
24
25
26
27
28
29
30
31
32
33
34
using System.Collections;
using System.Collections.Generic;
using UnityEngine;
 
using System.Runtime.InteropServices;
 
public class OpenCVTest : MonoBehaviour
{
    [DllImport("OpenCVDll")]
    private static extern void FlipImage(ref Color32[] rawImage, int width, int height);
 
    // Start is called before the first frame update
    void Start()
    {
        Color32[] image = (GetComponent<Renderer>().material.mainTexture as Texture2D).GetPixels32();
        FlipImage(ref image, 608912);
        (GetComponent<Renderer>().material.mainTexture as Texture2D).SetPixels32(image);
        (GetComponent<Renderer>().material.mainTexture as Texture2D).Apply();
 
        // Assets - Resources 폴더에 이미지를 저장하고 로드해서 텍스쳐로 활용하는 예
        //Texture2D texture2D = Resources.Load("Barbara") as Texture2D;
        //Color32[] image = texture2D.GetPixels32();
        //FlipImage(ref image, 608, 912);
        //texture2D.SetPixels32(image);
        //texture2D.Apply();
        //GetComponent<Renderer>().material.mainTexture = texture2D;
    }
 
    // Update is called once per frame
    void Update()
    {
 
    }
}


OpenCVTest 스크립트는 위와 같이 수정하고 저장한다.


유니티로 돌아오면 스크립트가 컴파일된다. 실행 버튼을 클릭한다.


상하좌우가 반전된다.


반응형
Posted by J-sean
:
반응형

유저 컨트롤(dll)을 만들고 사용해 보자.


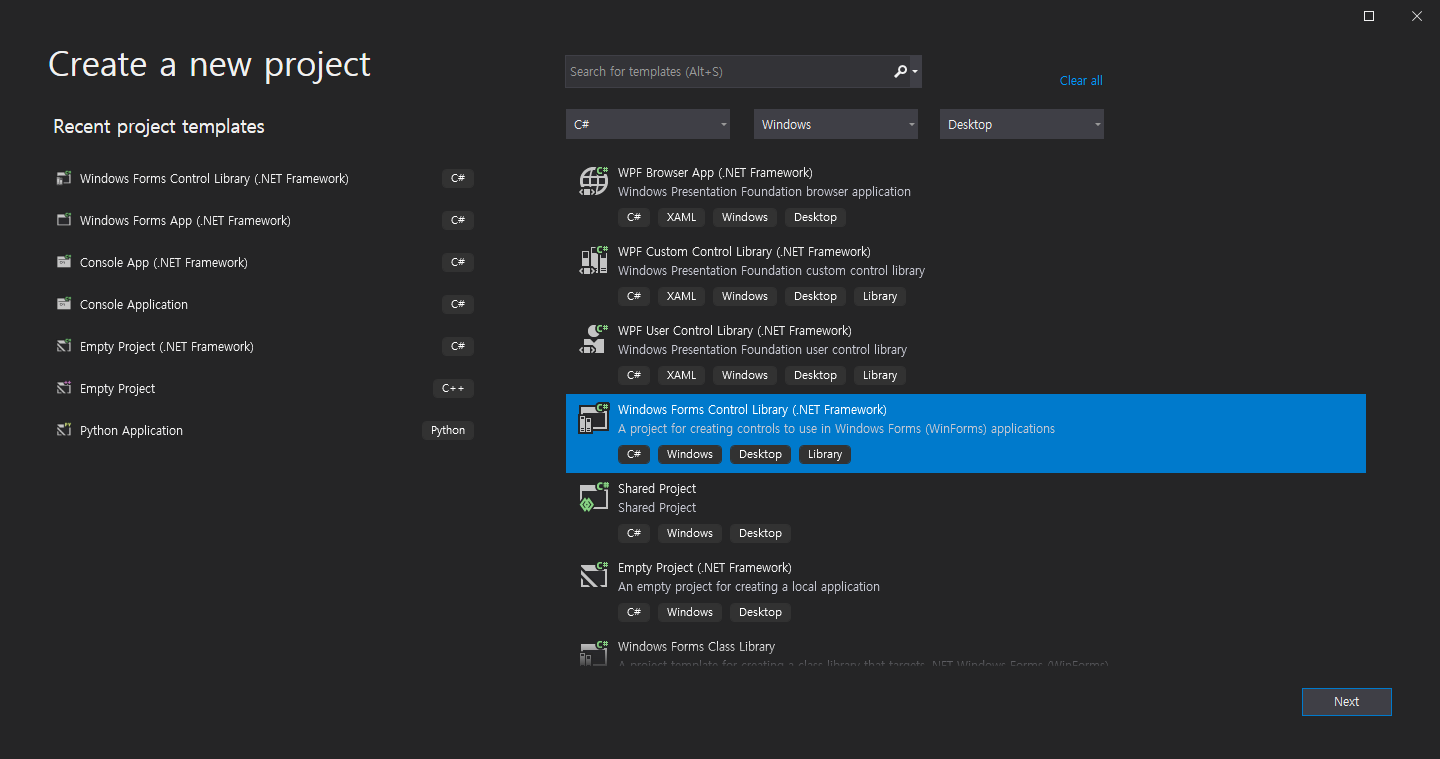
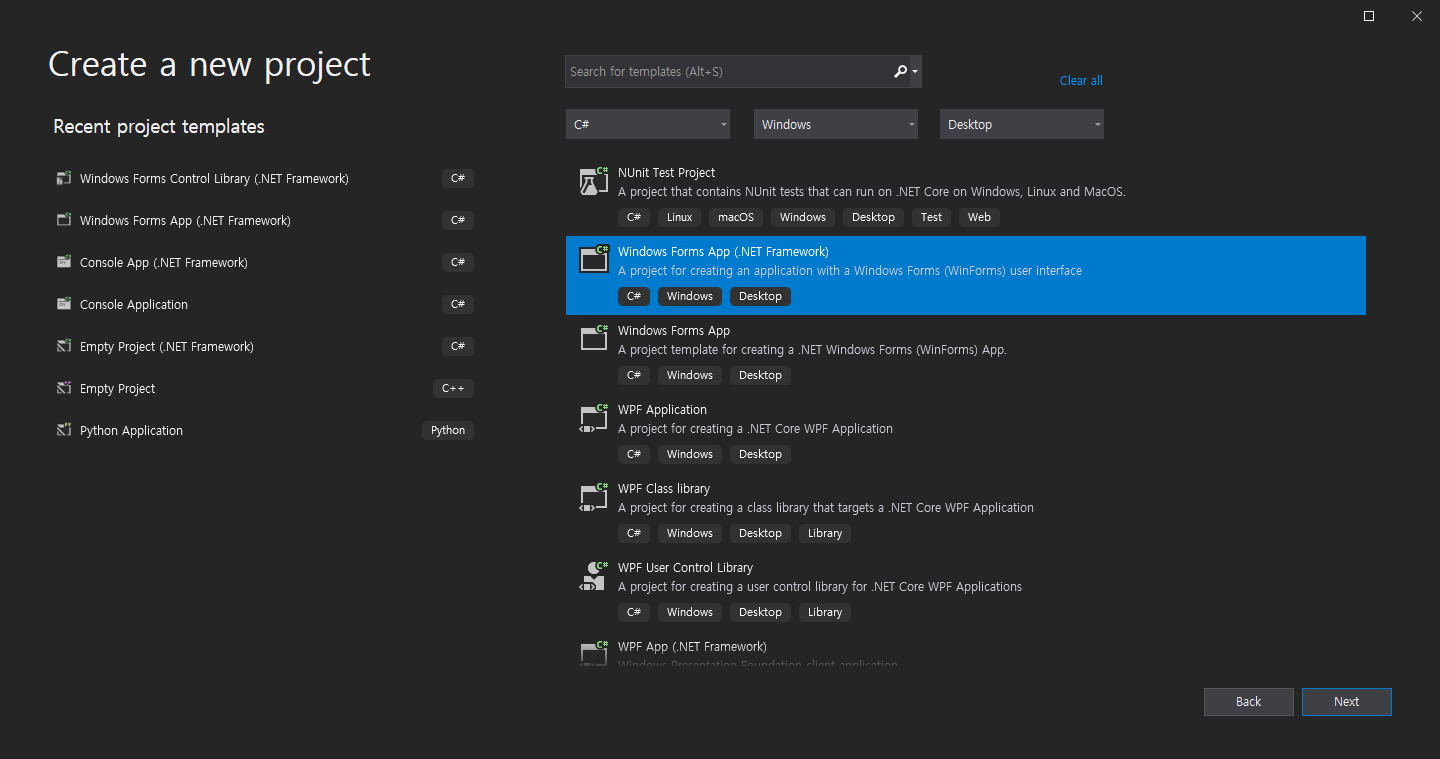
Windows Forms Control Library 프로젝트를 만든다.


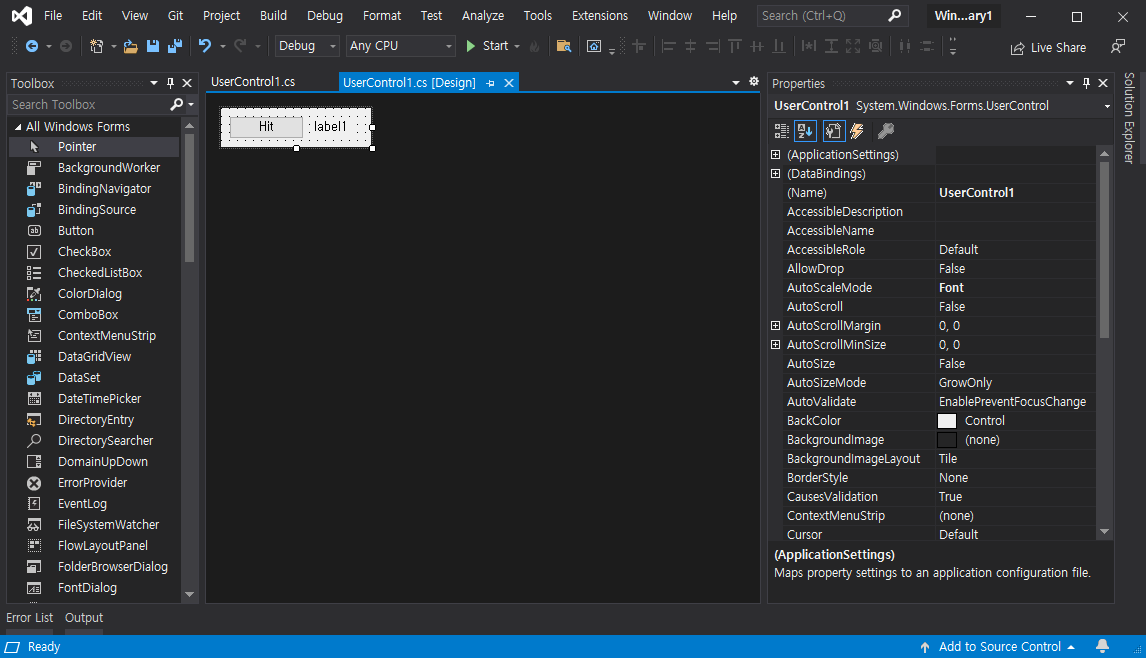
폼에 버튼과 레이블을 적당히 배치한다.


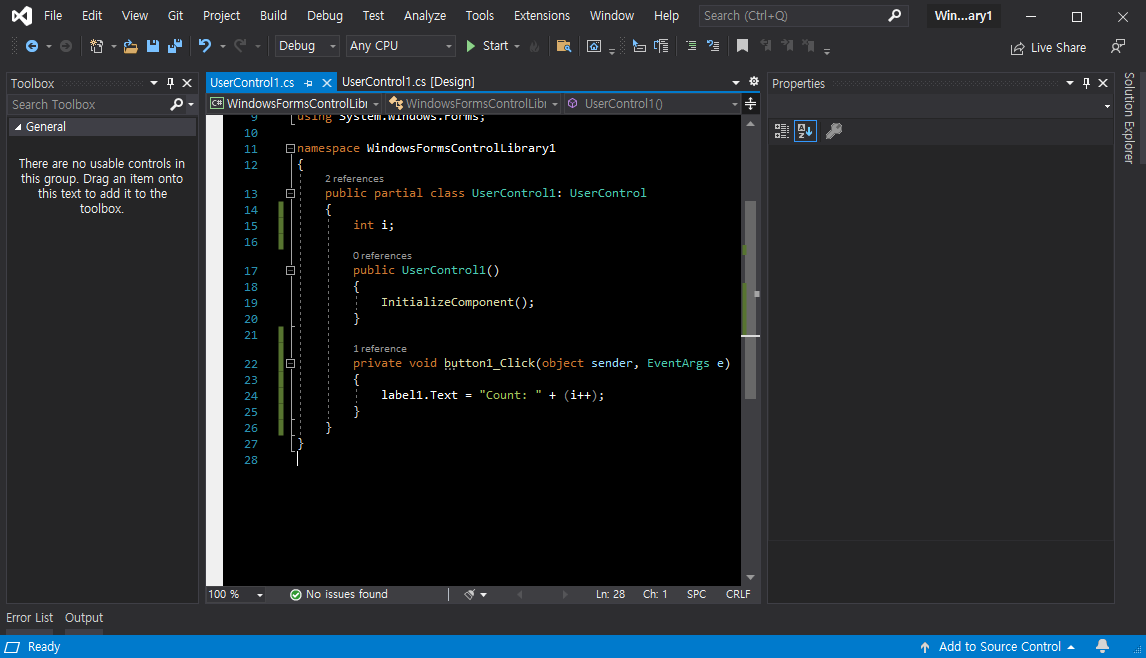
간단한 코드를 작성한다.


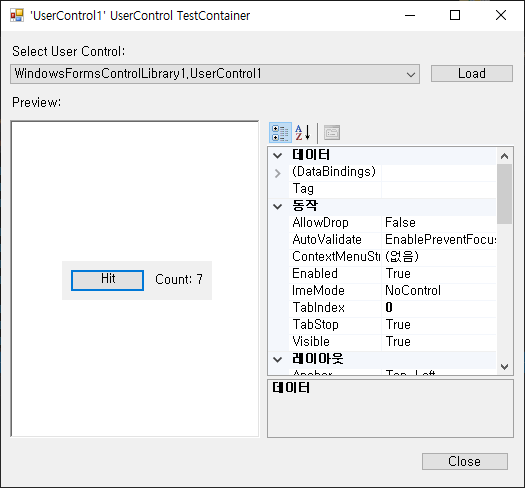
빌드하고 실행하면 컨트롤을 테스트하고 속성을 확인 할 수 있는 화면이 나타난다.


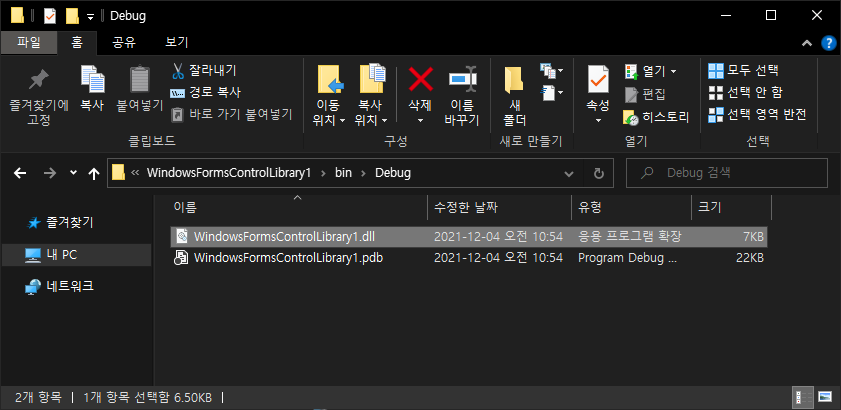
Output 폴더에 dll 파일이 생성 되었다.


이번엔 Windows Forms App 프로젝트를 만든다.


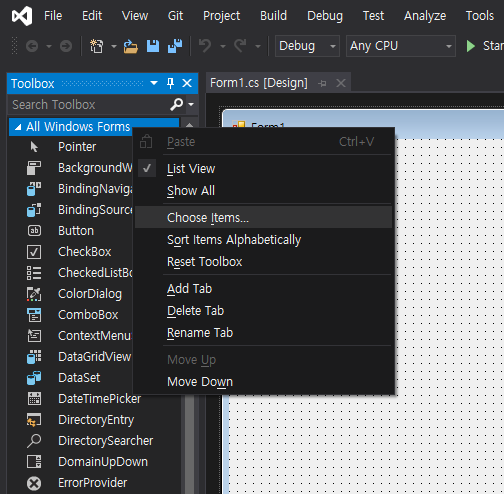
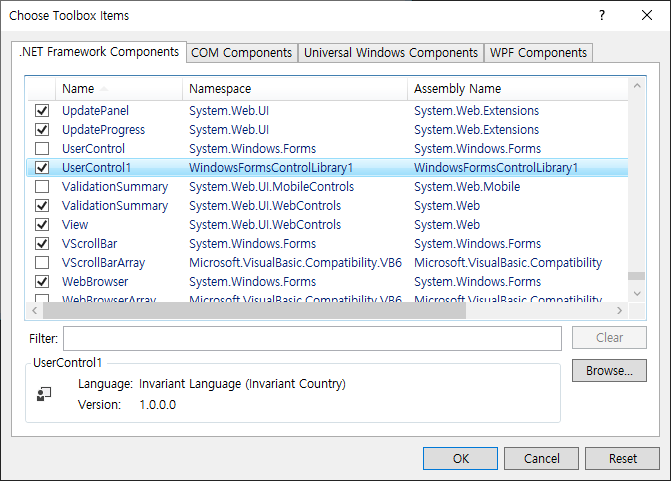
툴 박스에서 마우스 우클릭 - Choose Items... 를 선택한다.


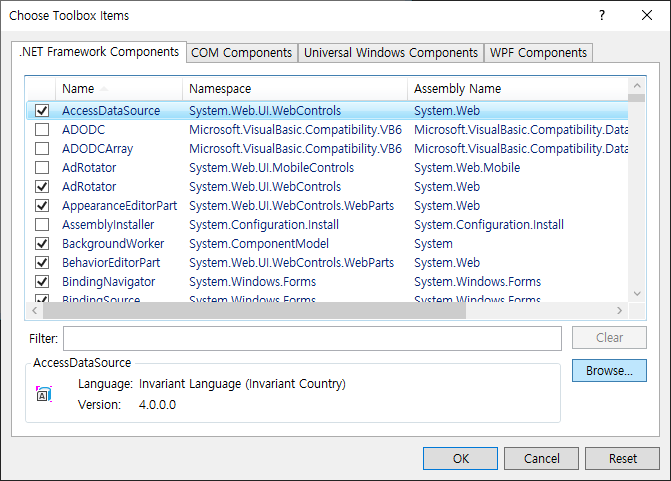
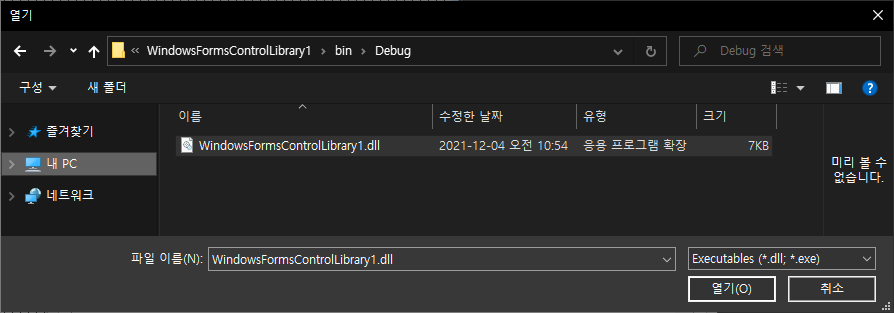
Browse... 를 클릭한다.


위에서 만든 컨트롤 dll 파일을 선택한다.


유저 컨트롤이 추가 되었다. OK를 클릭한다.


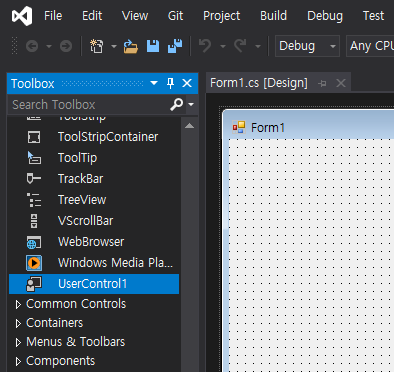
툴 박스에 자동으로 등록된다.


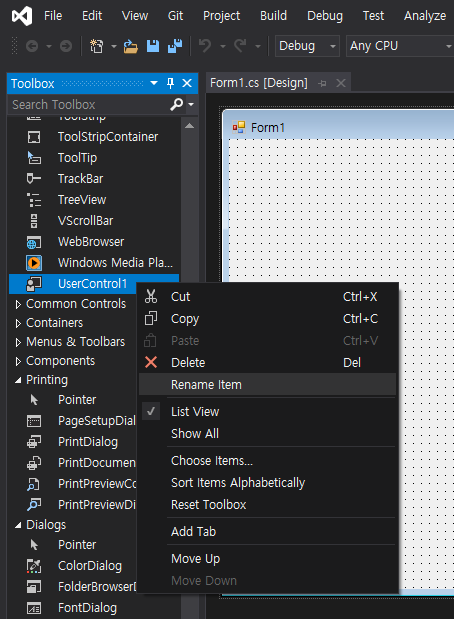
마우스 우클릭 - Rename Item 으로 이름을 바꿀 수 있다.


폼에 적당히 배치한다.


추가 코드 작성 없이 빌드하고 실행하면 잘 작동한다.

실행 파일(exe)과 컨트롤 라이브러리 파일(dll)을 함께 배포해야 한다.


반응형
Posted by J-sean
:
반응형

I2C 프로토콜과 SSD1306 드라이버를 사용하는 0.96인치 OLED를 아두이노나 NodeMCU에서 간단하게 사용 할 수 있다.


중국에서 구매한 0.96인치 I2C OLED. SSD1306 드라이버를 사용하고 파란색 화면이 나온다.

(케이스에는 SSD1315라고 표기 되어 있다)


디스플레이 보호 스티커가 붙어 있다.


떼자.


뒷면


아래와 같이 연결한다.

[OLED - 아두이노]

VCC - 5V

GND - GND

SCL - A5

SDA - A4


실제 OLED와는 약간 다르다.


Library Manager에서 adafruit gfx를 검색하고 설치 한다.


Dependencies도 모두 설치 한다.


adafruit ssd1306도 검색해서 설치 한다.


ssd1306_128X64_i2c 예제를 로드한다.


OLED의 주소를 0x3C로 바꾼다.


컴파일하고 아두이노에 업로드 하면 여러가지 예제 화면이 출력 된다.


0.91인치 OLED.


핀맵은 0.96인치 OLED와 동일 하다.


0.96인치 해상도: 128 X 64

0.91인치 해상도: 128 X 32


0.91인치 OLED는 SCREEN_HEIGHT를 32로 바꿔서 테스트 한다.


Adafruit 라이브러리는 용량이 굉장히 크다. 필요 하다면 좀 더 작고 가벼운 U8g2 라이브러리를 사용하자.


그림 출력을 위한 1비트 픽셀 BMP(Black and White) 변환이 필요 하다면 이 링크나 아래 프로그램을 사용하자.

ezBMP.exe


반응형
Posted by J-sean
: